Einleitung
This guide shows how to disassemble the device and replace the digitizer in a Samsung Galaxy Light (SGH-T399).
The Galaxy Light is a low-end phone that is significantly easier to service than onther Galaxy phones. The screen and digitizer are two separate items that are not directly attached to one another; it is perfectly possible to replace the digitizer without needing to touch the screen.
Was du brauchst
-
-
Using a plastic opening tool (or your fingernails), pry up the back cover of the device.
-
Remove the back cover.
-
-
-
Using a Phillips #0 screwdriver, remove all nine (9) screws attaching the midframe to the front of the device.
-
-
-
Using the plastic opening tool, separate the midframe from the front panel of the device.
-
Remove the midframe.
-
-
-
-
To detach the motherboard from the device:
-
Using the plastic opening tool, carefully pry up the digitizer connector from the motherboard.
-
Carefully lift the motherboard up and move it toward the left side of the device.
-
Using the plastic opening tool, carefully pry up the display connector on the back side of the motherboard.
-
-
-
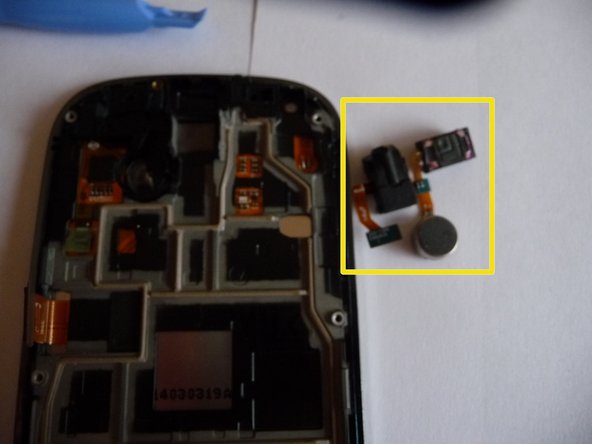
Using a plastic opening tool, carefully remove the headphone jack (red)/earpiece (red)/vibrator (orange) assembly. This is removed as a single unit. Be particularly careful with the thin ribbon cables connecting them together as they can be easily torn.
-
-
-
Using a plastic opening tool, remove the support piece.
-
-
-
Using a plastic opening tool, release the latch (it swings up towards the cable) and slide the digitizer connector free.
-
On the wide area of the cable (where the chip is), the cable is strongly glued to a small metal plate which is in turn strongly affixed to the back with heat-conducting adhesive. Loosen this cable from the back.
-
If you plan on reusing the digitizer be very careful when removing this as you can easily damage the cable. Use gentle applications of heat and a metal tool to pry between the metal plate and the back.
-
-
-
As you release the adhesive and pull the digitizer away from the frame, use guitar picks or cards to keep the adhesive from reattaching as it cools.
-
Work in sections starting from the top (near the Samsung logo). The adhesive is strong and thick all the way around. Apply even heat and pull the top edge away from the frame using plastic opening tools. The digitizer cable feeds through a slot in the frame.
-
Apply more heat to the sides, using the plastic opening tools to separate the digitizer from the frame. Be very careful not to push the tool too far inside so as not to damage the screen or smear adhesive on it.
-
Unlike other Samsung phones, there is no cable on the back of the two touch-sensitive buttons on either side of the home button.
-
Once the digitizer has been separated from the frame on all sides, remove it.
-
-
-
Installation of a new digitizer is the reverse process. If the old digitizer was cracked, do a thorough inspection of the frame to remove any stray shards of glass before affixing the replacement digitizer or it will not sit right and can cause functional problems.
-


To reassemble your device, follow these instructions in reverse order.
To reassemble your device, follow these instructions in reverse order.
Rückgängig: Ich habe diese Anleitung nicht absolviert.
8 weitere Personen haben diese Anleitung absolviert.
Team

UMass Dartmouth, Team 5-2, Vijaybhaskar Fall 2014 Mitglied von UMass Dartmouth, Team 5-2, Vijaybhaskar Fall 2014
UMASSD-VIJAYBHASKAR-F14S5G2
3 Mitglieder
5 Anleitungen geschrieben