Zum Hauptinhalt wechseln

Samsung Galaxy Mega Earpiece Speaker/LED Indicator Replacement

Was du brauchst

  1. Samsung Galaxy Mega Earpiece Speaker/LED Indicator Replacement, Battery: Schritt 1, Bild 1 von 3 Samsung Galaxy Mega Earpiece Speaker/LED Indicator Replacement, Battery: Schritt 1, Bild 2 von 3 Samsung Galaxy Mega Earpiece Speaker/LED Indicator Replacement, Battery: Schritt 1, Bild 3 von 3
    • Before starting, ensure device is completely turned off.

    • On the back of phone, locate the slot on the top left corner.

    • Insert plastic opening tool or fingernail and pull up on the back plate.

    • With the corner released, slide your finger around the device between the back plate and the phone to release connectors.

  2. Samsung Galaxy Mega Earpiece Speaker/LED Indicator Replacement: Schritt 2, Bild 1 von 3 Samsung Galaxy Mega Earpiece Speaker/LED Indicator Replacement: Schritt 2, Bild 2 von 3 Samsung Galaxy Mega Earpiece Speaker/LED Indicator Replacement: Schritt 2, Bild 3 von 3
    • Insert fingernail into the slot on bottom of battery and gently pull up.

    • Remove the battery.

  3. Samsung Galaxy Mega Earpiece Speaker/LED Indicator Replacement, Midframe: Schritt 3, Bild 1 von 3 Samsung Galaxy Mega Earpiece Speaker/LED Indicator Replacement, Midframe: Schritt 3, Bild 2 von 3 Samsung Galaxy Mega Earpiece Speaker/LED Indicator Replacement, Midframe: Schritt 3, Bild 3 von 3
    • Remove the 14 3.45 mm Phillips #000 screws from the assembly.

    • Gently, insert plastic opening tool into seam above the volume buttons of your phone.

    • You may substitute metal spudger for plastic opening tool to first start the opening of the seam. This may cause exterior cosmetic damage.

  4. Samsung Galaxy Mega Earpiece Speaker/LED Indicator Replacement: Schritt 4, Bild 1 von 2 Samsung Galaxy Mega Earpiece Speaker/LED Indicator Replacement: Schritt 4, Bild 2 von 2
    • Slowly slide plastic opening tool around the device to release all the connectors internal to the device.

    • The device should easily come apart after the plastic opening tool is slid around the entire device.

    • During reassembly, ensure volume and power buttons align properly.

  5. Samsung Galaxy Mega Earpiece Speaker/LED Indicator Replacement, Earpiece Speaker/LED Indicator: Schritt 5, Bild 1 von 1
    • Remove the black 2.55 mm Phillips #000 screw.

  6. Samsung Galaxy Mega Earpiece Speaker/LED Indicator Replacement: Schritt 6, Bild 1 von 1
    • Remove the metal cover with the plastic opening tool.

  7. Samsung Galaxy Mega Earpiece Speaker/LED Indicator Replacement: Schritt 7, Bild 1 von 2 Samsung Galaxy Mega Earpiece Speaker/LED Indicator Replacement: Schritt 7, Bild 2 von 2
    • Remove the motherboard clip from speaker assembly to the motherboard.

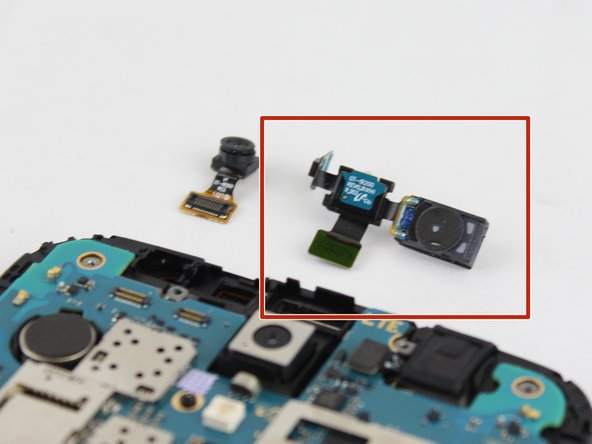
    • Gently lift the speaker and LED assembly out of the device.

    • Speaker assembly may be glued to the device, gently pry until it releases.

Abschluss

To reassemble your device, follow these instructions in reverse order.

4 weitere Nutzer:innen haben diese Anleitung absolviert.

Max Rathman

Mitglied seit: 02/04/16

915 Reputation

4 Anleitungen geschrieben

Team

USF Tampa, Team 17-2, Blackwell Winter 2016 Mitglied von USF Tampa, Team 17-2, Blackwell Winter 2016

USFT-BLACKWELL-W16S17G2

4 Mitglieder

8 Anleitungen geschrieben

0 Kommentare

Kommentar hinzufügen

Seitenaufrufe:

Letzte 24 Stunden: 0

Letzte 7 Tage: 0

Letzte 30 Tage: 0

Insgesamt: 975