Einleitung
Der Digitizer ist die glasähnliche Schutzscheibe über dem LCD. Der Digitizer gibt deine Berührungen an die Elektronik weiter. Unter ihm liegt das LCD, es ist die Bildschirmanzeige. Die Anleitung zeigt dir, wie du entweder beide Teile oder auch einzeln austauschen kannst.
Was du brauchst
-
-
Benutze einen Plastikhebel. Fange an der Stelle, wo der S-Pen war an und hebele die Ecke vorsichtig hoch.
-
-
-
Arbeite dich um das gesamte Gerät herum, indem du das Plastiköffnungswerkzeug sorgfältig durchschiebst.
-
-
-
Drehe die acht 3 mm PH00 Schrauben heraus, die den Akku befestigen.
The photo highlighting the screws is incorrect, the highlight in the upper right side is a plastic tab, whereas the actual 8th screw to remove is on the bottom (but that's fairly easy to identify when performing the fix).
-
-
-
Fasse vorsichtig den weißen Verbinder an der rechten unteren Ecke des Akkus und hebe ihn an. Er ist mit zwei roten und zwei blauen Drähten mit dem Akku verbunden.
the white battery connectory also has 2 black wires, so 2 blue/2red/2black
There is some sort of safe unit in the upper left corner. It is a connector that opens when you lift off the backside. The safe was not in properly fit when I closed the back. In fact, the most difficult step was to get the safe unit properly in place while closing the backside.
Thanks @henriknaslund for note on the "Safe Unit" I succesfully managed to hold it in pace with a little basic sticky tape. Did the job.
Piece of cake. Entire procedure took just 15 minutes. Thank you, Joel & Co., for making this so easy!
why is this under galaxy note 8? the note 8 is not a tablet??? Please respond to my comment as I will check back. I need to fix my NOTE 8 POWER BUTTON…does not work properly. Makes a “short” sound…as in electrical.
HELP!!
The Galaxy Note 8 was the designation for the 8 inch WiFi tablet long before Samsung confused everyone with the Note 8 phone. When Im looking for items for the tablet I usually only get things for the phone.
’
”
”
When the Galaxy Note 8 Battery is replaced is all data, contact info,
downloads, photos etc lost ??
-
-
-
-
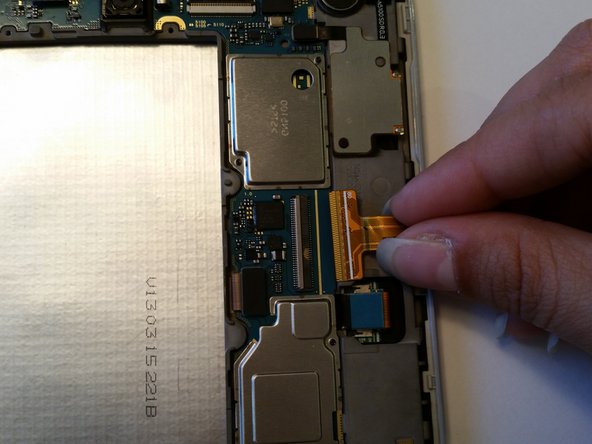
Hebe vorsichtig die braune Klappe des Digitizer-Verbinders hoch.
-
Ziehe sorgfältig das orangene Flachbandkabel aus dem Sockel.
-
-
-
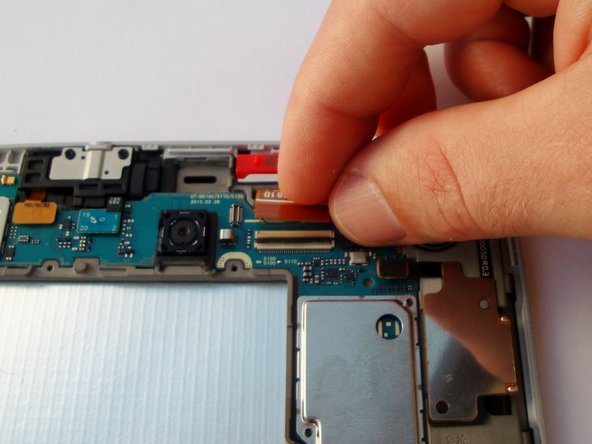
Hebe vorsichtig die schwarze Klappe am Verbinder des LCD Kabels hoch.
-
Ziehe sorgfältig das orangene Flachbandkabel aus dem Sockel.
-
-
-
Drehe das Tablet mit dem Bildschirm nach oben. Stelle dein Heißluftgebläse auf mittlere Hitze.
-
Bewege das Heißluftgebläse entlang des weißen Rands des Bildschirms. Lasse die Hitze etwa 30 Sekunden lang auf jeder Seite einwirken bevor du zur nächsten weiter gehst.
-
Geh nach folgendem Muster vor: erst unten, dann links, oben und rechts, jeweils 30 Sekunden lang. Wiederhole drei mal.
-
-
-
Setze ein Plastiköffnungswerkzeug zwischen silbernem Rahmen und der Scheibe ein, beginne oben am Tablet.
Hi, I’ve tried to do this and just end up cracking / breaking the silver grey plastic surrounding the screen. Can you please elaborate here a little? How exactly should I insert my opening tool so as not to break the silver grey plastic surrounding the screen?
I managed to get it open but with a whole lot of effort. The glass was cracked all over from a drop, so I stuck tape over the glass and heated up the device, then stuck a small flat screwdriver into and under the glass, cracking and breaking it as I went along. The tape helped prevent glass shards from shooting into my eye. Note that it’s best to get the whole Screen Digitizer assembly as a replacement for just the Glass screen at the top would be quite difficult to do without breaking or bending the LCD panel as well.
-
-
-
Schiebe das Werkzeug die Seite des Tablets mit der Lautstarkeregler und dem Einschaltknopf entlang. Schiebe bis zum Home Button bis sämtliche Klebestellen aufgetrennt sind.
-
-
-
Schiebe das Werkzeug die Kante mit dem Home Button entlang, bis auch hier die Klebestellen frei sind.
-
-
-
Drehe das Tablet herum und drücke ganz vorsichtig das LCD von der Rückseite, aber nur an der Kante mit dem Anschaltknopf. Drücke vorsichtig durch die Öffnung für den Akku.
-
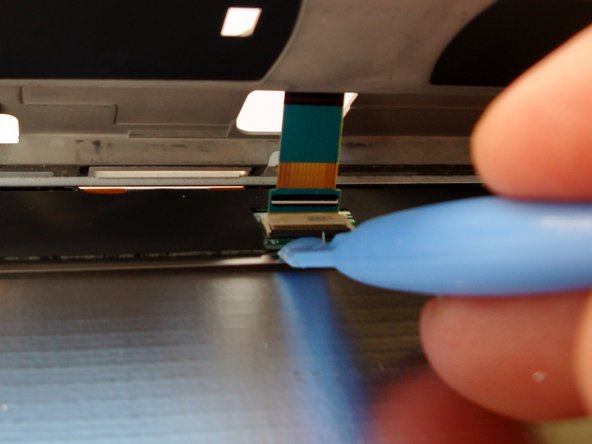
Löse jetzt das Flachbandkabel das die ganze Bildschirmeinheit mit der Hauptplatine verbindet.
-
-
-
Drehe das Tablet um und entferne die ganze Bildschirmeinheit, indem du das Öffnungswerkzeug entlang der letzten verklebten Kante schiebst, bis auch hier der Kleber getrennt ist.
-
Wenn du die ganze Bildschirmeinheit ersetzen willst fahre mit dem nächsten Schritt fort. Wenn du nur den Digitizer austauschen willst, dann gehe ab jetzt wieder die Schritte in umgekehrter Reihenfolge.
-
-
-
Um die Scheibe vom LCD zu lösen musst du die Verklebung zwischen den beiden wieder erwärmen.
-
Stelle das Heißluftgebläse wieder auf mittlere Hitze, halte sie etwa 15 cm von der Scheibe entfernt und schwenke hin und her während du du sie von oben nach unten bewegst.
-
Erwärme sie so etwa 5 min lang, immer von schwenkend von oben nach unten.
-
-
-
Nimm eine Plastikkarte, die du nicht mehr länger benötigst.
-
Schiebe die Karte zwischen Digitizer und Bildschirm , wobei du von außen her kommend zur Mitte vorgehst.
-


Um dein Gerät wieder zusammen zu setzen folge den Schritten in umgekehrter Reihenfolge.
Um dein Gerät wieder zusammen zu setzen folge den Schritten in umgekehrter Reihenfolge.
Rückgängig: Ich habe diese Anleitung nicht absolviert.
47 weitere Nutzer:innen haben diese Anleitung absolviert.
Besonderer Dank geht an diese Übersetzer:innen:
100%
VauWeh hilft uns, die Welt in Ordnung zu bringen! Wie kann ich mithelfen?
Hier starten ›
Team

USF Tampa, Team 12-2, Blackwell Fall 2014 Mitglied von USF Tampa, Team 12-2, Blackwell Fall 2014
USFT-BLACKWELL-F14S12G2
4 Mitglieder
16 Anleitungen geschrieben
20 Kommentare
For steps 15 and 16, removing just the glass digitizer from the lcd, does this step happen after you completely remove the lcd from the tablet? It is hard to tell because it looks like the silver from the tablet is present but it takes place in the instructions after the lcd should already be removed and no silver should be present. Any help on this would be appreciated. I have one where the digitizer screen is broken but the lcd has no damage at all.
No you dont need to remove the lcd you hav to unplug the toch connector n heat the glass like in the steps
For step 13, I ripped this motherboard connector trying to get the new lcd in. Anyone have any idea what I have actually damaged? And where I could find out how to fix it?
yes replacements are on ebay
Pantalla Flex Cable LCD Conector Display Screen Ribbon Samsung Galaxy Note 8.0.
I have the Samsung note 8, model Model N5110, the glass got broken, the unit still work very good. Question. . Most I change the glass and digitaliser, or gust the glass can be change
thanks in advanced for help
my advice would be keep using it with the glass broken if it still works because changing it is a nightmare.
Everything was going well until Step 16. Sliding the the plastic card between the digitizer screen and LCD totally messed up the glue on the surface of the LCD. Wished I had watched that one Youtube video before attempting this part. Might have to buy a digitizer screen/LCD combo now.
All looks good except I don't quite understand this part
"If you are replacing the screen by itself, continue to the next step. If you are replacing the screen digitizer only, simply follow the procedures in reverse to complete the replacement."
I'm sure it will be clear when I actually get to do the job. Thanks, good work instruction and care points. If you need a job these instructions are better than what we write at work:)
When you just remove the digitiser, you dont have to remove the battery (step 4 to 6) or detach the LCD cable (step 8). Also it is easier to use credit cards or even buisiness cards for removing the digitiser. Look on Youtube first as this is a great instruction how to replace the lcd, but less so for removing the digitiser only....
Does anyone know what substance to use to remove the glue on the LCD. It looks like silicon so nailpolish remover might help (etylacetate)?
Alcohol. try some hand sanitiser , nail polish remover may be a bit rough, too abrasive. I used hand sanitiser and it rolled off in sausages.
I have replaced the glass digitizer and LCD (a set together) but sadly it is black screen afterwards. Touch screen is working, I can still hear the screen being unlocked sound. I shined light onto the screen but can't see anything which I thought backlight not working, it's just totally black. What could be the problem here?
I'm having the same issue, and was told to try the following:
"1. Clean the digitizer flex cable with alcohol and carefully attempt to reattach the cables; make sure all cables and connections are secure.
2. There may be a "metal tape" on the original LCD Flex. Please remove it and put on the new assembly.This tape is for grounding purpose and without it, the LCD will not work correctly
3. Make sure your device is charged.
4. Do a soft reset of your device. "
About to try it on mine; if it still doesn't work it is either a damaged cable or defective replacement part.
Yoron -
I just received my replacement screen, and same issue is happening. Disconnected all of the cables to double-check, and found the mainboard to LCD cable has a partial tear where it doubles over. Just ordered a replacement on eBay; awaiting arrival. Will post results.
Board comes off with 4 screws (1 on the board, 1 on the metal tab covering a connection to the charging module, and the 2 holding the speaker on that side). Obviously disconnect all connections (I count 7 on the GT-N5100, not including those already disconnected for screen removal). The cable is just below the mainboard, and is held in place with a small amount of adhesive.
Yoron -
It worked! Replaced the LCD to motherboard cable in Step 13; replaced the screen--100% functioning now.
Yoron -
How do I know if this is what I need. Mine fell of the arm rest of my chair and hit stone tile floor. The screen lights up and goes through all the motions and animations but they are nothing but lines across the screen. Nothing is legible.
Hello, the screen of my Samsung Galaxy Note 8 broke. Can I use the same steps below to replace it??? And how I can place the new one back???
Can I buy a replacement screen on e-bay???
I purchased the glass only.. Can't find a video on just the glass
Anyone ever do glass only? I purchased the glass online came with tools. However, can't find a video on just