Zum Hauptinhalt wechseln

Samsung Galaxy Note II Motherboard Assembly Replacement

Grundständige Anleitung
Dies ist eine grundständige Anleitung, die nur als Teil einer anderen Anleitung verwendet werden sollte.

Was du brauchst

  1. Samsung Galaxy Note II Motherboard Assembly Replacement, Motherboard Assembly: Schritt 1, Bild 1 von 3 Samsung Galaxy Note II Motherboard Assembly Replacement, Motherboard Assembly: Schritt 1, Bild 2 von 3 Samsung Galaxy Note II Motherboard Assembly Replacement, Motherboard Assembly: Schritt 1, Bild 3 von 3
    • Use a spudger to disconnect the vibrator/power button assembly cable connector.

    • Disconnect the antenna cable connector.

    • Disconnect the display cable connector.

    Dear Sirs,

    My Galaxy Note II is completely dead due to lightning in the house. I guess there is a fuse or a protection somewhere but I can not find it. Can you help ? Thanks in advance, Jose

    Jose - Antwort

    One idea would be to track backwards, i.e. check to see if current is reaching from the charge port to the mainboard. Looking at the following picture http://d3nevzfk7ii3be.cloudfront.net/igi... it seems like the fuse is - as expected - located right by the USB port. If you're lucky it could be as easy as replacing the charging board, a $10 component.

    hakro807 -

    My Note II LTE does not have the antenna cable like here

    Bubbele - Antwort

  2. Samsung Galaxy Note II Motherboard Assembly Replacement: Schritt 2, Bild 1 von 3 Samsung Galaxy Note II Motherboard Assembly Replacement: Schritt 2, Bild 2 von 3 Samsung Galaxy Note II Motherboard Assembly Replacement: Schritt 2, Bild 3 von 3
    • Disconnect the front-facing camera cable connector.

    • Disconnect the headphone jack cable connector.

    • Disconnect the digitizer cable connector.

  3. Samsung Galaxy Note II Motherboard Assembly Replacement: Schritt 3, Bild 1 von 3 Samsung Galaxy Note II Motherboard Assembly Replacement: Schritt 3, Bild 2 von 3 Samsung Galaxy Note II Motherboard Assembly Replacement: Schritt 3, Bild 3 von 3
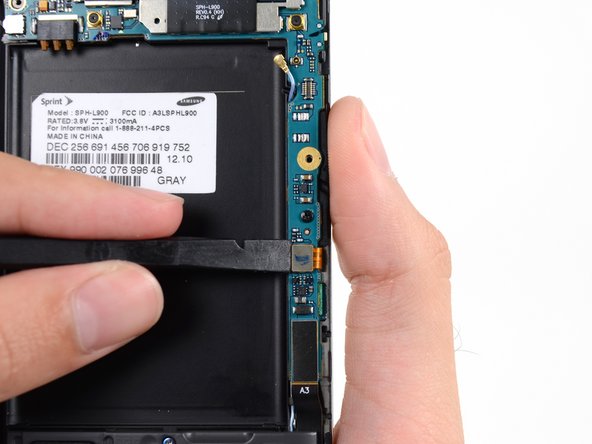
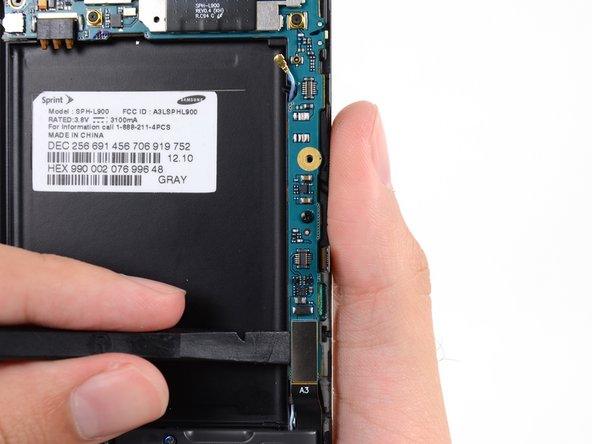
    • Use the spudger to disconnect the antenna cable connector from the motherboard.

    • Disconnect the soft button cable connector.

    • Disconnect the USB board cable connector.

  4. Samsung Galaxy Note II Motherboard Assembly Replacement: Schritt 4, Bild 1 von 1
    • Remove the 3 mm Phillips #00 screw securing the motherboard to the display assembly.

    Is it possible to replace my Note II N7105 motherboard to N7100? Is there some negative effects happen, if i did it?

    Eduardo Lucas III - Antwort

  5. Samsung Galaxy Note II Motherboard Assembly Replacement: Schritt 5, Bild 1 von 2 Samsung Galaxy Note II Motherboard Assembly Replacement: Schritt 5, Bild 2 von 2
    • Gently remove the motherboard.

    • Hold the motherboard by its edges to prevent ESD damage. Be careful not to snag it on any cables as you extract it from the display assembly.

Abschluss

To reassemble your device, follow these instructions in reverse order.

Sam Goldheart

Mitglied seit: 10/18/12

465.759 Reputation

538 Anleitungen geschrieben

Team

iFixit Mitglied von iFixit

Staff

135 Mitglieder

16.816 Anleitungen geschrieben

0 Kommentare

Kommentar hinzufügen

Seitenaufrufe:

Letzte 24 Stunden: 0

Letzte 7 Tage: 0

Letzte 30 Tage: 0

Insgesamt: 47