Zum Hauptinhalt wechseln

Samsung Galaxy S III Front Panel Einheit ersetzen

Was du brauchst

Einführungsvideo

  1. Samsung Galaxy S III Front Panel Einheit ersetzen, Hinteres Gehäuse: Schritt 1, Bild 1 von 2 Samsung Galaxy S III Front Panel Einheit ersetzen, Hinteres Gehäuse: Schritt 1, Bild 2 von 2
    • Die folgenden vier Schritte können ohne Plastic Opening Tool ausgeführt werden. Die Verwendung eines Werkzeuges ist jedoch empfehlenswert, um zu vermeiden, dass die Clips, die um den hinteren Gehäuseteil herum angebracht sind, nicht abbrechen.

    • Führe ein Plastic Opening Tool oder einen Fingernagel in die Einkerbung in der Lücke zwischen dem Gehäuse und dem Rest des Mobiltelefons, die sich oben am Gerät befindet.

    • Drehe das Plastic Opening Tool vorsichtig etwas, um die Clips, welche die Oberseite des hinteren Gehäuses befestigen, zu lösen.

  2. Samsung Galaxy S III Front Panel Einheit ersetzen: Schritt 2, Bild 1 von 2 Samsung Galaxy S III Front Panel Einheit ersetzen: Schritt 2, Bild 2 von 2
    • Fahre mit dem Plastic Opening Tool nach links entlang der oberen Kante und wiederhole die Drehbewegung, um die Lücke zwischen dem Mobiltelefon und dem hinteren Gehäuse zu vergrößern.

  3. Samsung Galaxy S III Front Panel Einheit ersetzen: Schritt 3, Bild 1 von 2 Samsung Galaxy S III Front Panel Einheit ersetzen: Schritt 3, Bild 2 von 2
    • Bewege das Plastic Opening Tool weiter, um die linke obere Ecke und heble vorsichtig am hinteren Gehäuse entlang.

  4. Samsung Galaxy S III Front Panel Einheit ersetzen: Schritt 4, Bild 1 von 2 Samsung Galaxy S III Front Panel Einheit ersetzen: Schritt 4, Bild 2 von 2
    • Heble entlang der rechten oberen Ecke und weiter die rechte Seite des hinteren Gehäuses entlang.

  5. Samsung Galaxy S III Front Panel Einheit ersetzen: Schritt 5, Bild 1 von 2 Samsung Galaxy S III Front Panel Einheit ersetzen: Schritt 5, Bild 2 von 2
    • Hebe das hintere Gehäuse an und entferne es vom Mobiltelefon.

    • Möglicherweise musst du das Gehäuse anheben, um es von den Clips, die unten am Mobiltelefon noch festsitzen können, zu trennen.

    very easy to follow instructions clear and concise

    Deric JONES - Antwort

  6. Samsung Galaxy S III Front Panel Einheit ersetzen, Akku: Schritt 6, Bild 1 von 2 Samsung Galaxy S III Front Panel Einheit ersetzen, Akku: Schritt 6, Bild 2 von 2
    • Für diesen Schritt ist kein Plastic Opening Tool vonnöten. Du kannst auch einfach die Finger nehmen.

    • Führe ein Plastic Opening Tool in die kleine Einkerbung über dem Akku.

    • Heble den Akku aus seiner Einbuchtung.

  7. Samsung Galaxy S III Front Panel Einheit ersetzen: Schritt 7, Bild 1 von 2 Samsung Galaxy S III Front Panel Einheit ersetzen: Schritt 7, Bild 2 von 2
    • Entferne den Akku.

  8. Samsung Galaxy S III Front Panel Einheit ersetzen, SIM Karte: Schritt 8, Bild 1 von 3 Samsung Galaxy S III Front Panel Einheit ersetzen, SIM Karte: Schritt 8, Bild 2 von 3 Samsung Galaxy S III Front Panel Einheit ersetzen, SIM Karte: Schritt 8, Bild 3 von 3
    • Drücke die SIM Karte mit dem Fingernagel etwas tiefer in ihren Slot, bis du ein Klick hörst.

    • Lasse die Karte nach dem Klicken los. Daraufhin ploppt sie aus dem Slot.

    • Beim Wiederzusammenbau drücke die SIM Karte in den Slot, bis sie wieder einrastet.

  9. Samsung Galaxy S III Front Panel Einheit ersetzen: Schritt 9, Bild 1 von 3 Samsung Galaxy S III Front Panel Einheit ersetzen: Schritt 9, Bild 2 von 3 Samsung Galaxy S III Front Panel Einheit ersetzen: Schritt 9, Bild 3 von 3
    • Helfe mit dem Daumen nach, bis die SIM Karte weit genug aus ihrem Slot gleitet, so dass man sie ergreifen kann.

    • Ergreife die SIM Karte und entferne sie vom Mobiltelefon.

  10. Samsung Galaxy S III Front Panel Einheit ersetzen, microSD Karte: Schritt 10, Bild 1 von 3 Samsung Galaxy S III Front Panel Einheit ersetzen, microSD Karte: Schritt 10, Bild 2 von 3 Samsung Galaxy S III Front Panel Einheit ersetzen, microSD Karte: Schritt 10, Bild 3 von 3
    • Drücke die microSD Karte mit dem Fingernagel etwas tiefer in ihren Slot, bis du ein Klick hörst.

    • Lasse die Karte nach dem Klicken los. Daraufhin ploppt sie aus dem Slot.

    • Beim Wiederzusammenbau drücke die micro SD Karte in den Slot, bis sie wieder einrastet.

  11. Samsung Galaxy S III Front Panel Einheit ersetzen: Schritt 11, Bild 1 von 2 Samsung Galaxy S III Front Panel Einheit ersetzen: Schritt 11, Bild 2 von 2
    • Helfe mit dem Daumen nach, bis die microSD Karte weit genug aus ihrem Slot gleitet, so dass man sie ergreifen kann.

    • Ergreife die SIM Karte und entferne sie vom Mobiltelefon.

    Forgot about the step to remove the back casing...pretty simple though, just several screws then pop it off.

    Courtney - Antwort

  12. Samsung Galaxy S III Front Panel Einheit ersetzen, Kunststoff Mittelrahmen: Schritt 12, Bild 1 von 1
    • Entferne die zehn 4,0 mm Kreuzschlitzschrauben, die den Mittelrahmen an der Front Panel Einheit befestigen.

    What would you use to remove the screws

    Curt the heneke - Antwort

    I used both P#000 and J#00 precision bits to good effect. I tend to prefer the Japanese Standard bits in place of Philips, as the JIS bits seem not to cam out and strip screws as easily.

    E West -

  13. Samsung Galaxy S III Front Panel Einheit ersetzen: Schritt 13, Bild 1 von 2 Samsung Galaxy S III Front Panel Einheit ersetzen: Schritt 13, Bild 2 von 2
    • Ergreife die linke Seite des Kunststoff Mittelrahmens mit Daumen und Zeigefinger und entferne ihn vom Mobiltelefon.

    • Der Mittelrahmen klackt leicht zurück in seine Position und kann mit nur sehr wenig Kraftaufwand entfernt werden.

    There's another piece of the frame that needs to be taken out, but it doens't come out as nicely... unless I did something wrong. It's the part that covers the speaker. I couldn't find a nice way of taking it out.

    David - Antwort

    I had to use a guitar-pick to pry that section off of the frame. Start at the front-facing camera edge and run the pick underneath the plastic cover. The catches should release.

    Takashi Alekseev - Antwort

    I used a pointed prying too to get it started, then the flat one. It took some fiddling but finally came off nicely.

    Nick B - Antwort

    READ ME!

    For a guide that takes you step by step on how to remove the SIM and microSD, I'm surprised they didn't mention the top part of this midframe (still attached, in the pictures). This top part of the midframe also needs to be removed before you can take out the motherboard.

    You need to disconnect a ribbon not listed in these directions first, then pry that midframe up with the help of a guitar pick. This ribbon is located by the back-camera, next to the digitizer ribbon. This ribbon is connected to the midframe so it is essential you disconnect this before lifting the frame up.

    The frame is really snapped in there so don't be afraid to use a little force - for reference, you will use more force to pull this frame off than you did to pull off the back-cover of the phone. Once this piece is off, your phone should look like the picture in step 14.

    Jess - Antwort

  14. Samsung Galaxy S III Front Panel Einheit ersetzen, Ohrhörer/Lautsprecher Einheit: Schritt 14, Bild 1 von 2 Samsung Galaxy S III Front Panel Einheit ersetzen, Ohrhörer/Lautsprecher Einheit: Schritt 14, Bild 2 von 2
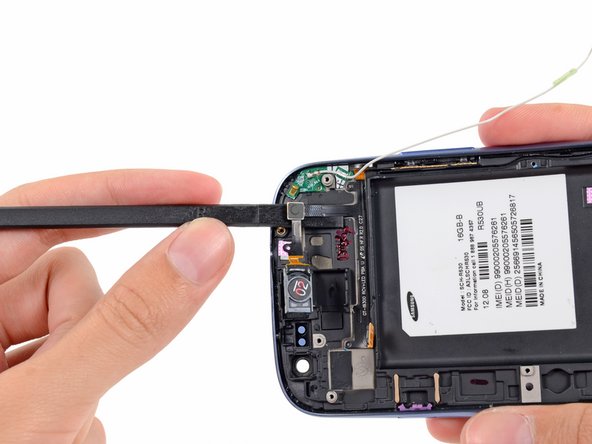
    • Heble den Anschluss der Rückkamera von seiner Fassung auf dem Motherboard hoch.

    • Stelle sicher, dass du am Anschluss und nicht an der Fassung selbst hebelst, da du sonst das Motherboard beschädigen kannst.

    This is not a rear facing camera connector. This is the connector for the lHeadphone Jack/Speaker Assembly

    Chasity Miller - Antwort

    You're right I

    Joel Muhong - Antwort

  15. Samsung Galaxy S III Front Panel Einheit ersetzen: Schritt 15, Bild 1 von 2 Samsung Galaxy S III Front Panel Einheit ersetzen: Schritt 15, Bild 2 von 2
    • Führe ein Plastic Opening Tool nach außen gerichtet in den Lautsprecherteil der Ohrhörer-/Lautsprecher Einheit.

    • Heble die Kopfhörer-Lautsprecher Einheit von der Front Einheit weg.

  16. Samsung Galaxy S III Front Panel Einheit ersetzen: Schritt 16, Bild 1 von 1
    • Hebe die Ohrhörer-/Lautsprecher Einheit aus dem Galaxy S III heraus.

    Worked perfectly. Thanks!

    brewclay - Antwort

  17. Samsung Galaxy S III Front Panel Einheit ersetzen, Motherboard Einheit: Schritt 17, Bild 1 von 1
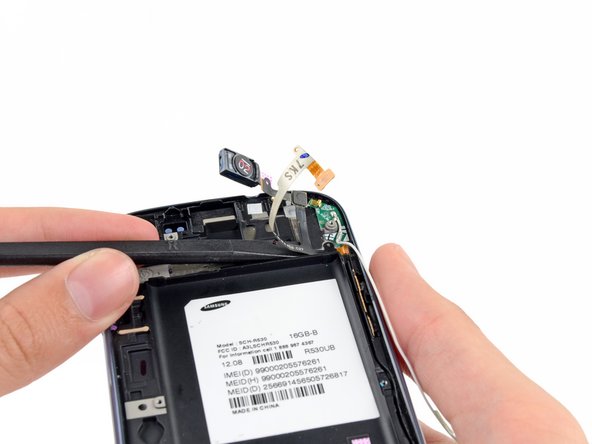
    • Verwende ein Plastic Opening Tool, um den Anschluss der Frontkamera aus seiner Fassung auf dem Motherboard zu hebeln.

    • Versuche nicht, die Frontkamera jetzt schon zu entfernen. Das Kabel ist immer noch unter der Motherboard Einheit am Umgebungslichtsensor festgemacht.

  18. Samsung Galaxy S III Front Panel Einheit ersetzen: Schritt 18, Bild 1 von 2 Samsung Galaxy S III Front Panel Einheit ersetzen: Schritt 18, Bild 2 von 2
    • Trenne das Digitizer Kabel, indem du vorsichtig seinen Anschluss aus der Fassung auf dem Motherboard hebelst.

    Step 18 says the front digitizer connector, but later calls it the earpiece/buttons/ambient light sensor ribbon cable.

    Is the Digitizer connector part of the display connector, or is it elsewhere?

    Kyle Mattfield - Antwort

    It's the volume and speaker

    Joel Muhong - Antwort

  19. Samsung Galaxy S III Front Panel Einheit ersetzen: Schritt 19, Bild 1 von 2 Samsung Galaxy S III Front Panel Einheit ersetzen: Schritt 19, Bild 2 von 2
    • Trenne das Displaydatenkabel vom Motherboard.

  20. Samsung Galaxy S III Front Panel Einheit ersetzen: Schritt 20, Bild 1 von 3 Samsung Galaxy S III Front Panel Einheit ersetzen: Schritt 20, Bild 2 von 3 Samsung Galaxy S III Front Panel Einheit ersetzen: Schritt 20, Bild 3 von 3
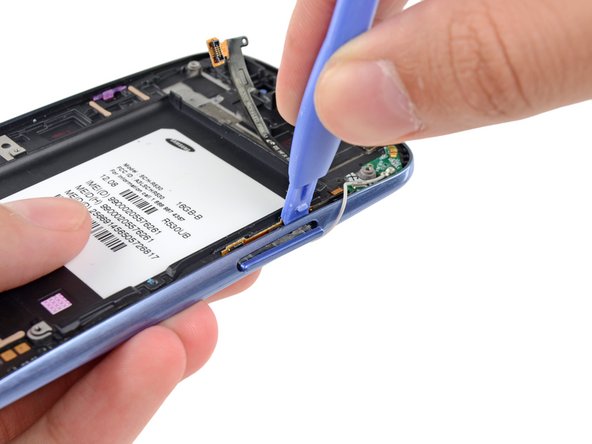
    • Heble das Wi-Fi Antennenkabel hoch aus seiner Fassung auf dem Motherboard.

    • Bewege das Kabel vorsichtig beiseite, so dass es nicht im Weg ist.

    Be very careful,as it is very easy to break the connector off the motherboard.

    vjmickelson - Antwort

    Has anyone tried just folding the motherboard back to the left after removing all the screws WITHOUT disconnecting the wi-fi antenna? I'm just a little worried about this one step.

    Cullen Johnson - Antwort

    Folding the motherboard back without disconnecting the WiFi antenna worked for me! :)

    Alec -

    I broke the WiFi antenna connector bit off motherboard. How do I fix it?

    rileygoldsmith - Antwort

  21. Samsung Galaxy S III Front Panel Einheit ersetzen: Schritt 21, Bild 1 von 1
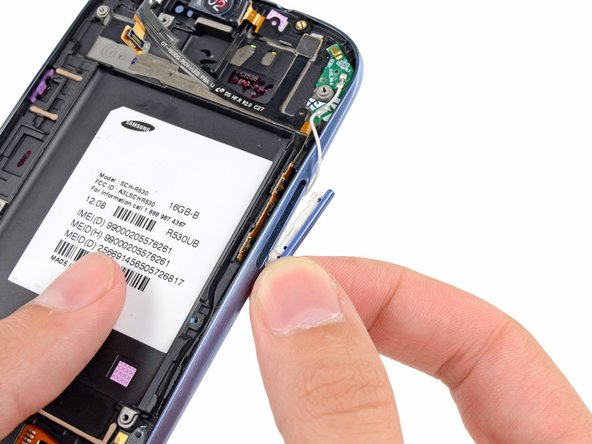
    • Entferne die einzelne 3,0 mm Kreuzschlitzschraube (Phillips #0), die das Motherboard an der Front Panel Einheit befestigt.

  22. Samsung Galaxy S III Front Panel Einheit ersetzen: Schritt 22, Bild 1 von 2 Samsung Galaxy S III Front Panel Einheit ersetzen: Schritt 22, Bild 2 von 2
    • Hebe den unteren Teil des Motherboards vorsichtig vom Front Panel weg.

    • Entferne das Motherboard vom Front Panel und gebe dabei auf Kabel acht, die noch im Weg sein könnten.

    When reassembling your device, there can be a problem with connecting display data cable to the motherboard. I fixed display data cable on the motherboard before mounting motherboard: it gave me some freedom and simplified positioning of data cable on the motherboard

    fomondik - Antwort

    If I am not mistaking, there is a screw also on the motherboard needs to be removed before removing motherboard from the assembly

    blingblingyourlink - Antwort

    It's covered in Step 21

    Amy Losh -

  23. Samsung Galaxy S III Front Panel Einheit ersetzen, Frontkamera: Schritt 23, Bild 1 von 1
    • Entferne die einzelne 2,0 mm Kreuschlitzschraube (Phillips #0), welche die Klammer der Frontkamer am Front Panel befestigt.

    Will screw with b sometimes difficult but how do u still remove it?

    kendrick - Antwort

  24. Samsung Galaxy S III Front Panel Einheit ersetzen: Schritt 24, Bild 1 von 2 Samsung Galaxy S III Front Panel Einheit ersetzen: Schritt 24, Bild 2 von 2
    • Hebe Frontkamera/Umgebungslichtsensor/hinteres Mikrofon mit einer Pinzette aus der Fassung auf dem Front Panel.

  25. Samsung Galaxy S III Front Panel Einheit ersetzen, Front Panel Einheit: Schritt 25, Bild 1 von 2 Samsung Galaxy S III Front Panel Einheit ersetzen, Front Panel Einheit: Schritt 25, Bild 2 von 2
    • Hole das Antennenkabel aus seinem Kanal in der Front Panel Einheit.

    • Entferne das Antennenkabel noch nicht vollständig, da es immer noch an der Antennenplatine befestigt ist.

    Replacing only the glass was a terrible idea...

    I bought a new screen including the frame and front button.

    On this fix i had to transfer the wifi-antenna module, led, the vibrating module, the cable connecting the front speaker and volume control and then the two side buttons. This was kinda hard, so i think this should be included in the guide.

    Step 26: Remove the lock and volume control buttons by pushing them out from the inside.

    Step 27: Carefully lift the front speaker with the cable glued to the frame. With the volume control button removed it's easier to access the volume control module at the end of this cable.

    Step 28: Remove the vibrating module. Be carefull not to break the piece glued to the frame.

    Step 29: Remove the flat wifi-antenna module. This is also glued to the frame wich makes it really tricky to lift.

    Mysil - Antwort

    THIS IS A QUESTION to anyone who is good with fixing phones. If i buy this Front Panel Replacement stuff, will this be the fix to a broken screen? i have an issue where i plug the phone into a computer and the phone will charge but the computer cannot see any data (pics, apps, a n y t h i n g) from the phone. will this issue be fixed if i use this method? will my data remain in reach when i use this method? .... thank you

    Dre Marie - Antwort

    Where do all the little soft rubber parts go? I found 2 but I have 3 left over!

    Jack Gatewood - Antwort

  26. Samsung Galaxy S III Front Panel Einheit ersetzen: Schritt 26, Bild 1 von 2 Samsung Galaxy S III Front Panel Einheit ersetzen: Schritt 26, Bild 2 von 2
    • Fahre mit der Spudgerspitze unter den Ohrhörer/Lautsprecher und heble ihn aus der Einlassung im Front Panel.

  27. Samsung Galaxy S III Front Panel Einheit ersetzen: Schritt 27, Bild 1 von 1
    • Löse den oberen Teil des Flachbandkabels von Ohrhörer/Lautstärkeregler/Umgebungslichtsensor mit dem flachen Ende eines Spudgers vom Front Panel ab.

  28. Samsung Galaxy S III Front Panel Einheit ersetzen: Schritt 28, Bild 1 von 2 Samsung Galaxy S III Front Panel Einheit ersetzen: Schritt 28, Bild 2 von 2
    • Fahre mit dem flachen Ende eines Spudgers vorsichtig unter den Umgebungslichtsensor.

    • Löse das Flachbandkabel von Ohrhörer/Lautstärkeregler/Umgebungslichtsensor vom Front Panel ab.

  29. Samsung Galaxy S III Front Panel Einheit ersetzen: Schritt 29, Bild 1 von 2 Samsung Galaxy S III Front Panel Einheit ersetzen: Schritt 29, Bild 2 von 2
    • Fahre mit dem flachen Ende eines Spudgers unter den Anschluss des Flachbandkabels von Ohrhörer/Lautstärkeregler/Umgebungslichtsensor

    • Fahre vorsichtig mit dem Spudger darunter, damit sich das Flachbandkabel von Ohrhörer/Lautstärkeregler/Umgebungslichtsensor weiter vom Front Panel ablöst.

  30. Samsung Galaxy S III Front Panel Einheit ersetzen: Schritt 30, Bild 1 von 3 Samsung Galaxy S III Front Panel Einheit ersetzen: Schritt 30, Bild 2 von 3 Samsung Galaxy S III Front Panel Einheit ersetzen: Schritt 30, Bild 3 von 3
    • Führe ein Plastic Opening Tool zwischen das Flachbandkabel der Regler und dem Lautstärkeregler.

    • Drücke den Lautstärkeregler aus seiner Einbuchtung auf dem Front Panel.

    • Hebe den Lautstärkeregler an und entferne ihn vom Mobiltelefon.

  31. Samsung Galaxy S III Front Panel Einheit ersetzen: Schritt 31, Bild 1 von 2 Samsung Galaxy S III Front Panel Einheit ersetzen: Schritt 31, Bild 2 von 2
    • Fahre mit der flachen Seite eines Plastic Opening Tools zwischen das Flachbandkabel von Ohrhörer/Lautstärkeregler/Umgebungslichtsensor und fahre damit nach unten, um den Kleber, der das Flachbandkabel befestigt, zu lösen.

  32. Samsung Galaxy S III Front Panel Einheit ersetzen: Schritt 32, Bild 1 von 1
    • Ergreife das Flachbandkabel von Ohrhörer/Lautstärkeregler/Umgebungslichtsensor und entferne es.

  33. Samsung Galaxy S III Front Panel Einheit ersetzen: Schritt 33, Bild 1 von 3 Samsung Galaxy S III Front Panel Einheit ersetzen: Schritt 33, Bild 2 von 3 Samsung Galaxy S III Front Panel Einheit ersetzen: Schritt 33, Bild 3 von 3
    • Löse die Antenneplatine mit einem metallenen Spudger vorsichtig vom Front Panel.

    • Hebe die Antennenplatine an und entferne sie.

    Be careful. My chip snapped in half! ( used a plastic spudger)

    Lindsay - Antwort

    Same thing happened to me!!! It snapped in half :(

    gkskkgkskgk -

    Mines too :( I thought i was carefull enough

    Romano -

  34. Samsung Galaxy S III Front Panel Einheit ersetzen: Schritt 34, Bild 1 von 3 Samsung Galaxy S III Front Panel Einheit ersetzen: Schritt 34, Bild 2 von 3 Samsung Galaxy S III Front Panel Einheit ersetzen: Schritt 34, Bild 3 von 3
    • Drücke den Power Button aus seiner Einbuchtung auf dem Front Panel.

    • Entferne den Power Button vom Front Panel.

  35. Samsung Galaxy S III Front Panel Einheit ersetzen: Schritt 35, Bild 1 von 2 Samsung Galaxy S III Front Panel Einheit ersetzen: Schritt 35, Bild 2 von 2
    • Heble den Vibrationsmotor mit einem Spudger aus seiner Einbuchtung auf dem Front Panel.

  36. Samsung Galaxy S III Front Panel Einheit ersetzen: Schritt 36, Bild 1 von 2 Samsung Galaxy S III Front Panel Einheit ersetzen: Schritt 36, Bild 2 von 2
    • Löse den Vibrationsmotor mit der Spudgerspitze vom Front Panel.

  37. Samsung Galaxy S III Front Panel Einheit ersetzen: Schritt 37, Bild 1 von 1
    • Hebe und entferne den Vibrationsmotor vom Front Panel.

  38. Samsung Galaxy S III Front Panel Einheit ersetzen: Schritt 38, Bild 1 von 1
    • Das Front Panel bleibt übrig.

    • Wenn du das Front Panel durch ein neues ersetzt, vergesse dabei nicht, alle Teile, die du entfernt hast, an dein neues Front Panel zu versetzen.

Abschluss

Arbeite die Schritte in umgekehrter Reihenfolge ab, um dein Gerät wieder zusammenzubauen.

212 weitere Nutzer:innen haben diese Anleitung absolviert.

Besonderer Dank geht an diese Übersetzer:innen:

en de

100%

Nina Steinhaeuser hilft uns, die Welt in Ordnung zu bringen! Wie kann ich mithelfen?
Hier starten ›

14 Kommentare

Hi,

I wonder if this is guide to actually replace broken digitizer - if we have full Digitizer/LCD assembly?

Thanks

Akki S - Antwort

I've just watched the video and... that was pure pleasure to watch repairer. She's professional and beautiful!

paczor - Antwort

Thanks. This is the second time I've used this guide.

William Geisweit - Antwort

And how Ill install thenew screen ?

Lea Efremov - Antwort

Brilliant Step-By-Step guide. My phone needed new digitizer as just a black screen was showing when turned on, must have happened from a drop. I bought the digitizer screen combo from ebay and used this guide to dress across the components. Worked first time! There are a couple of other spongy or supportive rubber pieces around certain components that were in the original phone so I transferred those also, I guess they are there just to ensure tight connections etc. Absolute lifesaver!

James Lainchbury - Antwort

On my Samsung galaxy s3, which I have only had for two months, has stopped working. The phone will come on but that is it. The touch screen has completely stopped working. help!

Bessie - Antwort

Used this guide to fit a replacement front screen assembly. Was a bit more difficult and time consuming than expected as some parts stuck fast, but i got there. And it all still worked at the end which is the main thing. New screen looks great too. Thanks.

Wayne - Antwort

Used this guide to replace my front panel, and was very easy to follow.

I even watched the video, it helped a lot!

The only problem I had with my fix, is that I didn't have the spudger and was unable to remove the vibrator without damaging it. So I am yet to order another to replace it, other than that, everything came out great!!

thanialorena - Antwort

One digitizer assembly, one protech toolkit, one magnetic mat and 30 minutes later my phone works perfectly! The only problem is one of those screws jumped off the mat and now I can't find it...oh well. Ifixit made this repair cheap and easy! #repairisnoble

keithd - Antwort

Lovely manual.It took me no time to replace the front screen/digitizer.Peter

boelens - Antwort

hi

I'm having trouble finding a Screen Replacement of samsung SGHI747 its Canadian model of samsung s3 so giveme some idea how can i fixit

tayyabtair - Antwort

Wonderful thanks so much!! Working screen now yay!

fluffychick75 - Antwort

This phone was a dream to repair! Miss ya, buddy.

Ethan Rourke - Antwort

Hi I replaced the screen but now the phone is not booting. I also insert a new battery but didn’t turn on. How to troubleshoot the phone ?

Simple Developer - Antwort

Kommentar hinzufügen

Seitenaufrufe:

Letzte 24 Stunden: 1

Letzte 7 Tage: 5

Letzte 30 Tage: 33

Insgesamt: 271,440