Einleitung
Diese Anleitung zeigt, wie der Akku eines Samsung Galaxy S10+ entfernt und ausgetauscht wird.
Der Akku ist sehr fest verklebt. Daher vereinfacht die Anwendung von hochkonzentriertem (über 90%igem) Isopropylalkohol den Ausbau des Akkus.
Wenn dein Akku aufgebläht ist, musst du entsprechende Vorsichtsmaßnahmen treffen. Vermeide es in diesem Fall, dein Smartphone zu erwärmen.
Entlade den Akku aus Sicherheitsgründen auf unter 25%, bevor du mit der Reparatur anfängst. Das reduziert das Risiko, dass sich der Akku entzündet oder explodiert, falls er versehentlich während der Reparatur beschädigt wird.
Was du brauchst
Einführungsvideo
-
-
Ziehe das Ladegerät raus und schalte das Smartphone aus, bevor du anfängst.
-
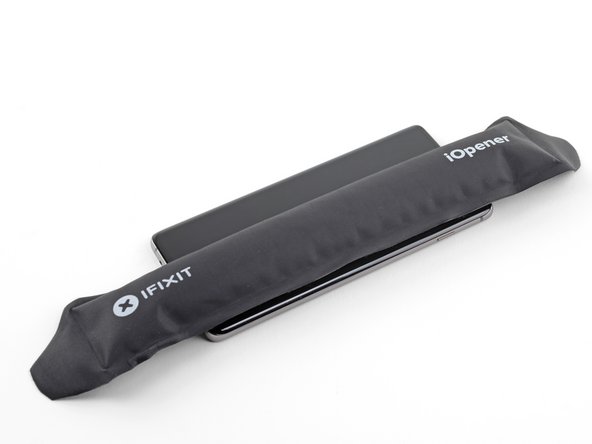
Erhitze einen iOpener und lege ihn zwei Minuten lang auf die rechte Kante der Rückabdeckung.
-
Schaue dir, während der Wartezeit, das Bild der entfernten Rückabdeckung an, um zu sehen, wo genau sich der Kleber befindet.
-
-
-
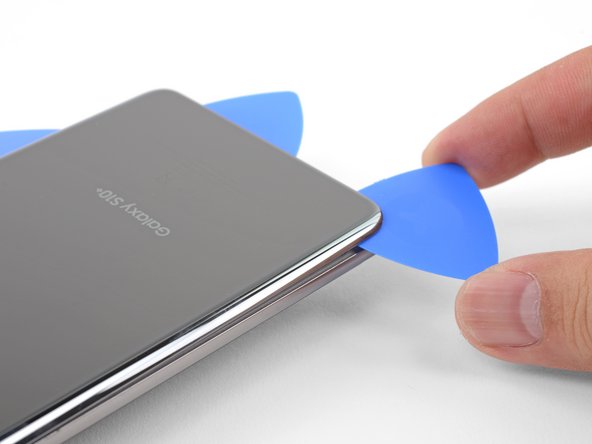
Setze einen Saugheber auf die Rückseite des Smartphones, und zwar so mittig auf die rechte Kante wie möglich (hier ist der Kleber am dünnsten).
-
Ziehe gleichmäßig und fest am Saugheber, um einen Spalt zwischen Rückabdeckung und Rahmen zu erzeugen.
-
Setze die Spitze eines Plektrums in den Spalt.
-
Falls du Schwierigkeiten dabei hast, einen Spalt zu erzeugen, ist es am Besten, die Kante erneut zu erhitzen und es nochmal zu versuchen.
-
Du kannst auch ein paar Tropfen Isopropylalkohol auf die Fuge träufeln, um den Kleber etwas aufzuweichen.
I can’t get the back cover to seperate, I’ve been trying for several hours now, it just stays with the rest of the phone. I’m fairly certain my phone is hot enough as I touched the back and I can’t place my hand there for more than a few seconds at a time. It’s just not coming off and I’m so frustrated! Any help?
Hi Fiona,
The back adhesive can be very difficult! Have you tried the suggestions in step 3? It may take a few heat cycles to weaken the adhesive. You can use a hairdryer to heat it pretty hot along the edge.
My back cover glass is shattered but not coming apart! What do I do?
I was able to use my fingernails first (with the assistance of the suction cup) to get in the gap, and then, with my fingernails still in the gap there was enough room to put in the pick. I couldn't get the pick in there by itself even after 10 minutes of warming and suction cup prying... but my fingernails could get in, and then I used them to hold the space open and pull a little more so the pick could be inserted.
-
-
-
Lege etwas unter die erwärmte rechte Kante des Smartphones, das etwa 13 mm (0,5") dick ist. So ist es einfacher, das Öffnungswerkzeug einzusetzen.
-
Halte die linke Kante des Smartphones mit deinen Fingern fest, sodass das Smartphone nicht abrutscht. Ziehe kräftig am Saugheber.
-
Drücke die Kante eines Öffnungswerkzeug in die Fuge zwischen Rückabdeckung und Rahmen.
-
Schiebe das Öffnungswerkzeug ein paar Mal an der Fuge hin und her.
-
-
-
Schiebe das Plektrum an der Kante des Smartphones entlang und durchtrenne den Kleber.
-
Lasse ein Plektrum in der Fuge stecken, damit sich der Kleber nicht wieder verbindet.
-
-
-
Lege einen erwärmten iOpener zwei Minuten lang auf die Unterkante des Smartphones.
-
-
-
Setze ein Plektrum in die rechte Kante nahe der unteren rechten Ecke ein.
-
Schiebe das Plektrum vorsichtig um die Ecke herum. Schneide an der Unterkante entlang weiter und um die linke untere Ecke herum.
-
Lasse ein Plektrum stecken, damit sich der Kleber nicht wieder verbindet.
-
-
-
-
Wenn du dich um das ganze Smartphone herum gearbeitet hast, verdrehe ein Plektrum in einer der Ecken, um die Rückabdeckung vom Rahmen abzulösen.
-
Hebe die Rückabdeckung langsam an. Benutze Plektren, um den restlichen Kleber zu durchtrennen.
-
Entferne die Rückabdeckung.
-
-
-
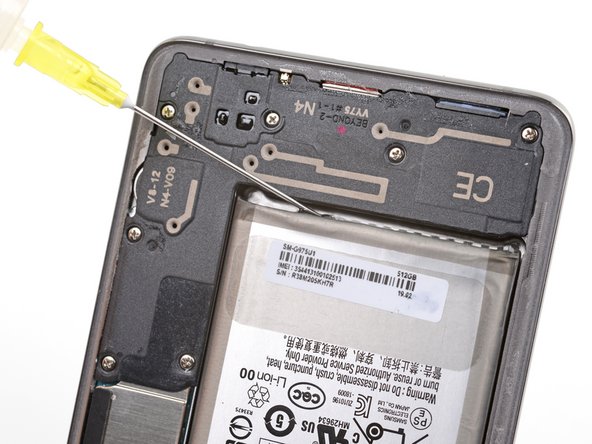
Entferne die neun 4 mm Kreuzschlitzschrauben, mit denen der obere Mittelrahmen am Smartphone befestigt ist.
-
-
-
Setze die Spitze eines Spudgers in die Kerbe in der rechten Kante des Mittelrahmens in der Nähe der Bixby-Taste.
-
Heble nach oben, um den Mittelrahmen vom Smartphone abzulösen.
-
-
-
Setze die Spitze eines Spudgers in die Kerbe auf der linken Kante des Smartphones, nahe der Einschalttaste.
-
Heble nach oben, um den Mittelrahmen vom Smartphone abzulösen.
-
-
-
Hebe den Mittelrahmen an den oberen Ecken hoch und entferne ihn vom Smartphone.
-
Richte die Oberkante des Mittelrahmens mit den Smartphone aus und lege den Rahmen auf das Smartphone ab.
-
Drücke den Mittelrahmen mit den Fingern außen herum fest, damit die Klammern des Mittelrahmens wieder einrasten. Die Kanten sollten bündig mit der Kante des Smartphones abschließen.
-
-
-
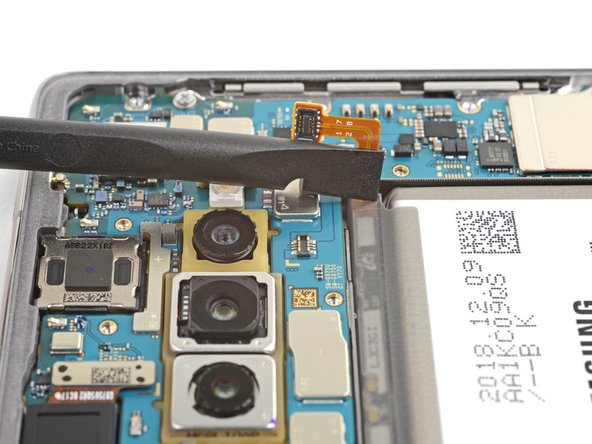
Setze das flache Ende eines Spudgers unter den Akkustecker, der unterhalb der Rückkamera mit dem Motherboard verbunden ist.
-
Heble den Stecker nach oben, um ihn aus seinem Anschluss zu lösen.
-
Schiebe das Flachbandkabel des Akkus vorsichtig vom Anschluss auf dem Motherboard weg, um einen versehentlichen Kontakt zu vermeiden.
-
-
-
Der Akku ist sehr fest verklebt. Achte besonders auf folgende Bereiche:
-
Der Rahmen, wo der Akku sehr stark verklebt ist.
-
Ein Ausschnitt im Rahmen, unter dem sich die empfindliche offenliegende Displayeinheit befindet. Sei vorsichtig, wenn du in diesem Bereich hebelst, damit die Displayeinheit nicht beschädigt wird.
-
-
-
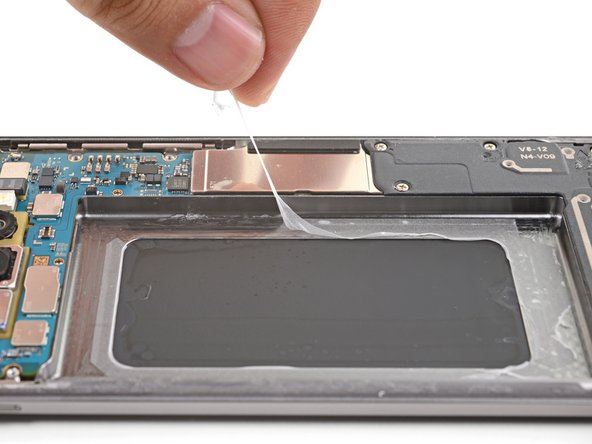
Hebe die Unterkante des Smartphones an und halte das Smartphone schräg.
-
Träufle etwas Isopropylalkohol in den Spalt zwischen dem Akku und dem unteren Mittelrahmen des Smartphones.
-
Halte das Smartphone eine Minute lang schräg, damit der Isopropylalkohol den Kleber erreicht.
-
Alternativ kannst du auch einen iOpener erhitzen und zwei Minuten lang auf die rechte Vorderseite des Smartphones legen.
Probably do use the iOpener in this step. Actually waited for an hour for isopropyl alcohol to actually loosen the adhesive barely enough to rip the battery out.
-
-
-
Setze die Ecke einer Plastikkarte in den Spalt zwischen Akku und unterem Mittelrahmen.
-
Heble den Akku aus seiner Vertiefung.
-
Benutze ein Plektrum, ein Öffnungswerkzeug oder einen Spudger, um den Akku herauszuhebeln. Verwende keine Metallwerkzeuge.
-
Wiederhole die Anwendung von Isopropylalkohol und versuche es erneut.
-
Versuche, den Kleber mehr mit dem iOpener zu erwärmen, damit er weich wird.
-
-
-
Entferne den Akku.
-
Klebe zuerst vorgestanzte Klebestreifen oder doppelseitiges Klebeband auf den Rahmen, bevor du den Akku in die Vertiefung hineindrückst.
-
Es darf kein Kleber auf die offenliegende Rückseite des Displays kommen.
Does the back panels adhesive needs to be replaced or its good to reassemble on old one?
Yes! If you don’t want to use new adhesive, remove any large chunks of adhesive that might prevent the back cover from sitting down flush, heat the back cover, and apply pressure to secure it. It won't be waterproof, but the leftover adhesive is usually more than strong enough to hold.
It’s a little confusing going through the battery removal for the Samsung S10+ and then being sent to the Samsung S10 installation process instead of the Samsung S10+ install. Although moderately intuitive, it would be nice to have a specific article for a specific phone that identifies the actual process with the physical parts involved since The S10 and the S10+ are not the same back covers and the same parts involved.
Additionally, the inner wireless connector plate NEEDS to be connected to validate a connection otherwise the battery will not power the phone. This is a Requirement on the S10+.
Please address the adhesive issues in the instructions! Add some discussion of how much of the old adhesive to remove (if any) and how to do it. Also there is no mention of how to apply the new adhesive, either to the battery compartment or to seal the back plate with.
Hi Alan,
Thanks for pointing this out! I'll add some links to general adhesive guides to help alleviate this issue.
My new battery came without new adhesive. Now what?
My new battery came without new adhesive. Now what? I guess I was supposed to order the custom-cut battery adhesive separately, right? I should have known this from the start, now all the parts are just lying around... and it seems, I can't even buy it form your shop. Thanks for the insanity.
I also have received new battery without the new adhesive
-


***Um dein Gerät wieder zusammenzubauen, folge den Schritten dieser Anleitung in umgekehrter Reihenfolge.
***
Folge dieser Anleitung, um einen Akkuzyklus-Reset durchzuführen und den neuen Akku zu kalibrieren.
Entsorge deinen Elektromüll fachgerecht.
Lief die Reparatur nicht wie geplant? In unserem Antwortenforum findest du Hilfe bei der Fehlersuche.
Rückgängig: Ich habe diese Anleitung nicht absolviert.
44 weitere Nutzer:innen haben diese Anleitung absolviert.
Besonderer Dank geht an diese Übersetzer:innen:
100%


Diese Übersetzer:innen helfen uns, die Welt zu reparieren! Wie kann ich mithelfen?
Hier starten ›


13 Kommentare
Worked great to replace my swollen battery, and thanks to it being swollen I could actually skip the steps to pry open the back cover. Anyway, from my experience everything is correct, the only downside is that I used a little more than a few drops to loosen the battery and after the whole annoyance of removing the glue and placing the new battery I turned on the phone to check everything was working and my back cameras were blurry.... yeah, too much alcohol, had to clean them up very well.... but the sad part is that some of the alcohol made it's way to the front cameras... now they are both blurry.
I agree with isely - the toughest part was removing all the left over adhesive. Removing the battery was a bit of a pain as well, even with isopropyl alcohol. I recommend using heat to remove the battery.
To get rid of the excess adhesive, I recommend using a heat gun and peeling it up with your thumb. As long as it's malleable, you can slowly peel it up to create a ball of adhesive and hopefully get most of it off at once. I was trying Q-Tips with isopropyl alcohol and that mostly just spread around the adhesive and got fluff from the Q-Tip over the phone.
Finally, I recommend buying a precut adhesive card to glue it back in place. It took me quite a while to cut a bunch of strips with my 2mm double sided tape.
And my phone is ruined because, presumably, the alcohol leaked somehow and destroyed the lens. Gonna have to get a new phone now anyway. Please add proper precautions to the instructions to avoid wrecking the lens. I didn't make any careless splashes or drips.
Would I need to replace the water-resistant seal with another to retain IP68 water resistance?
In my case, the old Galaxy 10+ battery swelled up. Getting the back off was simple as the battery expansion pushed the back off for me. Getting all the glue off was a bit of a pain though.
Replacement battery is vastly different from original (no surprise there), but no instructions were given on how to stick the new battery down. A sheet of pre-cut adhesive strips [which were almost impossible to use] came with the kit. I improvised to make my own battery stick-down strips.
The new adhesive for the back plate was a bit daunting to get set "just right". Ended up with a little bit of the material sticking out the side of the back. Some careful use of a single-edge razor blade took care of that.
iFixit guys - good instructions, now tie the bow on it by showing how to secure -your- replacement battery in the phone and how to apply -your- backside adhesive. You've only covered 1/2 of the job in these instructions.
Otherwise, I'm pretty happy with the repair. Resurrected my old Galaxy S10+.
i got sort of lucky and was able to skip straight to step 9 because the glue holding the back on had melted due to a house i used to live in not having a functional AC and it hitting 85F+ inside(that was the main reason i wanted this at first), the battery turning into a forbidden capri sun and warping my case made me pull the trigger(it also might have made me needing needing the iso a moot point).
Total time: 4 hours . Took a lot of time scraping/wiping away glue residue. And the battery was soaking in isopropyl alcohol for a whole hour to be barely loos enough to be ripped out. Use the iOpener for the battery removal.
Total time: 4 hours . Took a lot of time scraping/wiping away glue residue. And the battery was soaking in isopropyl alcohol for a whole hour to be barely loos enough to be ripped out. Use the iOpener for the battery removal.
Just finished an install and I must say this went way smoother than I had expected. Had zero issues and everything (including cameras) all still functioning. Thank you Ifixit team for making it possible to change the battery with ease.