Zum Hauptinhalt wechseln

Samsung Galaxy S20 Ultra USB-C Charging Port and Daughterboard Replacement

Was du brauchst

  1. Samsung Galaxy S20 Ultra USB-C Charging Port and Daughterboard Replacement, Heat the bottom edge: Schritt 1, Bild 1 von 1
    • Unplug and power off your phone before you begin.

    • Heat an iOpener and apply it to the back cover's bottom edge for two minutes.

    • A hair dryer, heat gun, or hot plate may also be used, but be careful not to overheat the phone—the display and internal battery are both susceptible to heat damage.

  2. Samsung Galaxy S20 Ultra USB-C Charging Port and Daughterboard Replacement, Separate the bottom edge adhesive: Schritt 2, Bild 1 von 3 Samsung Galaxy S20 Ultra USB-C Charging Port and Daughterboard Replacement, Separate the bottom edge adhesive: Schritt 2, Bild 2 von 3 Samsung Galaxy S20 Ultra USB-C Charging Port and Daughterboard Replacement, Separate the bottom edge adhesive: Schritt 2, Bild 3 von 3
    • Apply a suction cup to the back of the phone, as close to the center of the bottom edge as possible.

    • If the back cover is badly cracked, covering it with a layer of clear packing tape may allow the suction cup to adhere. Alternatively, very strong tape may be used instead of the suction cup. If all else fails, you can superglue the suction cup to the broken cover.

    • Pull on the suction cup with strong, steady force to create a gap between the back cover and the frame.

    • Insert the point of an opening pick into the gap.

    • Due to tight tolerances, this may take multiple attempts of reheating with the iOpener and separating with the suction cup before you get it right.

    • If you are having trouble creating a gap, apply more heat to the edge and try again.

    • Do not apply excessive force with the pick, or you risk cracking the back cover glass.

  3. Samsung Galaxy S20 Ultra USB-C Charging Port and Daughterboard Replacement, Slice the adhesive: Schritt 3, Bild 1 von 3 Samsung Galaxy S20 Ultra USB-C Charging Port and Daughterboard Replacement, Slice the adhesive: Schritt 3, Bild 2 von 3 Samsung Galaxy S20 Ultra USB-C Charging Port and Daughterboard Replacement, Slice the adhesive: Schritt 3, Bild 3 von 3
    • Slide the pick back and forth along the bottom edge to slice through the adhesive.

    • Do not attempt to cut the adhesive near the corners of the phone where the glass is curved or you risk cracking the glass panel.

    • Leave your opening pick in the seam to prevent the adhesive from resealing.

  4. Samsung Galaxy S20 Ultra USB-C Charging Port and Daughterboard Replacement, Heat the left edge: Schritt 4, Bild 1 von 1
    • Apply a heated iOpener to the left edge of the back cover for two minutes.

  5. Samsung Galaxy S20 Ultra USB-C Charging Port and Daughterboard Replacement, Separate the left edge adhesive: Schritt 5, Bild 1 von 3 Samsung Galaxy S20 Ultra USB-C Charging Port and Daughterboard Replacement, Separate the left edge adhesive: Schritt 5, Bild 2 von 3 Samsung Galaxy S20 Ultra USB-C Charging Port and Daughterboard Replacement, Separate the left edge adhesive: Schritt 5, Bild 3 von 3
    • Apply a suction cup to the back of the phone, as close to the center of the left edge as possible.

    • Pull on the suction cup with strong, steady force to create a gap between the back cover and the frame.

    • Insert the point of an opening pick into the gap.

    • As the glass on this edge is curved, you won't be able to insert this pick very far. As long as the very tip of the pick is underneath the glass's edge, you will be able to proceed.

    • Due to tight tolerances, this may take multiple attempts.

    • If you are having trouble creating a gap, apply more heat to the edge and try again.

    • You can try also applying a few drops of high concentration (over 90%) isopropyl alcohol into the seam to help loosen the adhesive.

    • Do not apply excessive force with the pick, or you risk cracking the back cover glass.

  6. Samsung Galaxy S20 Ultra USB-C Charging Port and Daughterboard Replacement: Schritt 6, Bild 1 von 2 Samsung Galaxy S20 Ultra USB-C Charging Port and Daughterboard Replacement: Schritt 6, Bild 2 von 2
    • Once the pick is underneath the glass's edge, tilt it downward and insert it further to fully separate the back cover's adhesive.

  7. Samsung Galaxy S20 Ultra USB-C Charging Port and Daughterboard Replacement: Schritt 7, Bild 1 von 2 Samsung Galaxy S20 Ultra USB-C Charging Port and Daughterboard Replacement: Schritt 7, Bild 2 von 2
    • Slide the pick towards the bottom edge of the phone to separate the back cover's adhesive.

    • Leave your pick under the left edge of the glass near the bottom of the device to prevent the adhesive from resealing.

  8. Samsung Galaxy S20 Ultra USB-C Charging Port and Daughterboard Replacement: Schritt 8, Bild 1 von 2 Samsung Galaxy S20 Ultra USB-C Charging Port and Daughterboard Replacement: Schritt 8, Bild 2 von 2
    • Insert another pick under the center of the left edge of the back cover.

    • Gradually slide the pick towards the top of the device to separate the back cover's adhesive.

    • Take care when sliding across the ridge in the frame surrounding the volume and power buttons—the cutout in the glass may make it more prone to cracking.

    • Leave your pick under the left edge of the glass near the top of the device to prevent the adhesive from resealing.

  9. Samsung Galaxy S20 Ultra USB-C Charging Port and Daughterboard Replacement, Heat the right edge: Schritt 9, Bild 1 von 1
    • Apply a heated iOpener to the right edge of the back cover for two minutes.

    • A hair dryer, heat gun, or hot plate may also be used, but be careful not to overheat the phone—the display and internal battery are both susceptible to heat damage.

  10. Samsung Galaxy S20 Ultra USB-C Charging Port and Daughterboard Replacement, Separate the right edge adhesive: Schritt 10, Bild 1 von 3 Samsung Galaxy S20 Ultra USB-C Charging Port and Daughterboard Replacement, Separate the right edge adhesive: Schritt 10, Bild 2 von 3 Samsung Galaxy S20 Ultra USB-C Charging Port and Daughterboard Replacement, Separate the right edge adhesive: Schritt 10, Bild 3 von 3
    • Apply a suction cup to the back of the phone, as close to the center of the right edge as possible.

    • Pull on the suction cup with strong, steady force to create a gap between the back cover and the frame.

    • Insert the point of an opening pick into the gap.

    • Like with the previous edge, you will need to tilt the opening pick downward to fully insert it underneath the back cover.

  11. Samsung Galaxy S20 Ultra USB-C Charging Port and Daughterboard Replacement: Schritt 11, Bild 1 von 2 Samsung Galaxy S20 Ultra USB-C Charging Port and Daughterboard Replacement: Schritt 11, Bild 2 von 2
    • Slide the pick towards the bottom edge of the phone to separate the back cover's adhesive.

    • Leave your pick under the right edge of the glass near the bottom of the device to prevent the adhesive from resealing.

  12. Samsung Galaxy S20 Ultra USB-C Charging Port and Daughterboard Replacement: Schritt 12, Bild 1 von 2 Samsung Galaxy S20 Ultra USB-C Charging Port and Daughterboard Replacement: Schritt 12, Bild 2 von 2
    • Insert another pick underneath the center of the right edge of the back cover.

    • Gradually slide the pick towards the top of the device to separate the back cover's adhesive.

    • As you do this, the bottom edge of the back cover may release the three picks located there. If this occurs, set these picks aside as the bottom edge shouldn't reseal from this point onward.

  13. Samsung Galaxy S20 Ultra USB-C Charging Port and Daughterboard Replacement, Heat the top edge: Schritt 13, Bild 1 von 1
    • Apply a heated iOpener to the top edge of the back cover for two minutes.

  14. Samsung Galaxy S20 Ultra USB-C Charging Port and Daughterboard Replacement, Separate the top edge adhesive: Schritt 14, Bild 1 von 3 Samsung Galaxy S20 Ultra USB-C Charging Port and Daughterboard Replacement, Separate the top edge adhesive: Schritt 14, Bild 2 von 3 Samsung Galaxy S20 Ultra USB-C Charging Port and Daughterboard Replacement, Separate the top edge adhesive: Schritt 14, Bild 3 von 3
    • The glass near the corners of the back cover is curved and very susceptible to cracking. Be gentle during this step to prevent damaging your back cover.

    • Gradually slide the pick from the right edge of the device around the top right corner.

    • Continue slicing along the top edge to fully separate the back cover adhesive.

    • If the slicing becomes difficult at any point, stop and reapply heat before continuing.

  15. Samsung Galaxy S20 Ultra USB-C Charging Port and Daughterboard Replacement, Remove the back cover: Schritt 15, Bild 1 von 2 Samsung Galaxy S20 Ultra USB-C Charging Port and Daughterboard Replacement, Remove the back cover: Schritt 15, Bild 2 von 2
    • Lift the back cover slowly. Use opening picks to slice any remaining adhesive.

    • Remove the back cover.

    • During reassembly:

    • This is a good point to power on your phone and test all functions before sealing it up.

    • Remove any adhesive chunks with a pair of tweezers or your fingers. Apply heat if you're having trouble separating the adhesive.

    • If you're using Samsung custom-cut adhesives, follow this guide.

    • If you're using double-sided tape, follow this guide.

  16. Samsung Galaxy S20 Ultra USB-C Charging Port and Daughterboard Replacement, Disconnect the wireless charging coil: Schritt 16, Bild 1 von 2 Samsung Galaxy S20 Ultra USB-C Charging Port and Daughterboard Replacement, Disconnect the wireless charging coil: Schritt 16, Bild 2 von 2
    • Use a spudger to pry up and disconnect the wireless charging coil connector.

    • When you disconnect connectors like these, be careful not to dislodge the small surface-mounted components surrounding the socket.

  17. Samsung Galaxy S20 Ultra USB-C Charging Port and Daughterboard Replacement, Unfasten the loudspeaker: Schritt 17, Bild 1 von 2 Samsung Galaxy S20 Ultra USB-C Charging Port and Daughterboard Replacement, Unfasten the loudspeaker: Schritt 17, Bild 2 von 2
    In diesem Schritt verwendetes Werkzeug:
    Magnetic Project Mat
    $19.95
    Kaufen
    • Use a Phillips #00 screwdriver to remove the five 3.9 mm-long screws securing the loudspeaker and lower midframe.

    • Throughout this repair, keep track of each screw and make sure it goes back exactly where it came from.

    • If you're reassembling with the Samsung Self-Repair kit, be sure to replace the screws with new ones labeled #3373.

  18. Samsung Galaxy S20 Ultra USB-C Charging Port and Daughterboard Replacement, Disconnect the loudspeaker: Schritt 18, Bild 1 von 2 Samsung Galaxy S20 Ultra USB-C Charging Port and Daughterboard Replacement, Disconnect the loudspeaker: Schritt 18, Bild 2 von 2
    • Insert the point of a spudger into the notch in the top left corner of the loudspeaker.

    • Pry up to release the clips holding it in place.

  19. Samsung Galaxy S20 Ultra USB-C Charging Port and Daughterboard Replacement, Remove the wireless charging coil: Schritt 19, Bild 1 von 2 Samsung Galaxy S20 Ultra USB-C Charging Port and Daughterboard Replacement, Remove the wireless charging coil: Schritt 19, Bild 2 von 2
    • Use tweezers, or your fingers, to gently peel the wireless charging coil away from the device.

    • Remove the wireless charging coil.

    • Set the charging coil aside. You'll reuse it during reassembly.

  20. Samsung Galaxy S20 Ultra USB-C Charging Port and Daughterboard Replacement, Unfasten the motherboard bracket: Schritt 20, Bild 1 von 2 Samsung Galaxy S20 Ultra USB-C Charging Port and Daughterboard Replacement, Unfasten the motherboard bracket: Schritt 20, Bild 2 von 2
    • Use a Phillips #00 screwdriver to remove the five 3.9 mm-long screws securing the motherboard bracket.

    • If you're reassembling with the Samsung Self-Repair kit, be sure to replace the screws with new ones labeled #3373.

  21. Samsung Galaxy S20 Ultra USB-C Charging Port and Daughterboard Replacement, Remove the motherboard bracket: Schritt 21, Bild 1 von 2 Samsung Galaxy S20 Ultra USB-C Charging Port and Daughterboard Replacement, Remove the motherboard bracket: Schritt 21, Bild 2 von 2
    • Use a pair of blunt-nose tweezers to unclip and remove the motherboard bracket.

    • Set the bracket aside. You'll reuse it during reassembly.

  22. Samsung Galaxy S20 Ultra USB-C Charging Port and Daughterboard Replacement, Disconnect the battery: Schritt 22, Bild 1 von 2 Samsung Galaxy S20 Ultra USB-C Charging Port and Daughterboard Replacement, Disconnect the battery: Schritt 22, Bild 2 von 2
    • Use a spudger to pry up and disconnect the battery connector.

  23. Samsung Galaxy S20 Ultra USB-C Charging Port and Daughterboard Replacement, Disconnect the daughterboard: Schritt 23, Bild 1 von 3 Samsung Galaxy S20 Ultra USB-C Charging Port and Daughterboard Replacement, Disconnect the daughterboard: Schritt 23, Bild 2 von 3 Samsung Galaxy S20 Ultra USB-C Charging Port and Daughterboard Replacement, Disconnect the daughterboard: Schritt 23, Bild 3 von 3
    • Use a spudger to pry up and disconnect the primary and secondary interconnect cables from the daughterboard near the bottom of the device.

    • To re-attach press connectors like this one, carefully align and press down on one side until it clicks into place, then repeat on the other side. Do not press down on the middle. If the connector is misaligned, the pins can bend, causing permanent damage.

  24. Samsung Galaxy S20 Ultra USB-C Charging Port and Daughterboard Replacement, Disconnect the flex cables: Schritt 24, Bild 1 von 3 Samsung Galaxy S20 Ultra USB-C Charging Port and Daughterboard Replacement, Disconnect the flex cables: Schritt 24, Bild 2 von 3 Samsung Galaxy S20 Ultra USB-C Charging Port and Daughterboard Replacement, Disconnect the flex cables: Schritt 24, Bild 3 von 3
    • Use a spudger to pry up and disconnect the primary and secondary interconnect cables from the motherboard.

  25. Samsung Galaxy S20 Ultra USB-C Charging Port and Daughterboard Replacement, Remove the flex cables: Schritt 25, Bild 1 von 3 Samsung Galaxy S20 Ultra USB-C Charging Port and Daughterboard Replacement, Remove the flex cables: Schritt 25, Bild 2 von 3 Samsung Galaxy S20 Ultra USB-C Charging Port and Daughterboard Replacement, Remove the flex cables: Schritt 25, Bild 3 von 3
    • Gently peel up and remove the primary and secondary interconnect cables.

    • Set both cables aside. You'll reuse them during reassembly.

  26. Samsung Galaxy S20 Ultra USB-C Charging Port and Daughterboard Replacement, Unfasten the daughterboard: Schritt 26, Bild 1 von 2 Samsung Galaxy S20 Ultra USB-C Charging Port and Daughterboard Replacement, Unfasten the daughterboard: Schritt 26, Bild 2 von 2
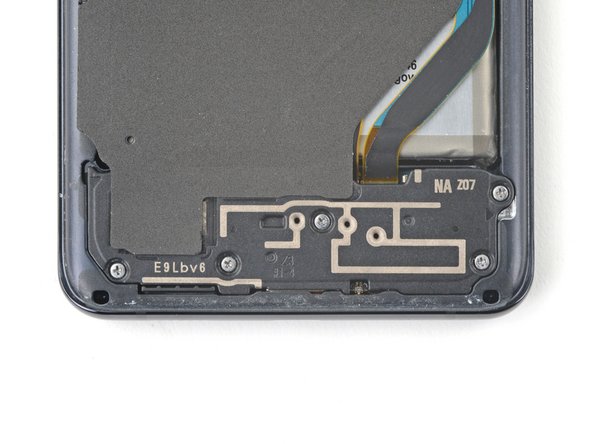
    • Use a Phillips #00 screwdriver to remove the three 3.7 mm-long screws securing the USB-C port and daughterboard.

    • If you're reassembling with the Samsung Self-Repair kit, be sure to replace the screws with new ones labeled #3396.

  27. Samsung Galaxy S20 Ultra USB-C Charging Port and Daughterboard Replacement, Remove the daughterboard: Schritt 27, Bild 1 von 3 Samsung Galaxy S20 Ultra USB-C Charging Port and Daughterboard Replacement, Remove the daughterboard: Schritt 27, Bild 2 von 3 Samsung Galaxy S20 Ultra USB-C Charging Port and Daughterboard Replacement, Remove the daughterboard: Schritt 27, Bild 3 von 3
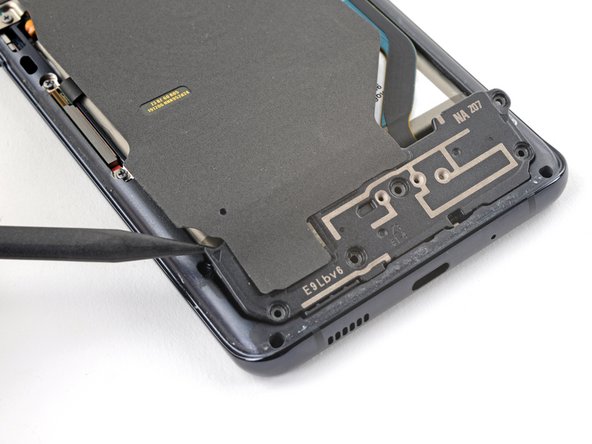
    • Insert the pointed end of a spudger under the left edge of the daughterboard and pry up to release it from its recess.

    • Use tweezers, or your fingers, to pull the daughterboard up and away from the bottom of the device and remove it.

Abschluss

To reassemble your device, follow the instructions in reverse order and perform the opposite actions, e.g., "reattach" instead of "removing." Skip steps that use heating and prying, and pay close attention to the 📌 bullets as you work through the steps.

After you've completed the repair, download the Samsung Members App from the Galaxy Store or the Play Store, and follow the Samsung Self-Repair document (beginning page 9) to make sure your device is fully functional.

Take your e-waste to an R2 or e-Stewards certified recycler.

Repair didn’t go as planned? Try some basic troubleshooting, or ask our Answers community for help.

Ein:e weitere:r Nutzer:in hat diese Anleitung absolviert.

Alex Diaz-Kokaisl

Mitglied seit: 01/16/22

118.844 Reputation

549 Anleitungen geschrieben

Team

iFixit Mitglied von iFixit

Staff

135 Mitglieder

16.718 Anleitungen geschrieben

2 Kommentare

All of these guides mention the reapplication of adhesive at the beginning of the guide, but none of them discuss how to reapply and the kits don't include adhesive. Seems like a pretty important oversight!

Roger Hitchner - Antwort

This guide is written very well. I followed it exactly, took my time and had no problems except reapplying the adhesive to the back cover and putting it back on straight was a challenge. I was successful but it was a stressful moment. Lol. As for the comment above about the fact that they did not include the adhesive, the "kit" that I ordered had the new charging port with tools, new screws, and the adhesive needed to replace the back cover. I tried to order just the part only but they said it was not available so I HAD TO order the kit. Maybe that is why they only sell the kit now? Anyway, my phone works like new again. Thank You IFIXIT!!

Carl Griffith - Antwort

Kommentar hinzufügen

Seitenaufrufe:

Letzte 24 Stunden: 5

Letzte 7 Tage: 25

Letzte 30 Tage: 91

Insgesamt: 2,897