Einleitung
Verwende diese Anleitung, um die Display Einheit zu ersetzen, die das Frontglas, Digitizer und Home Button Kabel beinhaltet.
Was du brauchst
Einführungsvideo
-
-
Gehe mit dem Fingernagel oder einem Plastic Opening Tool in die Einkerbung links neben der Rückkamera.
-
Entferne das flexible Rückgehäuse vorsichtig durch Hebeln und Verdrehen von der Rückseite des Gerätes.
-
-
-
Gehe mit einem Fingernagel oder einem Plastic Opening Tool in die Einbuchtung in der rechten unteren Ecke des Akkus und hebe ihn nach oben.
-
Entferne den Akku von deinem Gerät.
The battery will need to be charged after it is placed in the phone. No one told me that and I bought a battery and thought it was bad. Keep the phone off and insert the charger. You will need to charge it for several hours before you can use the phone.
-
-
-
Hole die microSD Karte von Hand aus dem Slot.
-
Entferne die microSD Karte von deinem Mobiltelefon.
I found removing the SIM/SD card with my fingertip a little difficult – not enough friction. So I used a 'rubber' (in US English it's called a pencil eraser or just simply, an eraser.
Simple, cheap (zero) and effective! :)
Cheers.
John
-
-
-
Wiederhole die vorherige Prozedur, um die SIM Karte zu entfernen.
Actually this isn’t as easy as it appears in the photo and instructions, since the SIM card does not have a notch that you can use to pull it out. In my experience I’ve found that the best way to remove the SIM card is by pressing down somewhat hard on the SIM card, and then push-pulling it outward.
-
-
-
Verwende ein Plastic Opening Tool, um das Mittelrahmen-Anschlussplatte aus Kunststoff nach oben zu hebeln.
-
Entferne die Anschlussplatte mit einer Pinzette.
In my experience I have always removed this Home button protector panel with ONLY a plastic opening tool, and I have never found adhesive beneath it.
-
-
-
Heble mit der Spudgerspitze den Home Button Kabelstecker gerade aus seiner Fassung.
-
-
-
Platziere den erhitzten iOpener für mindestens 90 Sekunden auf der linken Seite des Mobiltelefons.
-
Wärme den iOpener wieder auf und platziere ihn auf der rechten Hälfte des Gerätes.
good location for a timer, I am taking my phone apart
¿se puede hacer con la pistola de calor?
Si, puedes utilizar la pistola de calor también, pero ten cuidado ;-)
Otra opción es usar una “placa calefactora” que, según yo, es la opción mas “profesional” ya que con ella se puede limitar la temperatura, para que no se malogre la pantalla táctil (la “digitizador” detŕas del vídrio).
Another option is to use a “hot plate” which, according to me, is the more “professional” option since with it you can limit the temperature, so that the touchscreen doesn’t get ruined (the “digitizer” behind the glass).
A hairdryer on low not being used statically is also an easy option. Or if your a caveman or low tech, and all you have is a single baby sock and metal bb’s or little rocks, as long as they’re not silica rocks, put them in the baby sock, at the edge of your cave campfire to warm them and thats all you need. -retired aviation engineer
-
-
-
-
Führe die Kante eines Opening Picks unterhalb der rechten unteren Ecke des Frontglases ein.
I hope this helps others:
my screen was STRONGLY glued to the midframe, it was impossible to remove it without breaking it, be very careful with the copper adhesive in the midframe!!!
I can't even understand how this guide doesn't mention it properly!
Yeah, the real trick with these types of screens is to measure (or just “have a feel for”) an adequate temperature with the heat pad (e.g. iOpener), or heat gun, or hot plate. First you have to heat up the screen just enough so that you can “break into” one side without breaking the bezel or the glass, and then verrrry carefully and verrrrry gradually insert plastic opening picks (or even playing cards) as you make progress around the exterior border of the phone. Whenever I do this, I always insert 5-6 objects (again, plastic picks or playing cards) before I fully remove the digitizer-glass assembly, which typically ends up as follows as I move around the exterior border: one pick at each of the four corners and one pick on each of the two sides. WARNING: DO NOT INSERT ANY OBJECT BENEATH THE GLASS MORE THAN A FEW MILLIMETRES FROM THE EXTERIOR BORDER.
Wow seriously 100% ur going to break the LCD if this is the first time opening the phone this is why android is built disposable it now costs 60$ to fix a stupid 10$ part this fix is definitely not worth it
android=disposable
apple=a better way of life
I will never attempt to fix another android again
-
-
-
Fahre mit dem Opening Pick entlang der rechten Seite des Displays.
This is not as easy as they make it seem in this guide. The real trick with these types of touchscreens is to properly measure (or just “have a feel for”) an adequate temperature with the heat pad (e.g. iOpener), or heat gun, or hot plate, that you use to heat the adhesive beneath the glass exterior of the digitizer-glass assembly. First you have to heat up the screen just enough so that you can “break into” one side without breaking the bezel or the glass, and then verrrry carefully and verrrrry gradually insert plastic opening picks (or even playing cards) as you make progress around the exterior border of the phone. Whenever I do this, I always insert 5-6 objects (again, plastic picks or playing cards) before I fully remove the digitizer-glass assembly, which typically ends up as follows as I move around the exterior border: one pick at each of the four corners and one pick on each of the two sides. WARNING: DO NOT INSERT ANY OBJECT BENEATH THE GLASS MORE THAN A FEW MILLIMETRES FROM THE EXTERIOR BORDER.
-
-
-
Fahre mit dem Pick um die Ecke bis zum Lautsprechergitter oben am Gerät.
Be sure not to nick and tear the capacitive touch chip interface that meets the LCD screen here! I caught it and didn't even feel the resistance. :-(
-
-
-
Fahre das Opening Pick entlang der Oberseite des Mobiltelefons und sei dabei vorsichtig, das Pick nicht zu tief einzuführen.
-
-
-
Fahre das Opening Pick entlang der linken Hälfte des Mobiltelefons und stoppe an der unteren linken Ecke.
-
-
-
Fahre mit dem Pick entlang bis zur linken unteren Ecke des Mobiltelefons und gehe sicher, dass es richtig platziert ist.
-
-
-
Platziere den wiedererhitzten iOpener über dem unteren Teil der Display Einheit.
-
-
-
Fahre mit dem äußersten Ende von einem Opening Pick entlang der unteren Kante des Displays, um den letzten verbleibenden Kleber zu lösen.
-
-
-
Drehe das Opening Pick etwas, damit sich das Glas vom Mobiltelefon löst.
Be aware that there is adhesive on the inner parts of the screen. Plan on replacing this screen and digitizer as well.
-
-
-
Führe ein Opening Pick unter die Soft Button Icons auf dem Display ein und heble die Button Kabel auf der Innenseite des Front Panels ab.
My digitizer was glued to the chasis, the glass came up separately and the digitizer broke when I tried to pry it up.
That’s actually probably because you might not have heated the sides of the screen (where the adhesive is located) enough before prying up on the exterior border of the glass part. It’s very difficult to know the tolerance limits of such devices if you’ve never seen them apart before, and as such one can easily get confused between where the glass ends and the digitizer begins. On my first smartphone repair I broke a digitizer, so I know how it feels.
-
-
-
Hebe die Home Button Seite der Display Einheit etwas an, aber entferne sie nicht.
The display assembly I purchased from ifixit.com included a new home button with a new flex cable. If you have the same, I'd recommend removing the home button in this step.
Same here. My home-button flex cable extended under the main board rear cover plate, and would have required removing screws to extract. So I left the original home button installed, and removed the one that came with the new assembly.
The ‘reverse order’ step are misleading. It is not trivial to reconnect the main screen flex cable to the main assembly — lots of trial and error to get it snugly plugged into the receiving connector. That part is glossed over. (Dissassembly is trivial. Reassembly is hard.)
After putting the screen and connectors on, I learned that there’s some plastic edging on the BACK. I had to remove the screen since it effectively wraps the home-button key. The new screen cracked. Great.
Sansumg S5 is the stupiest design (for repair) ever.
I have fixed s2,s3,s4, note, note 2 and note 3
All of them, you can get into the logic board from the back without touching the screen assembly.
With the S5, just a simple problem could cost you buying a new lcd assembly.
You must remove the lcd in order to remove the screws for the logic board cover.
I purchased a cracked lcd S5, so I can replace it and sell it. My mistake was I did not did a research on the tear down (thinking it should the same as previous S model.
To make story short, lucky for me, I did a dry test of the entire phone, before glueing on the new lcd assembly.
Because the front camera lens was damaged, cost $5.
If I glued the lcd, it would be 50/50 chance that I would crack the new screen.
So any repair that you need to do on the S5, you will have to consider the risk of breaking the LCD.
I hope Samsung change the design on the S6. Which I doubt it. Because the higher cost of repair means people won't fix them = more new sells
How can I find out if I messed my phone up . the person who glued the screen on didn't glue it on right , so I tried to take off the screen and I got it off but now that I try to put it back on the screen is black .
I know this reply is a bit late, over 2 years late, but I just wanted to add to idevice Recycle that the way "they" designed this phone is exactly as you described, to make it wayyyy more difficult to fix even the most simplest thing on this phone. Inverting the motherboard, designed exactly the opposite way of the S4 (as you described), from their standpoint of view, as you'd have to admit, was a brilliant idea on "they're" part.
I've torn apart and fixed many cell/smart phones in my days thus far, but mostly iphones by far. A friend passed
me one of these phones this past week. I've never messed with one before so you already know, even though I
have much knowledge about them, this site was the first I visited about this phone. Needless to say, go figure.
They did a really great job though making this phone one of the most difficult phones to do any type of repair
on. Adhesive sucks. But eh, all is well with a bit of time and patience. Had to replace rear camera and middle
bezel frame. Time to off it....
This guide may have been written for a different revision but the SM-G900F that I just repaired had glue sticking the entire of the rear of the screen to the chassis making it very difficult to remove. Had to use a spudger and push it down the inside of the phone separating the copper film from the chassis to free it up. Would be easy to damage the home button cable but I was ok.
I had the same thing happen just now. I was working on a G900A. A real PITA!
mcr4u2 -
Is there a need to put adhesive after removing the screen?? If so, do you have an adhesive recommended...
Should be. i recommend using 3m strip double sided adhesive
leiki42 -
I had the same issue as idevice recycle. The model S5 that I was working on had a huge amount of glue on the back of the lcd which I wasn't aware of - this caused me to crack the glass which then literally broke the lcd in half (costing me £120 for a new screen!!!)
I've repaired all manner of Samsung products over the years and I've never had any issues with any model apart from this one. My advice to anyone doing this repair is once you have managed to unstick the screen from the frame, before attempting to remove it, apply a bit of heat (but not too much, you don't want to damage anything) to the back of the phone where the battery normally sits. This is where all the glue on the back of the lcd is located which sticks the lcd to the frame of the phone - I wish I knew of this before trying to remove the screen!
So this really blows. I needed to swap the logic board from a phone with a cracked screen to one with a good screen. Yeah that’s not happening. I now have two cracked screens… Thanks Samsung! The difficulty on this should be way higher. As others have said, the screen is glued on the underside over a large portion where the copper foil is. It’s not coming up easily or in one piece.
If you want to make the reassembly easier, be careful to not separate the Home button assembly, from the glass. Instead, just carefully pry away the soft button adhesive connectors.
-
-
-
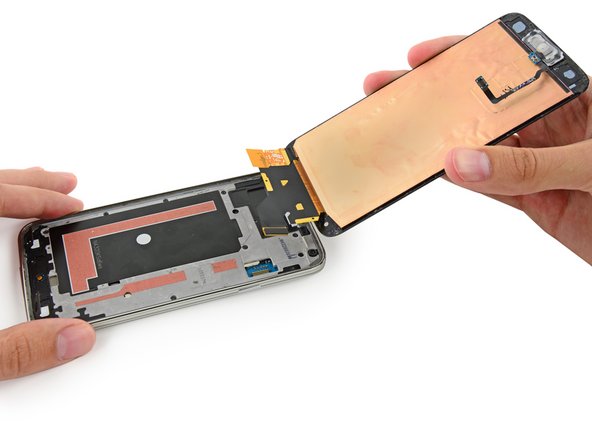
Hebe den Kabelstecker der Front Panel Einheit mit der Spudgerspitze aus seinem Anschluss auf dem Logic Board.
-
Entferne die Front Panel Einheit vom Mobiltelefon.
Absolutely wonderful! Worked like a charm. This is the easiest replacement I have seen so far on an Android. :)
This was all a breeze until I removed the screen and the LCD and digitizer crumpled on me now I have to replace the whole thing not just the charge port which was the initial issue… Great guide though and thanks it helped. Minus the panic attacked when all the parts started to crack and break as I removed the glass and now digitizer or LCD stayed safe for replacement.
The difficulty of changing the S5's display is enormous. Not only is it glued around the edges, it's also glued strongly to the midframe. If you ignore this, damage is inevitable. The digitizer flex cable is also very easy to kill. Glue sucks. When assembling the display, the edge bonding is not enough; you need special double-sided adhesive tape that is stuck to the midframe so that the display does not fall out again so quickly. Before doing this, you have to thoroughly remove the old adhesive on the edge. I have successfully performed this procedure once but would never do it again.
-


Arbeite die Schritte in umgekehrter Reihenfolge ab, um dein Gerät wieder zusammenzubauen.
Arbeite die Schritte in umgekehrter Reihenfolge ab, um dein Gerät wieder zusammenzubauen.
Rückgängig: Ich habe diese Anleitung nicht absolviert.
535 weitere Nutzer:innen haben diese Anleitung absolviert.
Besonderer Dank geht an diese Übersetzer:innen:
100%


Diese Übersetzer:innen helfen uns, die Welt zu reparieren! Wie kann ich mithelfen?
Hier starten ›


36 Kommentare
Be aware that the LCD is glued not just at the edges, but also in the middle (the orange areas in the photos for Step 20. These can adhere strongly enough to cause the LCD to crack. Don't ask how I know that.
I cracked it this way, so yeah. Any way to get the glue fluetly enough to get the LCD off the rest of the Phone? (the LCD and digitalizer is cracked anyway)
Onfortunately I read this to late. Many thanks anyway for confirming I'm not the only one ;)
Been there man. Had my Samsung Galaxy S5 Active pull one of those numbers. not a fun time.
Just found out about that, during my first time. Thanks for the tip.
Am I missing something?
How does it get re glued when you reverse the process? Doesn't it need to be re glued so water doesn't get into the hardware past the screen?
That would be my concern, the phone not being waterproof after the repairs are completed.
Thanks for your insight. Guide is done very well.
Bogdan.
I agree Bogdan Georgescu, the step of adding a new screen is not covered in these instructions but would be very helpful to know if anyone has experience? The instructions are wonderful to help you remove a screen, but the process of replacing is lacking for me. Has anyone had success replacing a screen that primarily has had surface damage? (I pay a monthly insurance fee on my galaxy s5 phone. But in addition, if I wanted to replace it, it will cost another $200 to get a replacement (refurbished - someone else's junk?) phone. I'd rather chance starting with replacing my screen myself, with the help from this online community if possible? Thank you!!! Karen
Karen -
They don't use glue, they use double sided adhesive that is not easy to find. 3M double sided tape works well but I have had screens come up when using the 3M adhesive. So yes you need to apply adhesive before install of new screen to keep it water resistant. The phone is and never was waterproof just resistant and I recommend using the best double sided tape you can get as you will fudge up the already adhered tape.
As mentioned above, the screens are held down by double sided tape, usually made by the 3M company. But most other good quality tape can do the same. The proper tapes are cut perfectly to fit all the little adge bits of the casing-to-screen, and that's all that makes it waterproof.
A thing to remember is, most people loose the charger cover anyway, so worrying about a perfect screen seal from water doesn't matter then I guess as water will just flow in anyway.
The screen isnt really waterproof, its just water resistant, so it's okay for the odd splash, but drop it in a bucket, and it's probably ruined :-( unless the bucket is empty of course ;-) When I refit a screen, i put a 5mm strip of my own tape down the centre (it MUST be the thinnest tape possible!!) and that helps keep the screens in place, but that idea varies from one phone model to another.
I replaced my midframe, but I cut the cables to the back and menu buttons. I also ripped some of the foil on the back of my screen, but that didn't seem to hurt anything.
Hey guys, I also cracked my screen, unfortunately. Not the glass as is usually the case but really the screen to the point it doesn't display anything.
However after digging around the Internet I found out that in order to replace your screen you need the service kit along with the new display unit.
The partnumber is GH81-12060A.
How one would remove the old adhesive is still a mystery as I'm not convinced a hair blower will do this time.
Cheers, Ronald R.
I did use a hair dryer, you just need to keep it on it a long time.
For reassembly, https://www.youtube.com/watch?v=gEgOsFPX....
I found it useful to have a reference for adhesive application. It wasn't complicated, but by far it was the most time consuming part of the repair.
My glass separated from the digitizer, but it was no biggie. Just go slow with the ribbon cables and it works perfectly. Don't forget to buy new tape, too.
Thanks a bunch Sam! Really useful, especially when you run a phone repair shop ( http://www.iphonerepairscolchester.co.uk... ) ;)
OK , for all those people that want to know about the adhesive once putting the new screen on. There is adhesive also on the new screen, protected by a blue plastic peel cover. When you're ready to place the screen back and you've connected it to the motherboard peel and cut the blue plastic glue cover on the new screen so you can slowly place the screen and peel the blue glue protector slowly (keep in mind that in my case the plastic was blue but that might not be the case for everyone).
@Bogdan Georgescu and others asking about reassembly of the phone and what, if any adhesive is needed to adhere the new display.
Step 5 has a note listed as follows:
"There should be enough adhesive to readhere the panel upon reassembly, otherwise use a small amount of double-stick tape"
This is a very extensive guide. I have a job soon to replace the display and digitizer and was doing a bit of research ahead of time. I can't wait to put my new iFixit toolset to work!
-Dave from Ohio
Thank you SOOO MUCH for this, you saved my ass! I just got this phone back in September and shattered the LCD part this past weekend. Because of your guide I have my phone back in service again! Now I just need to take it apart once more to reglue or tape it and maybe get a little sturdier case. Again, THANK YOU!!!
Using just a medium stiffness guitar pick and some boiled water in a bag wrapped in cloth I was able to do this tutorial. Thanks for the run through! But you don't need to buy the tools listed, such as the iOpener, spudger , or "opening pick".
Glass only? My phone has a cracked screen - a car ran over it! I'd like to try replacing just the glass, not the digitizer, to minimize my investment in case the damage is bad. Would I follow the same steps, but somehow take the screen off the digitizer?
you cant replace the glass alone you need to replace both the screen and digitizer
Heat guns are much more efficient as there is a considerable amount of glue throughout the middle of the phone. Would recommend using a heat gun over the iOpener.
Thank you for the advice. will definitely do this. i own a heatgun, not an IOpener, so less hardware to buy anyways.
Well it definitely worked but unfortunately it came off in quite a few pieces. the front glass remained in tact, all the ribbons and button bands are in tact, but the LCD and Backlight are thuroughly thrashed.
I think step one of this guide should definitely be changed to "Be Jesus Christ" since it seems like the only way to get that pesky digitizer and LCD up in one piece is by an act of pure magic.
Hair Dryer, Safety Razor & a small slotted screw driver!
Thanks. These work really well.
Louis -
fantastic, your graphics are great.
can you buy the screen and display digitizer separate for a galaxy s5 g900 and if so where ?
It is possible to get them seperate, but the process for fixing them together is complicated. The touch panel is just the thinnest glass layer, and very very cheap from all sorts of places (I don't want to advertise any company names). But to make that glass stick to the LCD panel, requires special UV glue (a very thin glue that only becomes sticky when UV light is applied to it in the right amount) for the right length of time).
It's practically impossible to split your original glass from the LCD panel though - the UV glue is a one way thing, the LCD panel is so sensitive it will 99% break, and the touch glass is also about 1mm thick and very weak.
For that reason, most people just buy a complete screen, and make it into a 10 minute job to refit it.
Please make sure that you have re-fed the home button cable through the chassis before you place and seal the new LCD + Digitizer unit onto the phone. If you are replacing the chassis too please beware and DO NOT forget to re-screw all 10 screws that fix the chassis to the motherboard before you place and seal the new LCD + Digitizer Unit. You don't want to know what made me post these two essential things you might forget. Let's say I'm suddenly very experienced at opening this phone ;)
While Step 18 (soft button adhesives) wasn’t an issue with my phone, please note the following:
- The display adhesive is actually thin black rubber running along the entire perimeter of the phone. It is important to separate the adhesive from the display and not the phone.. or you’ll have a terrible time reattaching/replacing the display.
- The display also sticks to the phone in the middle (no rubber adhesive, just sticky). No step accounts for this, so be extra careful/slow pulling off the display. With enough clearance, you may need to insert a plastic prod between the display & middle of phone and gently help unstick the two.
- Up where the speaker, camera, & light-sensor are, the adhesive gets even thinner as it runs in-between said components. Be extremely careful/slow pulling it off the display. It may even separate from the phone too, but you can gently place it back along the perimeter as long as you ensured the rest of the adhesive remained stuck to the phone.
1/2
- There is a “Step 21” if you intend to remove the home button & finger-print scanner. The home button also uses thin black rubber adhesive to attach it to the display. The finger-print scanner ribbon only sticks to display (no rubber adhesive). Again, be extra careful/slow pulling these off the display (with the plastic pick) while keeping the rubber adhesive attached to just the button.
- I used a hair dryer every now & then to loosen up the adhesive as well as to make it tacky during reattachment/replacement of the display.
2/2
I had a S5 with a “display flickering green on low brightness” defect.
I used a heat gun to heat up the display, this way it was really easy to separate the display from the phone, even the middle glued part. Unfortunately, I think I applied too much force and broke the digitizer (not visibly, but no input was recognized afterwards), so be super careful pulling up the display, using the plastic openers as much as possible.
Make sure to remove the speaker grill and put it on the new display before reinstalling!
The display was then replaced with an original Samsung display (coming in a service pack, part AMS510CV01 REV 2.0), it came with preapplied glue and homebutton, worked flawless and the flickering on low brightness was gone.
After reinstalling, I reheated the display with the heat gun and applied mild pressure to all edges for 15 minutes, otherwise the display would not attach properly to the phone.
Does anyone know if you can swap the screen of a at&t s5 with a Verizon one?
Thank you so much.