Einleitung
Hier wird der Austausch der Rückkamera gezeigt.
Was du brauchst
-
-
Setze deinen Fingernagel oder ein Plastiköffnungswekzeug in die Raste an der Seite des SIM Einschubs.
-
Heble den Einschub heraus aus seiner Fassung.
-
-
-
Erhitze die Frontscheibe am Rand des Smartphones mit einem iOpener, einem Haartrockner oder einem Heißluftgebläse für 60 Sekunden um die Klebeverbindung am Rand der Scheibe aufzuweichen.
Heat the phone in the microwave??? I really hope you meant to say heat the iopener tool in the microwave.
-
-
-
Ziehe mit Hilfe des Saughebers vorsichtig an der unteren Hälfte der Scheibe.
-
-
-
Wenn der Spalt, den du geöffnet hast, groß genug ist, dann setze ein Plastiköffnungswerkzeug unten ein, zwischen Glas und Rahmen des Smartphones.
-
Schiebe das Plastiköffnungswerkzeug rings um die Scheibe herum und hebele so das Display vorsichtig vom Rest des Smartphones weg.
My phone had a substantial amount of adhesive between the copper area on the back of the display assembly (see pic in step 10) and the frame (see pic in step 13). There was no way to have known that as I started to remove the glass, but this made it difficult to lift the glass up and eventually led to the glass cracking as I tried to work the plastic opening tool up along the side of the phone (about in the spot shown in the second picture of this step). In hindsight, I think it would have been extremely difficult to remove the front glass undamaged without first starting to separatie that adhesive from the frame, but I’m not sure what would have been the best way to do that. My guess is I would have needed to slide a tool with a thinner/sharper edge upward from the bottom while pulling on the suction cup to start separating the back of the display assembly from the frame, and worked on both that and the edges of the glass at the same time.
-
-
-
-
Ziehe an der unteren Hälfte der Scheibe mit dem Saugheber und drücke gleichzeitig den Rahmen nach unten, um so die beiden Teile zu trennen.
-
-
-
Wenn die Glasscheibe geöffnet ist, kannst du eine kleine Klammer sehen, welche die Verbindung des Bildschirms zur Hauptplatine oben am Smartphone bedeckt. Fasse die Klammer am Knick an der Seite an und ziehe sie heraus.
-
-
-
Löse die Verbindung zum Bildschirm mit dem Plastiköffnungswerkzeug.
If possible, disconnect the battery BEFORE you undo the screen connector. The battery flex is on the left, just under the LCD cable assembly.
-
-
-
Entferne die Displayeinheit aus LCD und Digitizer.
All that copper/tin foil, whatever it is, stayed glued to the case and tore off the screen. I hope it isn’t important. What is it for anyways?
Good Question. Mine ripped a little bit 2.
Probably heat displacement, you’ll find them on the back of most Samsung OEM LCD assemblies & high quality replacements. It’s probably not a big deal if you tear it, after all where’s the heat supposed to go from there? Pat yourself on the back for getting the LCD & glass up in one piece, don’t be surprised if nobody else shares your enthusiasm.
-
-
-
Entferne sechzehn 4 mm Kreuzschlitzschrauben #000 vom Rahmen.
PH00 size screwdriver fit the screw heads better on my phone.
Missing intermediate step: the screw just above the battery holds a little plastic cover that hides the battery connector. Take the cover out and carefully disconnect the battery using the tweezers.
-
-
-
Drücke etwas am Rand oben an den Seiten und unten um das Rückgehäuse abzutrennen.
-
-
-
Wenn alle Rasten gelöst sind, kannst du das Rückgehäuse vom Rahmen mit dem Akku trennen.
-
Der Akku befindet sich auf der Rückseite des Rahmens.
-
-
-
Setze ein Plastiköffnungswerkzeug an der Seite des Rahmens ein und hebe den Akku heraus.
The battery was glued quite well on mine, I had to slowly go around the whole edge about 3 times. Exercise care at this operation, especially if the old battery is swollen.
-
-
-
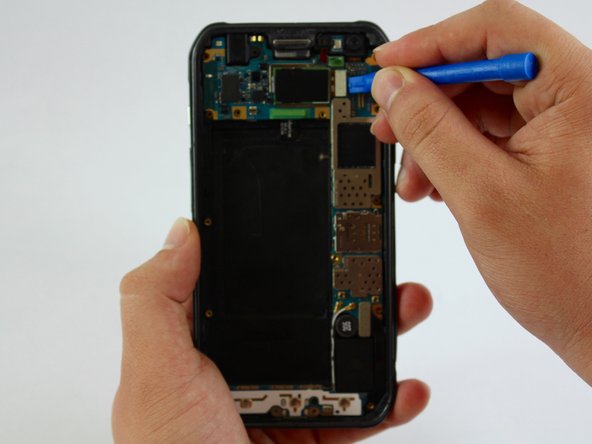
Die Rückkamera ist im Rückgehäuse an der Hauptplatine befestigt.
-
Löse den Verbinder der Rückkamera mit dem Plastiköffnungswerkzeug von der Hauptplatine.
-


Um dein Gerät wieder zusammenzusetzen, folge den Schritten in umgekehrter Reihenfolge.
Um dein Gerät wieder zusammenzusetzen, folge den Schritten in umgekehrter Reihenfolge.
Rückgängig: Ich habe diese Anleitung nicht absolviert.
Ein:e weitere:r Nutzer:in hat diese Anleitung absolviert.
Besonderer Dank geht an diese Übersetzer:innen:
100%
VauWeh hilft uns, die Welt in Ordnung zu bringen! Wie kann ich mithelfen?
Hier starten ›
Team

USF Tampa, Team 1-5, Sullivan Spring 2017 Mitglied von USF Tampa, Team 1-5, Sullivan Spring 2017
USFT-SULLIVAN-S17S1G5
3 Mitglieder
25 Anleitungen geschrieben
Ein Kommentar
I replaced the S6 Active’s old battery, and never touched the camera (that I know of) but now the camera does not work. I get ‘Camera Failure' error statement. Clearing Cache did not fix it.
Is the camera connection easy to accidently disconnect? Or to test? Don’t want to take my S6 Active apart again unnecessarily.