Zum Hauptinhalt wechseln

Samsung Galaxy S7 Active Battery Replacement

Was du brauchst

  1. Samsung Galaxy S7 Active Battery Replacement, Samsung Galaxy S7 Active Disassembly: Schritt 1, Bild 1 von 1
    • Melt the adhesive on the screen by applying a blow dryer directly on the screen.

    • Your phone is hot, please do not touch it with your bare hand.

  2. Samsung Galaxy S7 Active Battery Replacement: Schritt 2, Bild 1 von 1
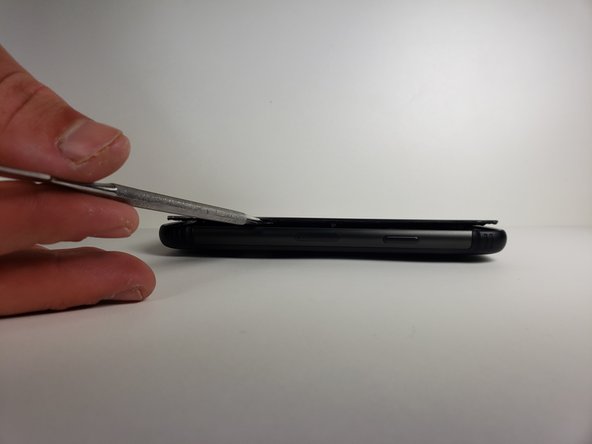
    • Wedge the metal spudger in between the screen and the frame to begin separating them.

    • It would be easier to separate the screen from the sealing adhesive on the frame if you with more than one metal spudger.

    • Your phone might no longer be watertight after you reassemble it.

  3. Samsung Galaxy S7 Active Battery Replacement: Schritt 3, Bild 1 von 2 Samsung Galaxy S7 Active Battery Replacement: Schritt 3, Bild 2 von 2
    • Slide the metal spudger around the phone at least once.

    • It would be easier to slide your metal spudger if you apply the blow dryer to where you are currently sliding.

  4. Samsung Galaxy S7 Active Battery Replacement: Schritt 4, Bild 1 von 1
    • Lift the screen up with your hands.

    • Please wash your hands thoroughly with hot water and soap after you finish.

  5. Samsung Galaxy S7 Active Battery Replacement, Battery: Schritt 5, Bild 1 von 1
    • Use a Phillips #000 screwdriver to remove a single screw.

  6. Samsung Galaxy S7 Active Battery Replacement: Schritt 6, Bild 1 von 1
    • Use tweezers to remove the small plastic cover you just unscrewed.

  7. Samsung Galaxy S7 Active Battery Replacement: Schritt 7, Bild 1 von 1
    • Use tweezers to remove the other small plastic cover.

  8. Samsung Galaxy S7 Active Battery Replacement: Schritt 8, Bild 1 von 1
    • Use a Phillips head #000 to take out the eleven screws marked in the photo.

  9. Samsung Galaxy S7 Active Battery Replacement: Schritt 9, Bild 1 von 1
    • Use tweezers to disconnect the marked pieces from the motherboard.

  10. Samsung Galaxy S7 Active Battery Replacement: Schritt 10, Bild 1 von 1
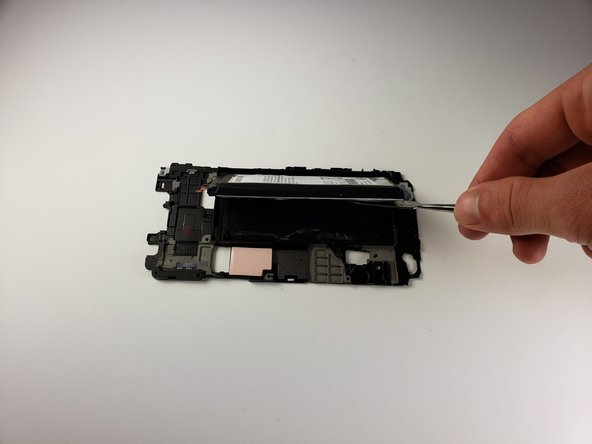
    • Use tweezers to take out the middle button and its connection to the motherboard.

  11. Samsung Galaxy S7 Active Battery Replacement: Schritt 11, Bild 1 von 3 Samsung Galaxy S7 Active Battery Replacement: Schritt 11, Bild 2 von 3 Samsung Galaxy S7 Active Battery Replacement: Schritt 11, Bild 3 von 3
    • Use a metal spudger to pull the mid frame and battery off of the motherboard.

  12. Samsung Galaxy S7 Active Battery Replacement: Schritt 12, Bild 1 von 2 Samsung Galaxy S7 Active Battery Replacement: Schritt 12, Bild 2 von 2
    • Use a spudger to remove the battery from the midframe.

    • To install a new battery and adhesive, follow this guide.

Abschluss

To reassemble your device, follow these instructions in reverse order.

11 weitere Nutzer:innen haben diese Anleitung absolviert.

Team

Cal Poly, Team S18-G1, Livingston Spring 2018 Mitglied von Cal Poly, Team S18-G1, Livingston Spring 2018

CPSU-LIVINGSTON-S18S18G1

4 Mitglieder

15 Anleitungen geschrieben

3 Kommentare

I would advise against using a metal spudger to remove the battery itself. While working at a device repair chain in the past, a coworker of mine punctured a battery with a metal spudger and destroyed the phone. Instead, use a sturdy plastic spudger to remove the battery. Otherwise, great guide!

Derek Margheim - Antwort

I got the battery fixed but shattered my screen wish it was more informative on how to get out the screen

joshua hofer - Antwort

Would using the Anti-clamp with heat gun be better option?

Kiriakos White - Antwort

Kommentar hinzufügen

Seitenaufrufe:

Letzte 24 Stunden: 2

Letzte 7 Tage: 10

Letzte 30 Tage: 71

Insgesamt: 24,531