Einleitung
Hier wird der Austausch der Ladebuchse im Samsung Galaxy Tab 2 10.1 gezeigt.
Achtung: auf einigen Bildern wird ein Metallspudger verwendet. Benutze lieber einen starken Spudger aus Kunststoff um Schäden zu vermeiden.
Eine Übersicht über verschiedene Arten von Verbindern gibt diese Seite.
Was du brauchst
-
-
Setze das Werkzeug zwischen Glasscheibe und Rückteil rin, so dass der abgewinkelten Teil unter dem Glas ist. Hebe das Rückteil vorsichtig weg von der Scheibe.
-
Achte darauf die ganze Displayeinheit abzutrennen und nicht nur die Glasscheibe vom Display. Du musst das Werkzeug etwas tiefer einsetzen.
-
Arbeite dich rings um das ganze Gerät und trenne das Rückteil ab.
-
-
-
Entferne mit den Fingern das grüne Klebeband, welches den Akkuanschluss bedeckt.
-
-
-
Setze den Spudger zwischen die Drähte und unter den Verbinder. Hebe den schwarzen Stecker vorsichtig hoch und löse den Akkuanschluss von der Hauptplatine.
-
-
-
-
Das schwarze Kabel führt zur Ladebuchse. Der Stecker am schwarzen Kabel zur Ladebuchse ist mit einem grünen Klebeband bedeckt. Löse es mit den Fingern ab.
-
-
-
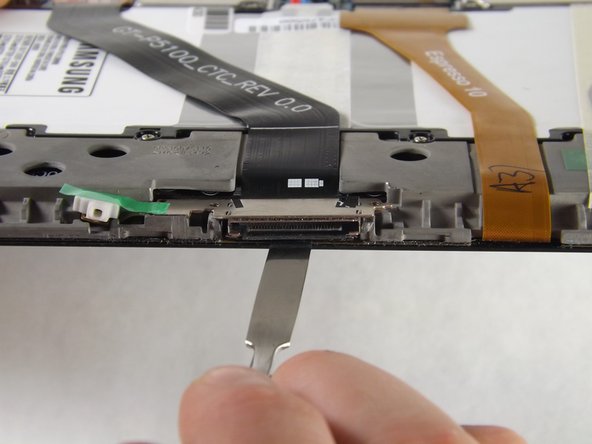
Klappe den schwarzen Sicherungsbügel am Stecker des Kabels zur Ladebuchse mit dem flachen Ende des Spudgers hoch.
-
Ziehe das Kabel heraus.
-
-
-
Drehe die beiden 3 mm Kreuzschlitzschrauben #000 heraus, welche die Ladebuchse befestigen.
-
-
-
Setze das flache Ende des Spudgers unter die Ladebuchse.
-
Achte darauf, dass du den Spudger ganz unter der Buchse entlang schiebst, damit die Klebeverbindung getrennt wird.
Where can I buy that part from
I need the charging port
-
-
-
Hebe die Ladebuchse mit dem flachen Ende des Spudgers hoch und entferne sie vom Gerät.
-


Um dein Gerät wieder zusammenzusetzen, folge den Schritten in umgekehrter Reihenfolge.
Um dein Gerät wieder zusammenzusetzen, folge den Schritten in umgekehrter Reihenfolge.
Rückgängig: Ich habe diese Anleitung nicht absolviert.
21 weitere Nutzer:innen haben diese Anleitung absolviert.
Besonderer Dank geht an diese Übersetzer:innen:
100%
VauWeh hilft uns, die Welt in Ordnung zu bringen! Wie kann ich mithelfen?
Hier starten ›
Team

Cal Poly, Team 6-26, Amido Winter 2015 Mitglied von Cal Poly, Team 6-26, Amido Winter 2015
CPSU-AMIDO-W15S6G26
5 Mitglieder
14 Anleitungen geschrieben
7 Kommentare
Dear John,
Why must one disconnet the battery in step 3 and 4, whilst that does not seem necessary to replace the cable & port for the charger only (steps 5-10), and NOT the battery....?
Regards, Frank
Does the P5100 have the same charging port as the P7500?
I always open the tablet and order the cable by part and rev number. you may order a part for a tablet and will most like be sent for a diff version.
Oscar C -
I'm having trouble after I tried replacing the charging port.
Everything for in and snapped in great except where the ribbon runs and conneconnects to the mother board. I believe i broke this plastic part, which seemed to allow the copper from the ribbon to connect with the MB.
Does anyone know where to get a replacement and what's the name of this piece? Thank you
If you are refering to step 6, the fpc connector will need to be soldered to the motherboard.
Oscar C -
Note that the headphone port protrudes into the back cover framing. Hence the rest of the back needs to be unclipped and taken off first.
Levi Howard - Antwort
I had problems getting it to separate at first. Pushing down with my thumb on the very edge of the case from the front while pushing up with my fingers from the back flexed it enough to get a very small jeweler’s screwdriver in the gap. From there I worked it until I could get the little bread wrapper plastics clips in the space. When it needed something stronger a 1 or 2 inch plastic putty knife from Walmart did the trick.
William H Bowers - Antwort
I replaced the battery and nothing no screen nothing. the batt was 3.7 V though.
The old one had 0V. I might have messed up the ribbon cables?
I put back the cover on it.
Held on the power button for 10 seconds, nothing. Held the power button and the volume up button for 10 seconds… also nothing..
I am leaving it charge for a while now. Even though if your battery is like full (3.7V measured) it should come on… but nothing..
Lets wait and see. Or this will be garbage…
xbox40489 - Antwort