Einleitung
Hier wird der Austausch der Rückkamera gezeigt.
Was du brauchst
-
-
Trenne den Bildschirm vom Rückteil indem du ein größeres Plastiköffnungswerkzeug zwischen sie setzt und aufhebelst.
-
-
-
Wenn der Bildschirm gelöst ist solltest du die Teile mit der Hand trennen können.
Peter how do I know which charging port I need thank you I don't know how else to reach you Tom Patrick mlc@earthlink.net all small case and no spaces thank you
Yikes. I began carefully prizing off the screen - but when it finally came away the connector (near the top of the screen, about 1” from the right side) got ripped, so the unit is damaged beyond repair. I think it would have been helpful if your guide had warned us about this possibility and given some advice about how to make sure it doesn’t happen. I now have a broken tablet and a brand new battery, likewise of no use to me. Pretty heartbroken - the unit had been working fine, mainstay of daily use.
For any future people repairing their tablets. DO NOT REMOVE THE SCREEN. I thought my tablet was a Tab 2, but no it was a Tab 3. No heat guns needed. I ended up cracking my screen a bit. I don’t know the extent of the damage yet, but Im probably going to get a replacement screen. You need to pop out the whole thing. Not just the front screen. The reason being that there’s a sort of metal scaffolding holding the screen and the back together. This needs to be separated to put in the new charging port.
Matt -
-
-
-
Um den Akku zu entfernen musst du zunächst z.B. mit einer Pinzette den Anschluss lösen.
-
-
-
Wenn der Anschluss gelöst ist kannst du den Akku mit den Händen herausziehen. Es kann etwas schwer gehen, weil der Akku auf der Rückseite verklebt ist.
You don't have to, just be careful with battery connector.
You have to be very careful with the battery connector. On mine, the plug was difficult to remove from the base and I ended up breaking the connections between the base and the circuit board. Maybe use the pry tool to hold the base down while easing out the plug.
I just did the same thing Hugh...does that mean my tablet is trashed? Can it be repaired?
tlibert -
-
-
-
-
Die Lautsprecher sind mit 2,9 mm Kreuzschlitzschrauben #000 befestigt. Drehe sie heraus und hebe die Lautsprecher aus dem Gerät.
-
-
-
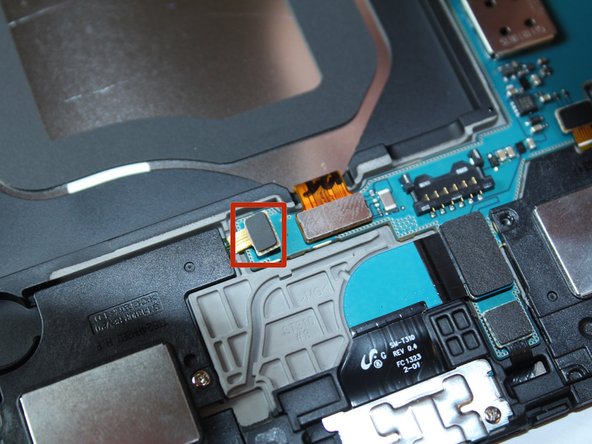
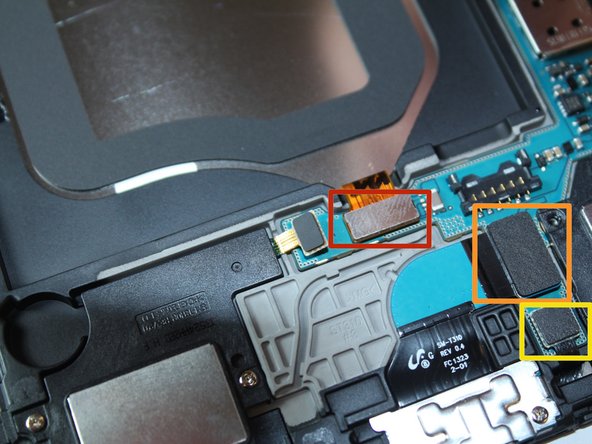
Löse mit einem Plastiköffnungswekzeug vorsichtig alle Verbinder auf der Platine.
-
-
-
Entferne die 2,9 mm Kreuzschlitzschraube # 000 über dem Akku und die drei 2,9 mm Kreuzschlitzschrauben #000 rechts vom Akku.
-
-
-
Hebe vorsichtig die Platine aus dem Gerät..
-
-
-
Drehe die Hauptplatine um damit du an den Anschluss der Rückkamera gelangst.. Hebe den Verbinder vorsichtig mit einer Pinzette aus dem Sockel und entferne die Kamera.
-


Um dein Gerät wieder zusammen zu setzen folge den Schritten in umgekehrter Reihenfolge.
Um dein Gerät wieder zusammen zu setzen folge den Schritten in umgekehrter Reihenfolge.
Rückgängig: Ich habe diese Anleitung nicht absolviert.
4 weitere Nutzer:innen haben diese Anleitung absolviert.
Besonderer Dank geht an diese Übersetzer:innen:
100%
VauWeh hilft uns, die Welt in Ordnung zu bringen! Wie kann ich mithelfen?
Hier starten ›
Team

USF Tampa, Team 4-2, Brown Fall 2014 Mitglied von USF Tampa, Team 4-2, Brown Fall 2014
USFT-BROWN-F14S4G2
3 Mitglieder
26 Anleitungen geschrieben
Ein Kommentar
That worked a treat, thanks a lot Anthony, I don’t quite know when I broke my rear camera but I suspect it’s after being dropped, unfortunatly more than once, a replacement camera was sourced from ebay and only cost £3.29 that included the postage! So all is well again now.
Here’s a link to where I bought mine, I can recommend them 100%
https://www.ebay.co.uk/itm/Genuine-Rear-...
Once again, Cheers!
Separating the back cover was the hardest part of the procedure for me (a retired electrical/software engineer). I used a large flat screwdriver blade instead of the hard plastic tool shown. Go slow all the way around the tablet and expect pops as the pieces separate. I was not able to re-connect the back cover completely, accepting a paper-thin gap about 30% around the cover, but it is secure.
Rick Nungester - Antwort