Zum Hauptinhalt wechseln

Samsung Galaxy Tab 8.9 Motherboard Replacement

Was du brauchst

  1. Samsung Galaxy Tab 8.9 Motherboard Replacement, Battery: Schritt 1, Bild 1 von 1
    • Insert a plastic opening tool between the back cover and the screen of the Samsung Galaxy Tab 8.9.

  2. Samsung Galaxy Tab 8.9 Motherboard Replacement: Schritt 2, Bild 1 von 1
    • 6 cm [2 in] away from the first plastic opening tool, insert a second plastic opening tool between the back cover and the screen.

  3. Samsung Galaxy Tab 8.9 Motherboard Replacement: Schritt 3, Bild 1 von 1
    • Slide the second plastic opening tool along the edge of the device to separate the back cover from the screen.

  4. Samsung Galaxy Tab 8.9 Motherboard Replacement: Schritt 4, Bild 1 von 1
    • Use your hands to open the back cover.

  5. Samsung Galaxy Tab 8.9 Motherboard Replacement, Remove Green Tape: Schritt 5, Bild 1 von 3 Samsung Galaxy Tab 8.9 Motherboard Replacement, Remove Green Tape: Schritt 5, Bild 2 von 3 Samsung Galaxy Tab 8.9 Motherboard Replacement, Remove Green Tape: Schritt 5, Bild 3 von 3
    • Use tweezers to peel up the green tape located on top of the two flexible ribbon cables.

  6. Samsung Galaxy Tab 8.9 Motherboard Replacement: Schritt 6, Bild 1 von 2 Samsung Galaxy Tab 8.9 Motherboard Replacement: Schritt 6, Bild 2 von 2
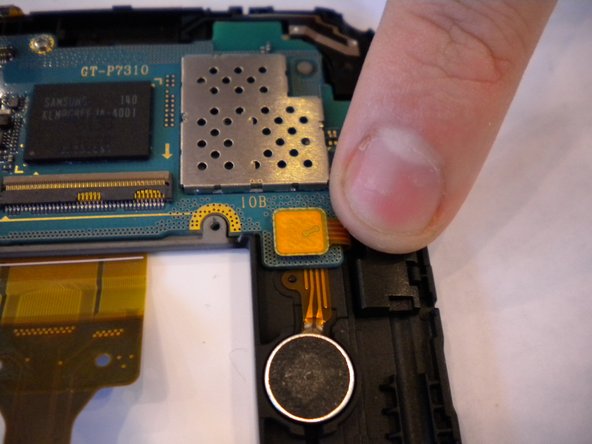
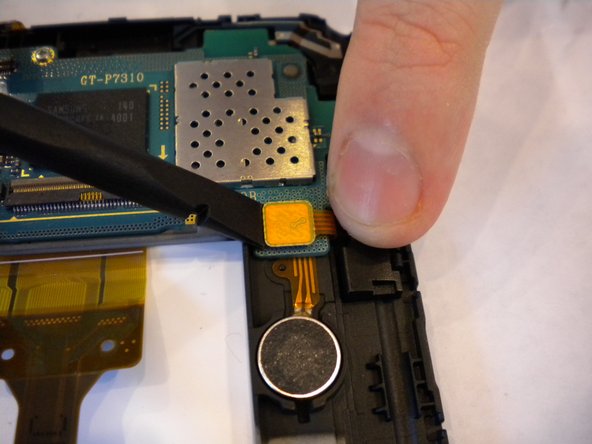
    • Insert a spudger under the orange tab.

    • Gently pry up the tab to disconnect the black flexible ribbon cable from the motherboard.

  7. Samsung Galaxy Tab 8.9 Motherboard Replacement: Schritt 7, Bild 1 von 3 Samsung Galaxy Tab 8.9 Motherboard Replacement: Schritt 7, Bild 2 von 3 Samsung Galaxy Tab 8.9 Motherboard Replacement: Schritt 7, Bild 3 von 3
    • Carefully pull out the yellow flexible ribbon cable to disconnect it from the motherboard.

  8. Samsung Galaxy Tab 8.9 Motherboard Replacement, Disconnect Battery from MotherBoard: Schritt 8, Bild 1 von 3 Samsung Galaxy Tab 8.9 Motherboard Replacement, Disconnect Battery from MotherBoard: Schritt 8, Bild 2 von 3 Samsung Galaxy Tab 8.9 Motherboard Replacement, Disconnect Battery from MotherBoard: Schritt 8, Bild 3 von 3
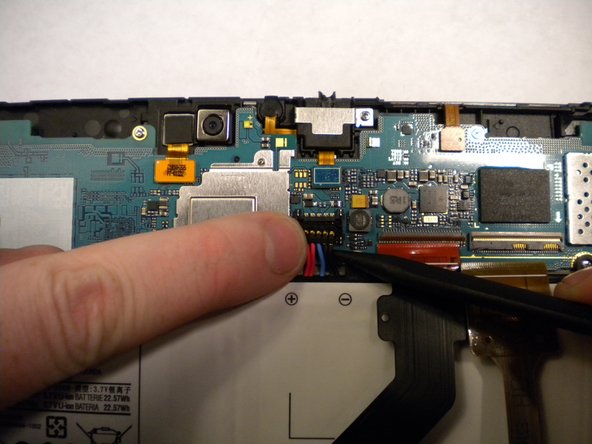
    • Insert the spudger under the red, black, and white cables.

    • Pry up and detach the battery from the motherboard.

  9. Samsung Galaxy Tab 8.9 Motherboard Replacement: Schritt 9, Bild 1 von 1
    • Use a Phillips #00 screwdriver to remove the nine 1 mm screws located around the battery.

  10. Samsung Galaxy Tab 8.9 Motherboard Replacement, Remove the Battery: Schritt 10, Bild 1 von 3 Samsung Galaxy Tab 8.9 Motherboard Replacement, Remove the Battery: Schritt 10, Bild 2 von 3 Samsung Galaxy Tab 8.9 Motherboard Replacement, Remove the Battery: Schritt 10, Bild 3 von 3
    • Use a spudger to lift up and separate the battery from its housing.

  11. Samsung Galaxy Tab 8.9 Motherboard Replacement, Motherboard: Schritt 11, Bild 1 von 3 Samsung Galaxy Tab 8.9 Motherboard Replacement, Motherboard: Schritt 11, Bild 2 von 3 Samsung Galaxy Tab 8.9 Motherboard Replacement, Motherboard: Schritt 11, Bild 3 von 3
    • Locate the motherboard and 5 connectors on it.

    • Pry up and detach the connector from the motherboard using the flat edge of the spudger.

    • Repeat for the 4 remaining connectors.

  12. Samsung Galaxy Tab 8.9 Motherboard Replacement: Schritt 12, Bild 1 von 3 Samsung Galaxy Tab 8.9 Motherboard Replacement: Schritt 12, Bild 2 von 3 Samsung Galaxy Tab 8.9 Motherboard Replacement: Schritt 12, Bild 3 von 3
    • Using the Phillips #00 screwdriver, unscrew the 3 screws (1mm) that are located near:

    • Camera

    • Power and volume buttons

    • Tilt sensor

  13. Samsung Galaxy Tab 8.9 Motherboard Replacement: Schritt 13, Bild 1 von 3 Samsung Galaxy Tab 8.9 Motherboard Replacement: Schritt 13, Bild 2 von 3 Samsung Galaxy Tab 8.9 Motherboard Replacement: Schritt 13, Bild 3 von 3
    • Using the flat edge of the spudger, pry and lift up the motherboard.

  14. Samsung Galaxy Tab 8.9 Motherboard Replacement: Schritt 14, Bild 1 von 2 Samsung Galaxy Tab 8.9 Motherboard Replacement: Schritt 14, Bild 2 von 2
    • Pull away the motherboard from the housing.

Abschluss

To reassemble your device, follow these instructions in reverse order.

4 weitere Nutzer:innen haben diese Anleitung absolviert.

Aleezee True

Mitglied seit: 09/30/14

532 Reputation

3 Anleitungen geschrieben

Team

USF Tampa, Team 11-4, Blackwell Fall 2014 Mitglied von USF Tampa, Team 11-4, Blackwell Fall 2014

USFT-BLACKWELL-F14S11G4

4 Mitglieder

10 Anleitungen geschrieben

0 Kommentare

Kommentar hinzufügen

Seitenaufrufe:

Letzte 24 Stunden: 0

Letzte 7 Tage: 0

Letzte 30 Tage: 3

Insgesamt: 2,313