Einleitung
Oft kann eine Batterie ihre Ladekapazität verlieren. Wenn sich dein Akku nicht auflädt oder dein Akku nur noch einige Stunden lang seine Funktion erfüllt, muss der er möglicherweise ausgetauscht werden. In dieser Anleitung erfährst du, wie du den Akku in deinem Gerät austauschen kannst.
Was du brauchst
-
-
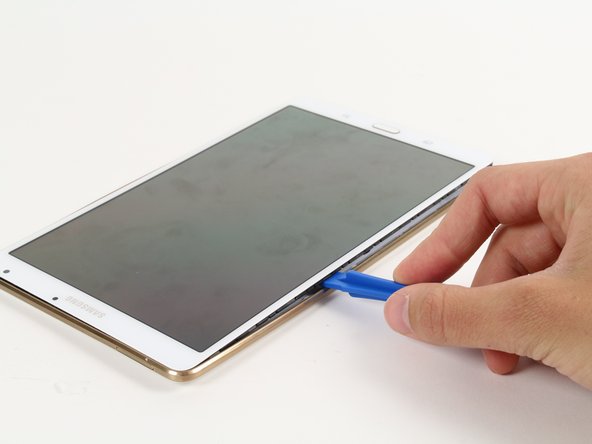
Setze das Kunststoff-Öffnungswerkzeug zwischen die Vorderseite des Displays und den Rand der hinteren Abdeckung des Geräts.
-
Bewege das Öffnungswerkzeug aus Kunststoff nach unten, bis sich zwischen dem Tablett und der hinteren Abdeckung ein Spalt bildet.
-
-
-
Schiebe das Kunststoff-Öffnungswerkzeug um den Rand des Geräts und heble vorsichtig den Bildschirm und die hintere Abdeckung auseinander.
-
-
-
-
Entferne die hintere Abdeckung, wenn die gesamte Umrandung gelöst ist.
I did some diy fixing because my tab-s came having issues. All battery connection related. Easy fix about 10 minutes but now the back cover won't sit flush and there's a large gap…idk what to do now it's infuriating there no broken tabs or connections
-
-
-
Der Akku ist normalerweise mit doppelseitigem Klebeband an den Seiten befestigt. Hebe den Akku heraus, indem du an der gefalteten weißen Lasche in der oberen rechten Ecke ziehst. Möglicherweise musst du erst den Kleber lösen, indem du mit einem dünnen und flachen Plastiköffnungswerkzeug unter den Kanten des Akkus entlangfährst.
there is adhesive under the battery that requires a fair bit of pressure to make the battery come out. Pulling on the corner of the battery pull tab is more effective than pulling halfway along and it did come out eventually. heating may help but heating a battery is never a good idea heat is going to take quite a while go get through from the screen side as there are many layers to get through before you get to the battery compartment. best bet make sure it is not cold then pull from the corner carefully
Original battery was a very snug fit in its space and the triangle pick tool helped. The replacement battery was 2mm narrower so much easier. The pull tab is strong, and needs to be strong.
-
-
-
Hebe vorsichtig den hellgrünen Stecker in der Nähe der linken unteren Ecke des Akkus hoch. Er ist mit roten, grünen und schwarzen Drähten mit dem Akku verbunden.
Lifting the old connector out was easy, fitting the new one seemed to need very careful alignment.
-


Um das Gerät wieder zusammenzusetzten, folge diesen Anweisungen in umgekehrter Reihenfolge.
Um das Gerät wieder zusammenzusetzten, folge diesen Anweisungen in umgekehrter Reihenfolge.
Rückgängig: Ich habe diese Anleitung nicht absolviert.
65 weitere Nutzer:innen haben diese Anleitung absolviert.
Besonderer Dank geht an diese Übersetzer:innen:
100%


Diese Übersetzer:innen helfen uns, die Welt zu reparieren! Wie kann ich mithelfen?
Hier starten ›
Team

Cal Poly, Team 12-15, Maness Fall 2015 Mitglied von Cal Poly, Team 12-15, Maness Fall 2015
CPSU-MANESS-F15S12G15
4 Mitglieder
12 Anleitungen geschrieben
11 Kommentare
Mine, the T320, the battery was held in place by 4 screws. Otherwise same steps.
The cover was tricky to get off, the plastic bends a bit but it took some careful force.
Thanks , Easy to understand and perform. I think the battery connector is loose from mother board. How do I fix that?
I'm sure it's a solder job to reattach the connector to the motherboard. From the picture above it looks like a PIH connector but it may be an SMT, hard to tell without physically seeing it close up. At any rate, being this is a newer device, the solder used is lead free (RoHS compliant, the motherboard should have the letters Pb inside a circle with a line through, screen printed on it) so unless you have some experience in soldering with lead free, you'll probably need to do some searching in your area for electronics repair shops (be sure to ask about their experience with lead free soldering). Lead free soldering requires more heat that can cause extensive damage to the substrate if not done properly.
-experience: 22 years electronics manufacturing and repair (3 leading global electronics manufacturers and the U.S. Navy)
Well written with precise instructions. The pictures included in these instruction for each stage of the process are clear and shoe exactly what needs to be done. What at first seems a bit of a daunting task to an amateur is a relatively easy tasks when equipped with these instructions. Thank you to the author.
On my Tab S 8.4 LTE, I had some problems with Step 4 (lifting up the battery) as there was some adhesive holding the battery down and so I was not able to lift it up just by using the folded white paper tab. In the end I managed to pry the battery loose by slowly lifting the edge near the top right corner.
Same here. It's still stuck.
Very good instructions. Also I had some problems lifting the battery due to some adhesive holding the battery down. In the first attempt I hadn’t plugged in the connector properly. When charging it said 100% but I couldn’t turn on the tablet. Plugging in the connector has to give an audible little click. Thank you to the author!
Nice job. I’ve been dreading the task and living with a weak battery out of laziness and belief that it would take me hours. Not so.
I can’t remember the name for those little plastic, and essential, tools. “Smudge?” or some word like that? I’ll ask Alexa, maybe she knows, or ask the guys (yes, and GALS) at Frys.
I have a similar problem charging a Tab Pro 8.4. I changed the battery as described in this tutorial. Before I was “playing around” with charging the old battery and found that it is charging only when give a slight pressure on a tiny plate next to the battery’s contacts. (The look inside is a bit different than in step4 picture) It looks like a small plastic cover and can be carefully lifted up to 3 mm. When lifted you see two rows of small open contacts. Depending on the pressure on the contacts it seems to work differently - (1)nothing is charging, (2) it charges with about 30…80 mA or (3) full current approx. 1.4 A.
Does anybody know how to get this working all the time in its right order? I’m asking because of the tab was not really charging already before opening it. (The charging icon looks strange then.) Maybe the back cover is not pressing these contacts together properly, what is my assumption so far. I fear that it will not getting better when closing the cover again.
Thanks in advance!
Uwe H.
Will a butter knife work?
Team Diamond (DrDiamond53) - Antwort
You could try a credit card, avoid metal tools.
Isaac Pettis -
The battery is still connected at this stage so, yes, avoid metal tools.
Once the outer frame was mostly unclipped with the opening tool, I found the ifixit triangle plastic picks useful. As well as clips around the 4 edges there are maybe 4 more clips in the centre of the back cover that are a challenge.
Make sure the display screen and logic boards and battery all come out in one bundle, just leaving a bare plastic back shell. Others have reported that if you separate the screen from the boards you’ll invariably break a ribbon cable and lose touch sensitivity.
Michael Morjanoff - Antwort