Einleitung
Hält die Ladung nicht mehr lange? Schaltet das Gerät manchmal einfach aus und lässt sich nicht mehr anschalten? Der Austausch des Akkus könnte die Probleme lösen.
Was du brauchst
-
-
Erwärme alle Nahtstellen des Geräts mit einem iFixit iOpener oder einem Heißluftgebläse, damit der Kleber rings um die Ränder des Bildschirms weich wird.
-
-
-
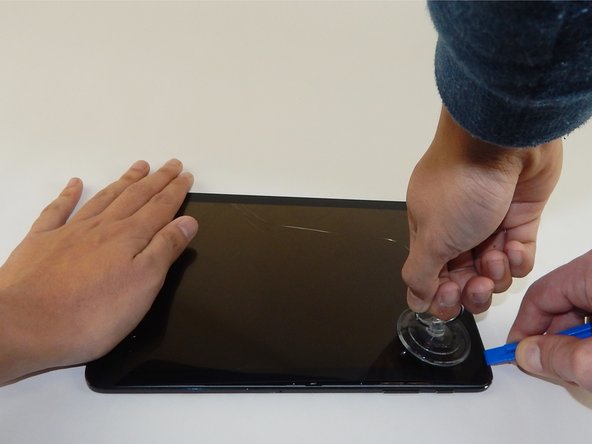
Setze das Plastiköffnungswerkzeug in den Spalt an der Seite des Tablets nahe der Ecke ein, von der aus du anfangen möchtest, den Bildschirm zu lösen.
-
Bringe einen kleinen Saugheber am Bildschirm nahe der Ecke ein, wo das Plastiköffnungswerkzeug steckt.
-
Hebe den kleinen Saugheber hoch und drücke gleichzeitig das Plastiköffnungswerkzeug nach unten, um den Bildschirm zu lösen. (Es ist gut, wenn jemand dabei das Gerät nach unten drückt, damit gut gehebelt werden kann)
The lower portion of the screen is glued to the body. The screen is unable to be completely removed.
starte oben, unten verhindert eine Nase an dem Audioanschluß das erste anheben.
start upside, downside a nose at the audio connector prevents the first lifting.
Difficile, j'ai acheté les outils nécessaires. Après avoir chauffé les côtés et essayé de les décoller, la vitre a craqué.😠
Had to use a heat gun to remove with patience and time, using a pic to "saw" into the seal, starting with the right side corners. Stopping every few seconds to reheat with heat gun. Take care on the bottom left corner, and left side. There is very little room between the edge and LCD, making it easy to stick a plastic pick or removal tool in between the LCD and front glass. The other sides have more room for prying. I nicked the bottom left corner with a prying pic, which killed the entire display :-( Good luck!
-
-
-
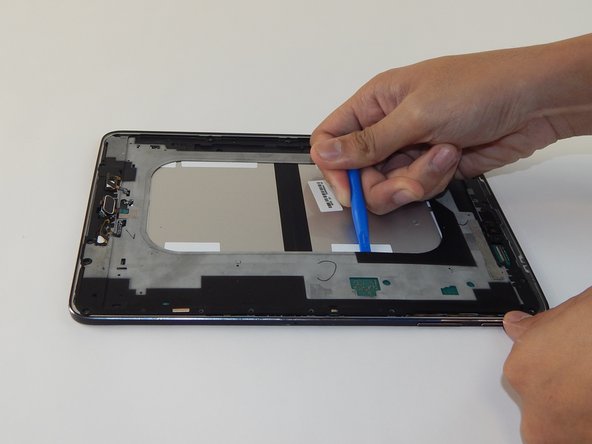
Entferne das silberfarbene Klebeband vorsichtig mit einer Pinzette.
-
-
-
-
Hebe mit dem Plastiköffnungswerkzeug vorsichtig das goldfarbige Flachbandkabel an, welches Bildschirm und Tablet verbindet, und löse es.
-
-
-
Entferne die neunzehn 3 mm Kreuzschlitzschrauben #1.
make sure to remove the 2 black screws on the frame. i fix it doesnt say to take those off. nearly damaged the frame
-
-
-
Heble die nächste Lage des Geräts mit dem Plastiköffnungswekzeug hoch.
-Zuvor unbedingt SIM Karte u microSD entfernen, sonst bleibt der Elekronikpart am Gehäuse fest und das Flachbandkabel davon kann beschädigt werden!
-Lösen des unteren Teils des Innengehäuses zum Schluss, da Ladebuchse eine Nase hat und sich erst löst wenn man es schräg nach unten abhebt.
-
-
-
Entferne die vier schwarzen 3 mm Kreuzschlitzschrauben #1, welche den Akku befestigen.
I had an issue with charging of Tab S2. When you connect it to a charger, it detects it, charges for 2 seconds, stops charging for 7-8 seconds and charges again for 2 seconds. It keeps going on in circles. It actually did charge to 100%, but it could take a whole day. I watched some videos online and there’s a way to get to it from behind. I got myself tools and a new battery, thinking it could be a battery problem. Long story short, there are flat cables reaching behind from volume buttons glued to the back cover and they use pressure from the back cover to make contact. Of course, I broke the flat cable. Most of the back cover is held in place by clips, but right next to the round metal looking “buttons” there is some extra strong glue (north of those “buttons”). Samsung didn’t want to make repairs easy and simple :/.
-
-
-
Klappe den schwarzen Sicherungsbügel am ZIF Verbinder oben links am Tablet mit einem Plastiköffnungswerkzeug hoch.
-
Der Verbinder ist dadurch entsichert worden und du kannst du das Flachbandkabel mit einer Pinzette herausziehen.
I did not find it necessary to detach this cable. The battery slid out from under it easily.
-
-
-
Löse den Akkuanschluss mit einem Plastiköffnungswerkzeug.
-
Nun kannst du den Akku mit der Hand entfernen.
I was proud of myself. It was for me as easy as this, videos online showed more difficulty . The suction cup and the jimmy was enough to open the screen. Do watch some videos online to see all the parts you could damage and on how to open the different cable connectors as they are and work different.
-


Um dein Gerät wieder zusammenzusetzen, folge den Schritten in umgekehrter Reihenfolge.
Um dein Gerät wieder zusammenzusetzen, folge den Schritten in umgekehrter Reihenfolge.
Rückgängig: Ich habe diese Anleitung nicht absolviert.
38 weitere Nutzer:innen haben diese Anleitung absolviert.
Besonderer Dank geht an diese Übersetzer:innen:
100%
VauWeh hilft uns, die Welt in Ordnung zu bringen! Wie kann ich mithelfen?
Hier starten ›
Team

USF Tampa, Team 10-4, Remmell Spring 2016 Mitglied von USF Tampa, Team 10-4, Remmell Spring 2016
USFT-REMMELL-S16S10G4
4 Mitglieder
18 Anleitungen geschrieben
17 Kommentare
Thanks for the guide. At least Apple has an out-of-warranty service for the battery replacement of $99. To replace this battery, with a dubious quality 3rd party battery as I don't think it's possible to buy a OEM Samsung battery, looks like a disaster waiting to happen, not worth the effort or time, I returned mine to Samsung after seeing this guide. I'm not suggesting Apple is a saint for the $99 replacement, but at least they will do it with an OEM battery.
Can you give a link to this apple offer for an ipad ?
after I did this, my display was dead. Nothing showed. Tablet was receiving email notifications and lights worked.. just a blank screen. What happened?
You crackedbthe oled panel
The Battery is accessible from the rear panel!
**It will damage two plastic mounts on the rear panel, however an appropriate adhesive (GO2 by loctite) or bonding tape, will fix this**
1: On the back, there is a clearly visible outline of a plastic cover.
2: Starting from the side opposite the “Little round button things” on the back, run a case opening tool slowly around the seam, popping the small plastic hooks. Do all three sides EXCEPT the side with the round button things.
3: When you get to this forth side, carefully and slowly work around the round buttons, working the case up. Then flex up the back plastic from the side you have already removed, and using a long case tool, insert it in all the way past the battery to the inside edge of the round button things and gently twist here. The tabs will pop and that side will release. Repeat for the other snap button.
4: Your back cover is now removed and you have access directly to the battery !
Do this If you are not confident lifting a $350 dollar screen…
The “two plastic mounts” are not “snap buttons.” There are two nuts mounted on the back panel, and they are attached by screws from the front. The process described in this comment will at least separate the nuts from the back panel. The back panel itself may crack, or even the nut and its attachment may remain connected to screw and a hole be formed in the back panel.
The proper procedure is to remove the display as shown here. Then remove the black screws connecting to the back panel, instead of all the silver screws in step 5. Then use an opening tool on the back panel and remove it safely to access the battery from the back side.
Unfortunately it’s hard to find the adhesive cutout needed to properly re-attach the display after removal (I only found the part GH81-13867A on eBay from Europe, about $28 with shipping). And even then it would be hard to remove the old adhesive well. We’ll likely have to reply on reuse of the old adhesive, and the display will not longer be attached perfectly as before.
Yep, this is the much easier and safer way to do it.
Thanks tek Gadget!
Many tanks tek Gadget!
Please take care of the Comment of tek gadget!!! Because the photos are horrible wrong. You MUST turn it and get of the cover of of the backside!!
tek gadget explained it very well on 31.10.2017!!
Failed to mention that if you take the screen off, there are 4 ribbon cables on the left side. If you go around with the guitar pick looking tool, you will rip right through them. Just destroyed my tablet.
Inside of my tab S2 looked slightly different (probably just a newer model) and yes there are ribbon cables to be aware of; however, I was able to replace my battery following this guide. It wan’t easy though!
Why not just remove the rear cover instead? Easy access and no chance of screwing up the screen, adding to your replacement costs?
If following the guide as listed. Step 6, you may want to pry on sides/top. For the bottom the headphone jack plug slightly juts out and its easier to slide out than work against it with fear of breaking.
Hi, ich habe hier ein samsung sm-t810 , jetzt gibt es 2 verschiedene wege. warum nicht durch die klappe hinten öffnen?
liebe Grüße
I find it way easier to remove the back panel, and break the two nuts.
The nuts are close to the snap button for the flip cover. By using the metal spudger, you can get a proper leverage close to the nuts, and get a clean break.
To do this, I detached all the clips I could, to the point where the cover is only attached by the two nuts. Then, to break a nut, I insert the spudger from the opposite side. I press the tablet against the table (not the cover...), and I lift the spudger until the nut break. Repeat with the second nut.
Then you gain access to the battery.
You can put back the cover without any glue or whatever, it already holds enough thanks to the numerous clips.
m.E. wichtig vorher die Kartenhalter für SIM und SD entfernen, sonst löst sich der Kontakt unkontrolliert bei Schritt 6.
Frank Huebner - Antwort
You make no mention of re-Glueing the screen, just applying the steps in reverse order - does that mean simply applying heat again will re-glue the components from the residue?
Robin Penny - Antwort
i replaced the battery, the sticky tape did hold up again, but if you replace the screen it depends on whate side the tape sticks to. On ine the most part of the tape stuck to the screen.
Steffen Hahn -
I know its 2020 but i cracked my screen and idk if its on or not
benjamin burkowski_FaZe - Antwort