Zum Hauptinhalt wechseln

Samsung Gear Live Motherboard Replacement

Was du brauchst

  1. Samsung Gear Live Motherboard Replacement, Lay the watch face-down: Schritt 1, Bild 1 von 1
    • Lay the watch face-down on a flat, stable surface.

  2. Samsung Gear Live Motherboard Replacement, Remove the holding pin: Schritt 2, Bild 1 von 1
    • Press the watchband down against the work surface.

    • Press the tip of a flathead screwdriver against the edge of the spring-loaded holding pin.

  3. Samsung Gear Live Motherboard Replacement, Remove the watchband: Schritt 3, Bild 1 von 1
    • With the spring-loaded pin pressed in, the watch band should release easily.

    • Gently pull the band away from the body of the watch.

    • Repeat steps 2 and 3 for the opposite side.

  4. Samsung Gear Live Motherboard Replacement, Locate the four screws: Schritt 4, Bild 1 von 1
    • With the watch laying face-down, locate the four screws. They are located on the back of the watch, at the four corners.

  5. Samsung Gear Live Motherboard Replacement, Remove the 4 screws: Schritt 5, Bild 1 von 1
    • Using a Torx-T5 screwdriver, remove each of the four 4mm screws and set them aside.

  6. Samsung Gear Live Motherboard Replacement, Pry off the back of the watch.: Schritt 6, Bild 1 von 1
    • Gently work the plastic opening tool under the top edge of the watch’s back cover.

  7. Samsung Gear Live Motherboard Replacement, Lift off the back cover: Schritt 7, Bild 1 von 2 Samsung Gear Live Motherboard Replacement, Lift off the back cover: Schritt 7, Bild 2 von 2
    • With the watch’s back cover pried loose, gently lift it away from the front half of the watch.

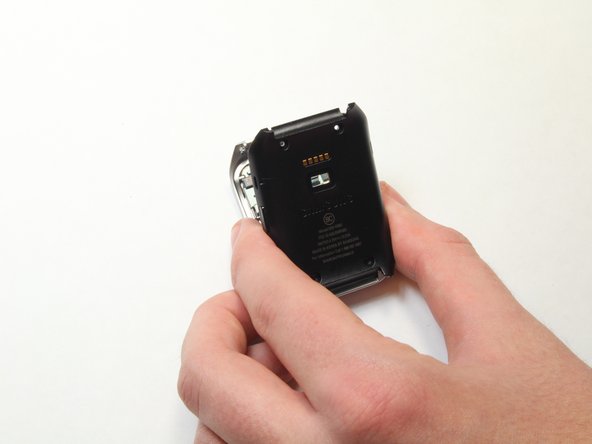
  8. Samsung Gear Live Motherboard Replacement, Set both halves of the watch aside: Schritt 8, Bild 1 von 1
    • Lay both halves of the watch body assembly face down (with internal components facing up).

  9. Samsung Gear Live Motherboard Replacement, Pry away the ribbon cable: Schritt 9, Bild 1 von 2 Samsung Gear Live Motherboard Replacement, Pry away the ribbon cable: Schritt 9, Bild 2 von 2
    • Locate the ribbon cable connector near the edge of the watch's case.

    • Using the plastic opening tool, gently pry the connector from the motherboard

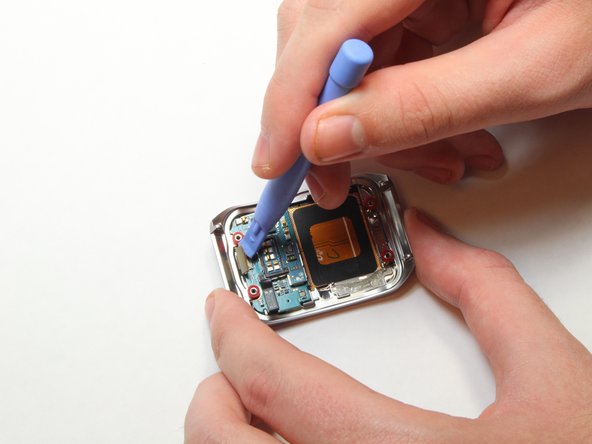
  10. Samsung Gear Live Motherboard Replacement, Remove the red spacers: Schritt 10, Bild 1 von 2 Samsung Gear Live Motherboard Replacement, Remove the red spacers: Schritt 10, Bild 2 von 2
    • Using the plastic opening tool, gently pry away the red spacers.

    • Set the spacers aside.

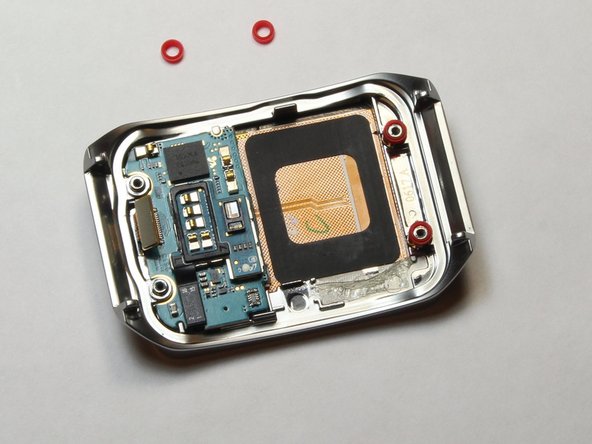
  11. Samsung Gear Live Motherboard Replacement, Pry up the motherboard: Schritt 11, Bild 1 von 3 Samsung Gear Live Motherboard Replacement, Pry up the motherboard: Schritt 11, Bild 2 von 3 Samsung Gear Live Motherboard Replacement, Pry up the motherboard: Schritt 11, Bild 3 von 3
    • Insert the end of the plastic opening tool under the motherboard.

    • Gently pry up the motherboard.

Abschluss

To reassemble your device, follow these instructions in reverse order.

2 weitere Nutzer:innen haben diese Anleitung absolviert.

Keith Cooper

Mitglied seit: 09/25/14

1.241 Reputation

6 Anleitungen geschrieben

Team

USF Tampa, Team 1-7, Brown Fall 2014 Mitglied von USF Tampa, Team 1-7, Brown Fall 2014

USFT-BROWN-F14S1G7

3 Mitglieder

6 Anleitungen geschrieben

0 Kommentare

Kommentar hinzufügen

Seitenaufrufe:

Letzte 24 Stunden: 0

Letzte 7 Tage: 0

Letzte 30 Tage: 1

Insgesamt: 837