Zum Hauptinhalt wechseln

Samsung NP-NC10-KA02US RAM Replacement

Was du brauchst

  1. Samsung NP-NC10-KA02US RAM Replacement, Battery: Schritt 1, Bild 1 von 2 Samsung NP-NC10-KA02US RAM Replacement, Battery: Schritt 1, Bild 2 von 2
    • Locate the external battery on the bottom side of the device.

    • Locate the tab on the right side of the battery.

    • Shift the tab to the left.

  2. Samsung NP-NC10-KA02US RAM Replacement: Schritt 2, Bild 1 von 1
    • Locate the tab on the left side of the device's battery.

    • Push the left tab to the right.

  3. Samsung NP-NC10-KA02US RAM Replacement: Schritt 3, Bild 1 von 1
    • Pull the battery up from the device.

  4. Samsung NP-NC10-KA02US RAM Replacement, Back Plate: Schritt 4, Bild 1 von 1
    • Locate the 14, 3.93 mm, screws that need to be removed on the base of the computer.

  5. Samsung NP-NC10-KA02US RAM Replacement: Schritt 5, Bild 1 von 1
    • Remove all 14 of the 3.93 mm screws using a PH1 screw bit.

  6. Samsung NP-NC10-KA02US RAM Replacement: Schritt 6, Bild 1 von 2 Samsung NP-NC10-KA02US RAM Replacement: Schritt 6, Bild 2 von 2
    • Using two plastic opening tools remove the back plate.

    • These plastic opening tools have a flat-head that extends as a wedge which are utilized to separate pressure fit plastic components without causing any damage to them.

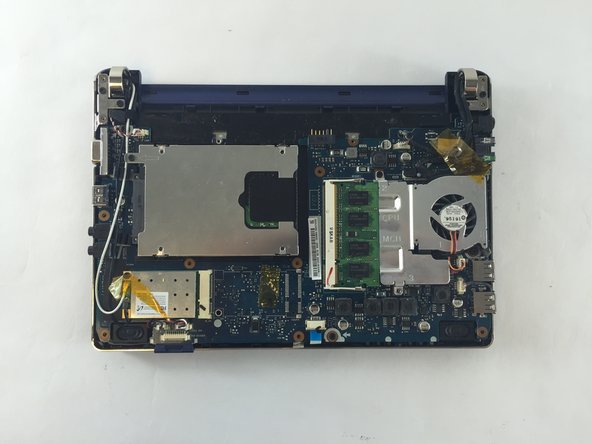
    • The back plate is now removed exposing all of the hardware components.

  7. Samsung NP-NC10-KA02US RAM Replacement, Fan: Schritt 7, Bild 1 von 2 Samsung NP-NC10-KA02US RAM Replacement, Fan: Schritt 7, Bild 2 von 2
    • Remove the three screws holding the fan using a 3.9mm screwdriver.

    • All three screws need to be removed in order to continue on to next step.

  8. Samsung NP-NC10-KA02US RAM Replacement: Schritt 8, Bild 1 von 1
    • Unplug the wires connected to the fan using a plastic opening tool.

  9. Samsung NP-NC10-KA02US RAM Replacement: Schritt 9, Bild 1 von 1
    • You are now able to carefully detach the fan from the base.

  10. Samsung NP-NC10-KA02US RAM Replacement, RAM: Schritt 10, Bild 1 von 1
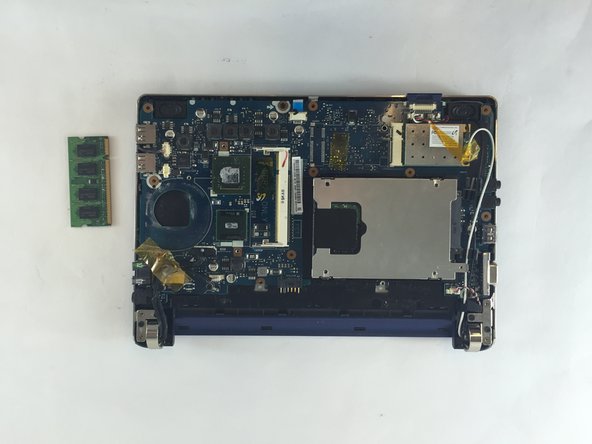
    • After detaching the fan, you are now able to remove the RAM by extending the two side bars out

    • During this process, the computer needs to be shut off. Other components could be damaged and the computer would not be able to recognize the RAM properly.

  11. Samsung NP-NC10-KA02US RAM Replacement: Schritt 11, Bild 1 von 2 Samsung NP-NC10-KA02US RAM Replacement: Schritt 11, Bild 2 von 2
    • With the bars extended, you are now able to slide the RAM off the base.

Abschluss

To reassemble your device, follow these instructions in reverse order.

3 weitere Nutzer:innen haben diese Anleitung absolviert.

JHOAN USECHE

Mitglied seit: 10/03/16

372 Reputation

2 Anleitungen geschrieben

Team

USF Tampa, Team 1-1, Sullivan Fall 2016 Mitglied von USF Tampa, Team 1-1, Sullivan Fall 2016

USFT-SULLIVAN-F16S1G1

3 Mitglieder

6 Anleitungen geschrieben

0 Kommentare

Kommentar hinzufügen

Seitenaufrufe:

Letzte 24 Stunden: 0

Letzte 7 Tage: 0

Letzte 30 Tage: 2

Insgesamt: 375