Zum Hauptinhalt wechseln

Sandisk Sansa m230 Series MP3 Player Headphone Jack Replacement

Was du brauchst

  1. Sandisk Sansa m230 Series MP3 Player Headphone Jack Replacement, Sandisk Sansa m230 Series mp3 player Teardown: Schritt 1, Bild 1 von 1
    • Remove the battery compartment cover.

    • Remove the battery.

  2. Sandisk Sansa m230 Series MP3 Player Headphone Jack Replacement: Schritt 2, Bild 1 von 1
    • Locate and remove the screw next to the battery compartment lid.

  3. Sandisk Sansa m230 Series MP3 Player Headphone Jack Replacement: Schritt 3, Bild 1 von 1
    • Locate the interlocking pegs along the seam of the device's casings.

    • Gently pry the pegs apart one at a time, working your way around the case.

    • Be careful when prying apart the pegs: they are made of plastic and may break.

  4. Sandisk Sansa m230 Series MP3 Player Headphone Jack Replacement: Schritt 4, Bild 1 von 1
    • The battery contact springs may prevent the case from separating.

    • Push the battery contact springs down through the hole in the case.

  5. Sandisk Sansa m230 Series MP3 Player Headphone Jack Replacement: Schritt 5, Bild 1 von 1
    • The casing protecting the USB and headphone jacks must be removed.

    • Locate and gently pry apart the two interlocking clips holding it in place.

    • The outer casings may now be removed and the MP3 player should separate.

  6. Sandisk Sansa m230 Series MP3 Player Headphone Jack Replacement: Schritt 6, Bild 1 von 1
    • You now have access to all components found on the inside of the device!

  7. Sandisk Sansa m230 Series MP3 Player Headphone Jack Replacement, Headphone Jack: Schritt 7, Bild 1 von 1
    • Locate the headphone jack on the motherboard.

  8. Sandisk Sansa m230 Series MP3 Player Headphone Jack Replacement: Schritt 8, Bild 1 von 1
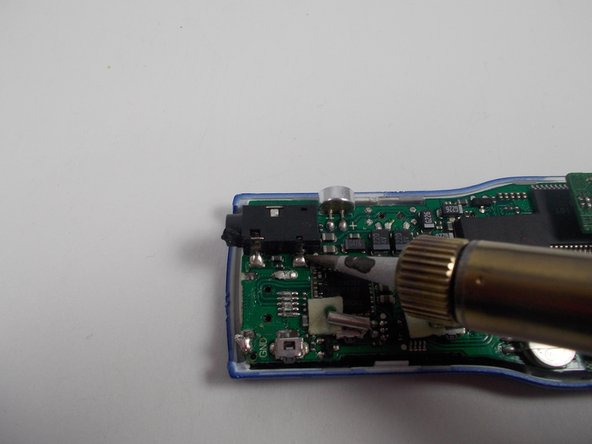
    • Ensure the hot end of the soldering iron is elevated on a metal stand when not in use to prevent burns.

    • The solder and soldering iron are very hot! Do not touch unless you are wearing appropriate protective gloves.

  9. Sandisk Sansa m230 Series MP3 Player Headphone Jack Replacement: Schritt 9, Bild 1 von 3 Sandisk Sansa m230 Series MP3 Player Headphone Jack Replacement: Schritt 9, Bild 2 von 3 Sandisk Sansa m230 Series MP3 Player Headphone Jack Replacement: Schritt 9, Bild 3 von 3
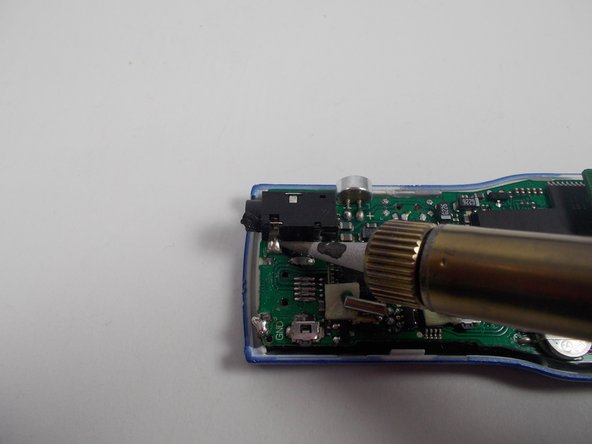
    • Use soldering iron to melt the existing solder at the three headphone jack connections.

  10. Sandisk Sansa m230 Series MP3 Player Headphone Jack Replacement: Schritt 10, Bild 1 von 1
    • Remove the faulty headphone jack from the motherboard.

  11. Sandisk Sansa m230 Series MP3 Player Headphone Jack Replacement: Schritt 11, Bild 1 von 1
    • Align the new headphone jack appropriately on the motherboard for soldering.

  12. Sandisk Sansa m230 Series MP3 Player Headphone Jack Replacement: Schritt 12, Bild 1 von 3 Sandisk Sansa m230 Series MP3 Player Headphone Jack Replacement: Schritt 12, Bild 2 von 3 Sandisk Sansa m230 Series MP3 Player Headphone Jack Replacement: Schritt 12, Bild 3 von 3
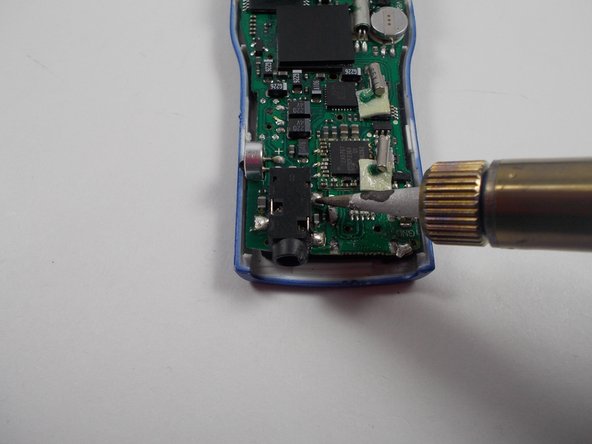
    • Use the soldering iron and solder to create three stable connections between the motherboard and the headphone jack.

    • Allow the new solder to cool and harden before reassembling the MP3 player.

Abschluss

To reassemble your device, follow these instructions in reverse order.

James Thorne

Mitglied seit: 11/05/13

638 Reputation

6 Anleitungen geschrieben

Team

UMass Dartmouth, Team 1-8, Shastany Fall 2013 Mitglied von UMass Dartmouth, Team 1-8, Shastany Fall 2013

UMASSD-SHASTANY-F13S1G8

3 Mitglieder

6 Anleitungen geschrieben

0 Kommentare

Kommentar hinzufügen

Seitenaufrufe:

Letzte 24 Stunden: 0

Letzte 7 Tage: 0

Letzte 30 Tage: 5

Insgesamt: 1,145