Diese Version enthält möglicherweise inkorrekte Änderungen. Wechsle zur letzten geprüften Version.
Was du brauchst
-
Dieser Schritt ist noch nicht übersetzt. Hilf mit, ihn zu übersetzen!
-
Remove the four 1.5mm screws on the back of the device.
-
-
Dieser Schritt ist noch nicht übersetzt. Hilf mit, ihn zu übersetzen!
-
Using a plastic opening tool, lift the metal backing from the front of the device.
-
-
Dieser Schritt ist noch nicht übersetzt. Hilf mit, ihn zu übersetzen!
-
Pull the rear panel off of the Sansa e260R.
-
-
Dieser Schritt ist noch nicht übersetzt. Hilf mit, ihn zu übersetzen!
-
Grip the bottom of the battery with your thumb and forefinger and pull it away from the device.
-
-
-
Dieser Schritt ist noch nicht übersetzt. Hilf mit, ihn zu übersetzen!
-
Remove the four 1.5mm screws on the inner casing of the device.
-
-
Dieser Schritt ist noch nicht übersetzt. Hilf mit, ihn zu übersetzen!
-
Flip the device so that the front is facing you.
-
Slide a plastic opening tool between the plastic front cover and the metal back cover of the device.
-
-
Dieser Schritt ist noch nicht übersetzt. Hilf mit, ihn zu übersetzen!
-
Pull the front cover away from the rest of the device.
-
-
Dieser Schritt ist noch nicht übersetzt. Hilf mit, ihn zu übersetzen!
-
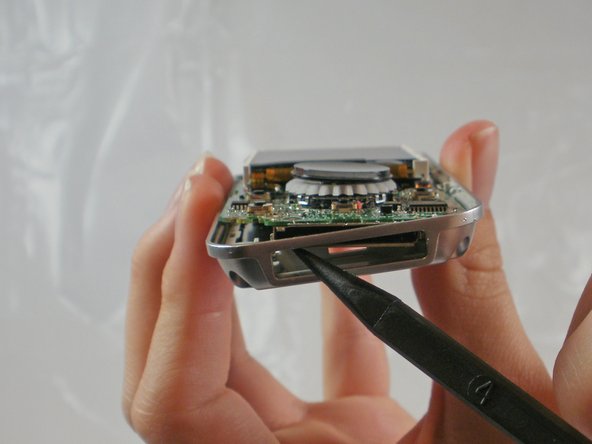
Near the charging port, pull the case away from the motherboard to create clearance to remove the motherboard.
-
Use the spudger to push the motherboard in and pop the metal edge of the charging port up and inside the plastic case.
-
-
Dieser Schritt ist noch nicht übersetzt. Hilf mit, ihn zu übersetzen!
-
Pull the bottom of the motherboard up and then out.
-
-
Dieser Schritt ist noch nicht übersetzt. Hilf mit, ihn zu übersetzen!
-
Peel the rectangle off slowly.
-
-
Dieser Schritt ist noch nicht übersetzt. Hilf mit, ihn zu übersetzen!
-
Peel the tape off about halfway so that it is no longer attached to the memory board.
-
-
Dieser Schritt ist noch nicht übersetzt. Hilf mit, ihn zu übersetzen!
-
Carefully peel the memory board away from the rest of the motherboard
-


Rückgängig: Ich habe diese Anleitung nicht absolviert.
6 weitere Nutzer:innen haben diese Anleitung absolviert.
Team

Cal Poly, Team 8-15, Maness Winter 2012 Mitglied von Cal Poly, Team 8-15, Maness Winter 2012
CPSU-MANESS-W12S8G15
5 Mitglieder
5 Anleitungen geschrieben
Ein Kommentar
thanks a million for this. i accidentally erased the boot partition, bought another one on eBay with a defective audio channel and switched the memory board: eureka! i’m happy listening to my tunes again!