Einleitung
Wenn die Maus geöffnet ist, kannst du an die Federn und das Rad selbst herankommen, wenn die Scrollwheeleinheit ausgebaut ist.
Was du brauchst
-
-
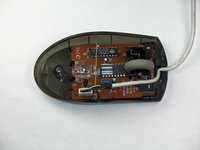
Halte die Maus so, dass der Boden zu dir zeigt.
-
Entferne die einzelne Kreuzschlitzschraube #1 an der unteren Hälfte des Bodens.
-
-
-
-
Lege die Maus mit dem Boden auf einer stabilen Arbeitsfläche ab.
-
Hebe die Abdeckung vorsichtig von der Maus ab und entferne sie.
-
-
-
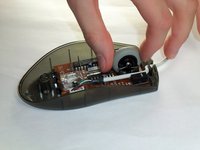
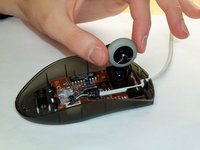
Finde das Scrollrad an der Maus.
-
Fasse das Scrollrad mit Daumen und Zeigefinger an.
-
Hebe es vorsichtig hoch und entferne es.
-


Um dein Gerät wieder zusammenzubauen, folge den Schritten in umgekehrter Reihenfolge.
Rückgängig: Ich habe diese Anleitung nicht absolviert.
6 weitere Personen haben diese Anleitung absolviert.
Besonderer Dank geht an diese Übersetzer:innen:
100%
VauWeh hilft uns, die Welt in Ordnung zu bringen! Wie kann ich mithelfen?
Hier starten ›
Team

Cal Poly, Team 5-14, Forte Winter 2013 Mitglied von Cal Poly, Team 5-14, Forte Winter 2013
CPSU-FORTE-W13S5G14
5 Mitglieder
23 Anleitungen geschrieben
2 Kommentare zur Anleitung
Thanks! The picture was what I needed after the mouse wheel parts came apart. My mouse is an M-BT58, but based on the numbers on the circuit board, there are probably several that are essentially the same. For others, here are some more details on putting things back together.
The mouse wheel has 4 parts:
1) The wheel itself (really a rubber tire and plastic rim, but they stay together)
2) Plastic carrier for the wheel
3) A spring for controlling rotation of the scroll wheel. This spring is at the top of the picture shown.
4) A spring for controlling clicks of the scroll wheel, shown near the wire leading to the computer.
Reassembly
1) Put spring (3) on carrier (2). There is a hole where the very tip of the end without the loop fits in.
2) Push the shorter axle of the mouse wheel into the carrier slightly depressing spring (3) as it is inserted. Once the wheel is inserted, the spring will stay in place.
3) Put spring (4) on the longer axle of the mouse wheel.
4) Install the carrier into the base of the mouse.