Zum Hauptinhalt wechseln

Sears Craftsman 315.109020 Motor Replacement

Was du brauchst

  1. Sears Craftsman 315.109020 Motor Replacement, Motor: Schritt 1, Bild 1 von 2 Sears Craftsman 315.109020 Motor Replacement, Motor: Schritt 1, Bild 2 von 2
    • To ensure that you do not get grease and dirt on your table or floor, lay a towel down before you begin working.

    • The grease from the circular saw can stain your towel so a dirty towel or work rag is recommended.

  2. Sears Craftsman 315.109020 Motor Replacement: Schritt 2, Bild 1 von 3 Sears Craftsman 315.109020 Motor Replacement: Schritt 2, Bild 2 von 3 Sears Craftsman 315.109020 Motor Replacement: Schritt 2, Bild 3 von 3
    • With your Phillips screwdriver, unscrew all 7 of the 20 mm screws on the handle of the circular saw.

    • There is one 25 mm screw that goes in the hole circled in red.

    • Unscrew the forked screw head

    • Lift off the top half of the handle.

  3. Sears Craftsman 315.109020 Motor Replacement: Schritt 3, Bild 1 von 2 Sears Craftsman 315.109020 Motor Replacement: Schritt 3, Bild 2 von 2
    • Unscrew the two wide-head 20 mm screws holding the remaining half of the handle to the motor.

    • Remove the remaining half of the handle from the motor by lifting it over the screw that is keeping it in place.

  4. Sears Craftsman 315.109020 Motor Replacement: Schritt 4, Bild 1 von 3 Sears Craftsman 315.109020 Motor Replacement: Schritt 4, Bild 2 von 3 Sears Craftsman 315.109020 Motor Replacement: Schritt 4, Bild 3 von 3
    • Using a crescent wrench, unscrew the hex washer head screw that is holding the blade in place.

    • Lift the blade over the internally threaded screw and pull it off of the saw.

    • If the hex washer head screw rotates but does not loosen or if the whole blade rotates as you turn your wrench, giving the wrench a quick jerk should loosen the screw.

  5. Sears Craftsman 315.109020 Motor Replacement: Schritt 5, Bild 1 von 2 Sears Craftsman 315.109020 Motor Replacement: Schritt 5, Bild 2 von 2
    • Remove the blade cover by applying upward pressure until it unsnaps from the washer.

    • The blade cover will come off easier if it is facing away from the rest of the saw (see second picture).

  6. Sears Craftsman 315.109020 Motor Replacement: Schritt 6, Bild 1 von 2 Sears Craftsman 315.109020 Motor Replacement: Schritt 6, Bild 2 von 2
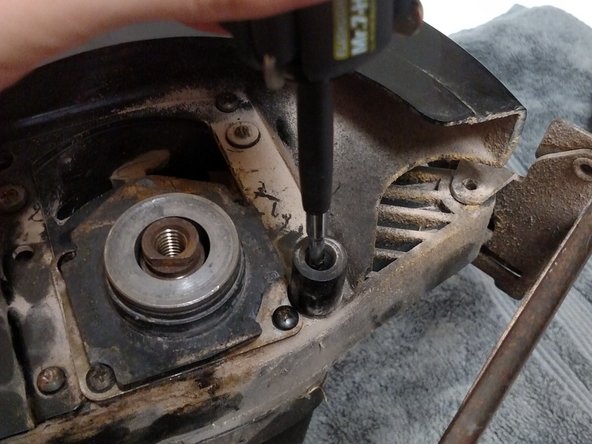
    • Unscrew the 70 mm screw that is inside the black tube (see first picture).

    • Unscrew the five screws as highlighted in the second picture. The bottom left is a 70 mm screw and the other four are 20 mm screws.

    • Unscrewing the remaining four 20 mm screws are unnecessary unless you wish to repair or replace the cogs in the saw.

  7. Sears Craftsman 315.109020 Motor Replacement: Schritt 7, Bild 1 von 2 Sears Craftsman 315.109020 Motor Replacement: Schritt 7, Bild 2 von 2
    • The motor will now be loose and you should be able to twist the motor in a counter-clockwise direction until it is able to be pulled off.

Abschluss

To reassemble your device, follow these instructions in reverse order.

Ein:e weitere:r Nutzer:in hat diese Anleitung absolviert.

Blake Avant

Mitglied seit: 09/29/15

218 Reputation

2 Anleitungen geschrieben

Team

Cal Poly, Team 17-4, Green Fall 2015 Mitglied von Cal Poly, Team 17-4, Green Fall 2015

CPSU-GREEN-F15S17G4

3 Mitglieder

4 Anleitungen geschrieben

0 Kommentare

Kommentar hinzufügen

Seitenaufrufe:

Letzte 24 Stunden: 0

Letzte 7 Tage: 1

Letzte 30 Tage: 4

Insgesamt: 367