Einleitung
Wenn sich die Walzenbürste nicht dreht, überprüfe das Rollenband, um festzustellen, ob es ausgetauscht werden muss. Das Vakuum wird zwar immer noch funktionieren, aber die Bürste dreht sich nicht, wenn der Riemen gerissen ist.
Was du brauchst
-
-
Ziehe am Griff und drücke gleichzeitig die Abhebe-Taste, um den Körper des Staubsaugers zu entfernen.
-
-
-
Drehe das Unterteil des Staubsaugers um, um zur Bodeneinheit zu gelangen.
-
Entferne die beiden kleinen Räder mit einem Metallspudger.
-
-
-
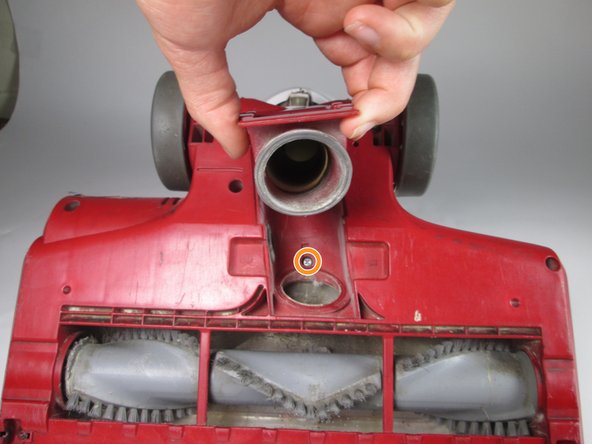
Entferne die neun 16 mm Schrauben mit dem Phillips #2 Schraubendreher. Drücke auf die seitlichen Laschen in der Mitte der Platte und ziehe sie nach oben, um die Schraube unter dem Schlauchanschluss freizulegen.
-
Entferne die beiden 13,5-mm-Schrauben mit dem Phillips #2 Schraubenzieher.
On my vacuum there are not 9 Phillips head screws. There are 2 Phillips head screws and 7 star head screws. If you have any sense at all when you put your vacuum back together you will throw away these star head screws and replace them with Phillips head screws of like thread and length.
I can’t find the right bit for these screws. What size/type are they??? Mine are not star bits…
On other vacuum models Shark uses Torx security screws. The Torx/Star screwdriver/bit needs to have a hole in the end to accommodate the pin inside the Tork screw head.
-
-
-
-
Ziehe die Abdeckung nach oben und bewege sie zur Seite.
-
Entferne den an der Basis befestigten Draht, indem du den Stift zusammendrückst und nach oben ziehst.
-
-
-
Entferne die beiden 11 mm Schrauben mit dem Phillips #2 Schraubenzieher.
-
Hebe die Walzenbürstenabdeckung an.
-
-
-
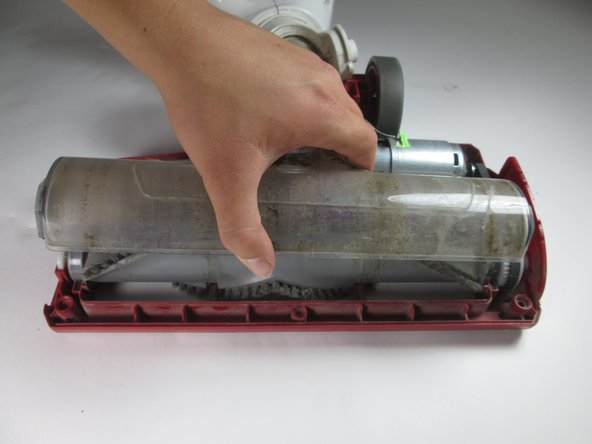
Ziehe die Walzenbürste heraus.
The photos were perfect. Followed the directions perfectly step by step and I was able to reassemble and I had no screws left over! Thanks (59yr old Nana)
I Found one on the bloody trash about an hour ago. Bleeding wankers! Throwing away a great bloody piece like it, is bloody crazy I say. !#off, it's mine now!
-
-
-
Entferne den Rollenriemen um die Walzenbürste und das Motorgetriebe herum.
-


Folge dieser Anweisung in umgekehrter Reihenfolge, um dein Gerät wieder zusammenzubauen.
Folge dieser Anweisung in umgekehrter Reihenfolge, um dein Gerät wieder zusammenzubauen.
Rückgängig: Ich habe diese Anleitung nicht absolviert.
34 weitere Nutzer:innen haben diese Anleitung absolviert.
Besonderer Dank geht an diese Übersetzer:innen:
100%


Diese Übersetzer:innen helfen uns, die Welt zu reparieren! Wie kann ich mithelfen?
Hier starten ›
Team

Cal Poly, Team 4-3, Livingston Fall 2016 Mitglied von Cal Poly, Team 4-3, Livingston Fall 2016
CPSU-LIVINGSTON-F16S4G3
4 Mitglieder
19 Anleitungen geschrieben
29 Kommentare
Very helpful re shark vacuum , thank you!
First of all, I couldn’t find the belt at 3 different stores that sell the vacuum including the place I bought it. Not on their websites either. And not on Shark’s website. Strange. I got it from Amazon. Next, I cannot get at the roller as the housing won’t come apart even with brute force. And yes, I got all the screws out and followed all instructions. It just fits so tightly, I cannot get it apart. I have a $350 vacuum, an $8 belt, and I cannot vacuum my rugs. Really disappointed as I’ve replaced belts in other vacuums in the past with no problems. And I’ve had this vacuum for a relatively short time and use it only weekly in a fairly small condo. Not sure why the belt literally disintegrated and came out in pieces.
The number of screws in the instructions is not correct. There were 11 in mine. One that is deeper and my screw driver didn't reach. But since I was just trying to clean the roller I gave up. But I'm betting you still need a screw or two out if you only took out the number listed. good luck. P.S. sometimes something you vacuum up gets in just the wrong spot and eats the belt by rubbing. The heat disintegrates it.
Depending on when you bought your vacuum, you can call shark and theyll replace the whole thing if need be. I had a 2 year time frame. It's worth a shot.
Yes, Linda is correct! You'll need a long, skinny screwdriver to take out the screw closest to the large wheels. I thought once I removed some of the screws it would loosen the piece so I could pull up one side, but it didn't budge until all the screws are out!
Hope you got it!
This works for the NV501, also, though the exact count of screws may be different. Just pay attention as you take them out; if the cover doesn't lift right off you probably missed one.
My switch is on and the belt is not broken. What else can it be and who can fix it?
The switches are on and the belt is not broken. What's wrong with it and who can fix it?
My belt is not broken, the power switch is on for the brush roller to engage and the nozzle is fully pushed in AND my roller brush STILL does NOT spin. No what? Thanks so much!
Mine was not rolling because there were threads and hairs wrapped around it that blocked it from turning.
The instructions were helpful, but I didn’t need to remove the two little screws next to the wheels. This is too much effort to remove the roller, as I need to remove threads and hairs from it often. All my previous vacuum cleaners allowed the roller to be removed without any tools!
This instrction was very hepful. I was able to take my vaccuum apart and found some large threads causing the problem. I also cleaned it while I had it apart (YUK). I was also able to find replacement belts (just in case). They can be found on Amazon ($5.95 for one belt) and Ebay ($7.95 for one belt). There is also available a pair of belts available on Walmart.com $17.95. Walmart is where the Shark is sold around here. Thanks for posting your info.
struggled with it for over an hour,never got it open. trashing this shark. wont be buying another. It took me about 3 min to change a kirby belt.
Nice directions BUT, not a #2 Phillips head but a T20-Security pinned head. What a PIA!!!! Why in the name of anything holy would they use a security head on a vacuum cleaner belt?!?!?
This is correct. 1/8” flat head screw driver will work to get screws out. This is not convenient, but still live the shark..
I had no roller function and the belt on mine was fine.
The little switch that stops the roller when the vaccum is stood up was bad. Its shown in the step 5 photo above between the left hand orange circle and the top of the photo. It has two red wires leading into it. I couldn’t get the switch to work, and I’m to lazy to find a matching replacement, so I cut the wires and joined them. That fixed my vacuum. The roller is always on when the button is pressed (it used to stop when the vacuum was stood upright), but I’m fine with that.
I hope this saves someone else some $$$
Thanks for the instructions, the disassembly was simple after looking at the steps!
I'm having the same problem! Love my vacuum but I agree w u all…it's insane at how ridiculous it is to get to the %#*@ belt!!! So VERY THANKFUL FOR THE WIRE HACK. I am a single mom w 3 teenagers and freaked out when I realized it wasn't the belt! Thank god I am mechanically inclined & for all the great ppl that take the time to write info like this! Lol
If it's not too much trouble for further assistance- if u don't mind telling me the best location where to cut and put together so I know I'm not making a bigger problem?? Either way— THANKS A TON!
These directions were 100% spot on, even showing the hidden screw under the hose access.
This made the job easy.
Contact switch that stops the roller when the vacuum is stood upright was bad on ours as well. Belt was fine and nothing wrapped around the roller. Cutting the red wires leading to/from the switch and joining them together, bypassing the switch, fixed the problem. Just be sure to use a wire nut, electrical tape and tuck loose wires safely away before re-assembly.
Is there a replacement hose for that inner hose? And how the heck do you get it out, mine is cracked
Had probs with roller giong round tried everything shark suggest no go so called customer services and guess what there are celebrating hols and please call back in January ggggrrrrr
I have been searching for a belt for a Shark Professional XL NV90 vacuum without luck. The belt seems to be pretty good, but the roller won’t go around. I cleaned everything off also. I watched a youtube video about taking the switch out and rewiring without it, but I wanted to try the belt first in case that’s what it is. So, does anyone know if any of the other models’ belts will work with this model? Or can you give me a link for a replacement belt? Thanks..
Tried removing screws with screwdriver as suggested, no luck. Got a flashlight and looks like you need something besides a screwdriver which I don't have…. ???
I agree with Deb above. I followed the instructions and took out 9 screws and I cannot get the dang thing apart. I guess there are 2 more screws once you get the white top off for a total of 11 screws. I mean, this is serious, I broke 2 fingernails!!! Seriously, I would not have bought this vacuum had I known how hard it would be to change belt.