Einleitung
When the roller brush motor breaks, the roller brush will not spin. The motor can break due to electrical malfunctions or even broken pieces inside.
Was du brauchst
-
-
Pull the handle while pressing the lift away button to remove the body of the vacuum.
-
-
-
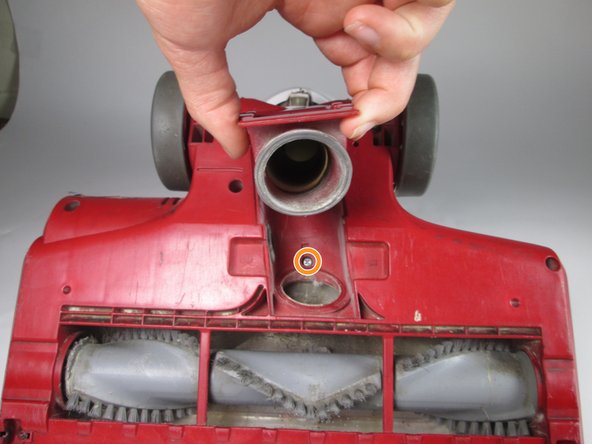
Flip the base of the vacuum over to access the bottom.
-
Remove the two small wheels with a metal spudger.
-
-
-
Remove the nine 16 mm screws using the Phillips #2 Screwdriver. Press on the side tabs in the middle of the panel and pull up to reveal the screw under the hose connection.
-
Remove the two 13.5 mm screws using the Phillips #2 Screwdriver.
On my vacuum there are not 9 Phillips head screws. There are 2 Phillips head screws and 7 star head screws. If you have any sense at all when you put your vacuum back together you will throw away these star head screws and replace them with Phillips head screws of like thread and length.
I can’t find the right bit for these screws. What size/type are they??? Mine are not star bits…
On other vacuum models Shark uses Torx security screws. The Torx/Star screwdriver/bit needs to have a hole in the end to accommodate the pin inside the Tork screw head.
-
-
-
-
Pull up on the cover and move it to the side.
-
Remove the wire attached to the base by squeezing the pin and pulling up.
-
-
-
Remove the two 11 mm screws using the Phillips #2 screwdriver.
-
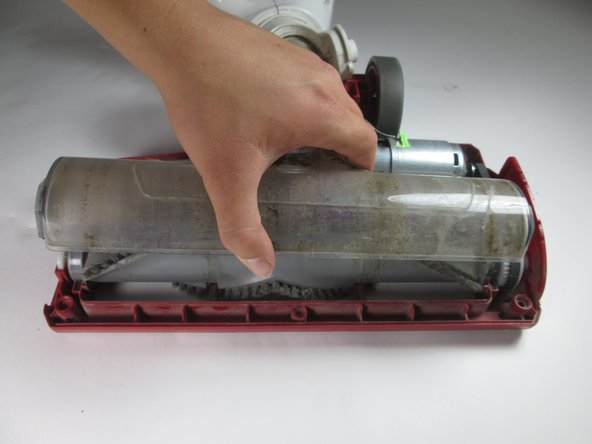
Lift the roller brush cover up.
-
-
-
Pull out the roller brush.
The photos were perfect. Followed the directions perfectly step by step and I was able to reassemble and I had no screws left over! Thanks (59yr old Nana)
I Found one on the bloody trash about an hour ago. Bleeding wankers! Throwing away a great bloody piece like it, is bloody crazy I say. !#off, it's mine now!
-
-
-
Remove the roller belt from around the roller brush and the motor gear.
-
-
-
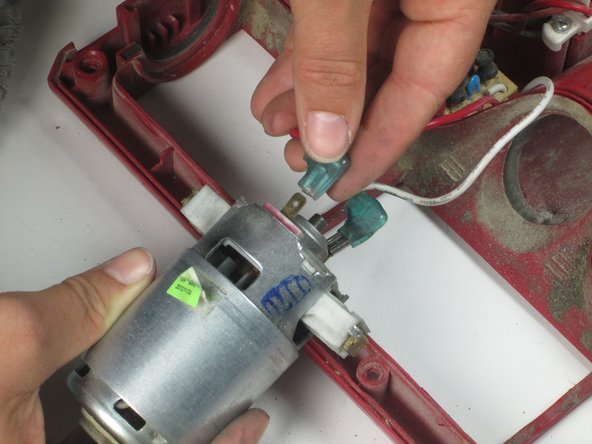
Lift the motor out of the base.
-
Disconnect the pins attaching the wires to the motor by pulling on the pins.
-


To reassemble your device, follow these instructions in reverse order.
To reassemble your device, follow these instructions in reverse order.
Rückgängig: Ich habe diese Anleitung nicht absolviert.
3 weitere Nutzer:innen haben diese Anleitung absolviert.
Team

Cal Poly, Team 4-3, Livingston Fall 2016 Mitglied von Cal Poly, Team 4-3, Livingston Fall 2016
CPSU-LIVINGSTON-F16S4G3
4 Mitglieder
19 Anleitungen geschrieben
6 Kommentare
Did you ever find a board, Dave?
Wife took all apart; quite impressed - but what voltage does beater motor run at? Gotta get a multimeter which are cheap now; Ck red and white leads to cute little motor; and if no power is reaching motor i’ll have the same question as DAVE… and also need to find part (and price of part) if it’s fhe motor …
I’m in the same boat here, Pretty sure my brush motor is going out. It keeps stuttering. I’ve cleaned everything but the filters. If cleaned filters don’t fix the problem, which I don’t know why they would, I need to buy a new brush motor. I don’t want to trash a vacuum only because of a easy to replace motor piece. If anyone finds where to buy it let us know!
Hi. I took apart per 8 step instructions hoping to find something obvious to repair ie. a belt, something pinched or mangled. I have never done anything like this before… all thumbs. Is there a step 9 or way to check roller function or motor function? Do I have to put it back together w/o the covers? 60 yr old neo-trician.