Einleitung
In this guide, we walk you through the steps of replacing a dying battery in the hub battery pack. We cover which screws to unscrew, and how to deal with the delicate circuit board inside. Finally, we show the removal of the battery from the actual hub.
Was du brauchst
-
-
With all other devices unplugged, flip the Charger Hub over so that the grey side with the screw is face up.
-
Take out the PH000 bit from your 26 Bit Driver Kit and attach it to the screw driver.
-
-
-
Once the screw has been fully loosened, pull it out and place it to the side. Be careful not to lose it!
-
-
-
Without pushing too hard, slightly lift the side of the gray bottom panel that was screwed down (the far side in this picture).
-
Do not force the whole gray bottom panel off, as it is not ready to come off yet!
-
-
-
If you are having difficulty pushing the gray bottom panel up, use the Plastic Opening Tools for assistance.
-
Do not bend the gray bottom panel completely up, as a clip is still holding it in place on the other side of the Charger Hub! Excessive bending may damage the device.
-
-
-
-
To fully remove the gray bottom panel, it must be slid out of place to release it from the internal sealing methods. Push/slide the grey bottom panel to the left given the orientation presented in the picture.
-
-
-
Fully remove the gray bottom panel. The insides of the Charger Hub should now be fully exposed as shown.
-
-
-
Using the Phillips bit PH1 from the 26 Bit Driver Kit, remove the three screws keeping the orange battery cover held in place. Keep track of these screws as well; they are not the same type of screw used to secure the bottom gray panel.
-
This part will take patience, as the PH1 bit may not fit perfectly within the threads of the screws. Applying a firm amount of pressure while unscrewing makes this process easier.
-
-
-
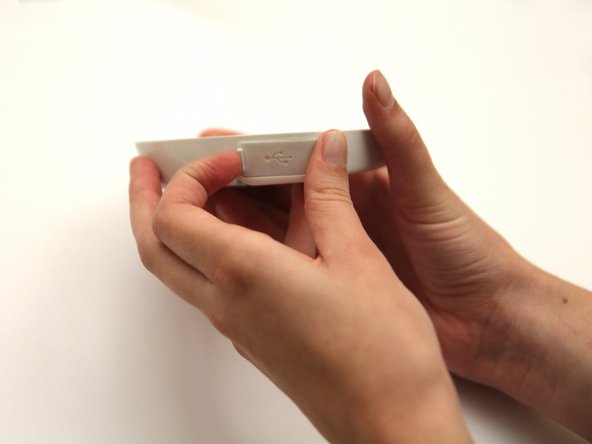
Before moving to remove the circuit board, pull out the USB port protector. This will allow the circuit board to be removed without conflict.
-
-
-
Be careful! You are working with a delicate circuit board, so you want to make sure you do not force any movements.
-
The battery is attached to the circuit board via wires, so you must remove both at once.
-
Place the Plastic Opening Tool underneath the circuit board and lift the circuit board up so that it becomes loosened.
-
-
-
This step will require some force, but be careful not to over stress the circuit board, as you do not want to break it!
-
Pull the white base of the wires out of the white port on the circuit board.
-
-
-
Now that the battery is removed, you can plug in your new Lithium Polymer Battery - 3.7V 2000mAh into the circuit board.
-
Follow the steps in reverse order using your new battery to put the device back together.
-


To reassemble your device, follow these instructions in reverse order.
To reassemble your device, follow these instructions in reverse order.
Rückgängig: Ich habe diese Anleitung nicht absolviert.
17 weitere Nutzer:innen haben diese Anleitung absolviert.
Team

Cal Poly, Team 8-21, Regan Fall 2012 Mitglied von Cal Poly, Team 8-21, Regan Fall 2012
CPSU-REGAN-F12S8G21
1 Mitglied
1 Anleitung geschrieben
Ein Kommentar
Please note that the replacement battery is available from Solio here:
http://store.solio.com/Solio-Bolt-Hub-Re...
The battery listed in the direction above does not fit the space, has the wrong connector, and is not the high-temp rated battery required for the extreme conditions of solar charging.