Einleitung
This guide includes screws removal and a procedure for removing the back case. Follow the steps precisely to avoid breaking of plastic locking tabs.
Was du brauchst
-
-
Turn the camera off by switching the power knob "OFF" text to the white selector dot.
-
-
-
Flip the camera upside-down and carefully place it on a flat surface.
-
With the lens facing outward, locate the battery compartment - indicated by a grooved latch.
-
Push the latch to the right to unlock the battery compartment. The door should flip upward.
-
-
-
With the compartment open, locate a blue tab shown with spudger
-
Press the tab to the side (to the left, or toward the camera wall). This will eject the camera battery.
-
-
-
-
Remove the two 3.5mm Phillips #00 screws that hold the back case - located inside the battery compartment.
-
-
-
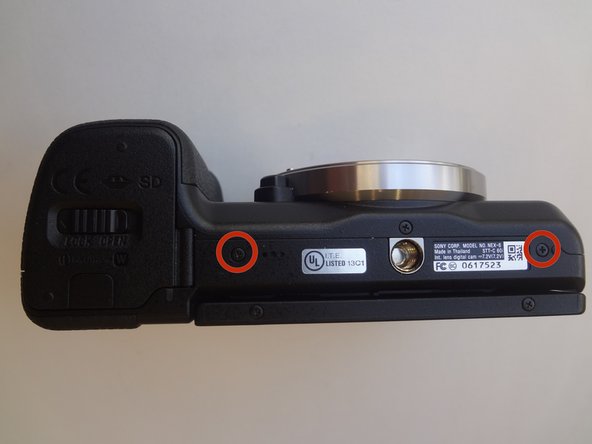
Remove the two 3.5mm Phillips #00 screws that hold the back case - located on the bottom of the camera.
-
-
-
Remove the 3.5 mm Phillips #00 screw on the side of camera - located between the charging and HDMI ports.
-
Remove the 4.0 mm Phillips #00 screw on the side of the camera - located next to the WiFi sign.
-
-
-
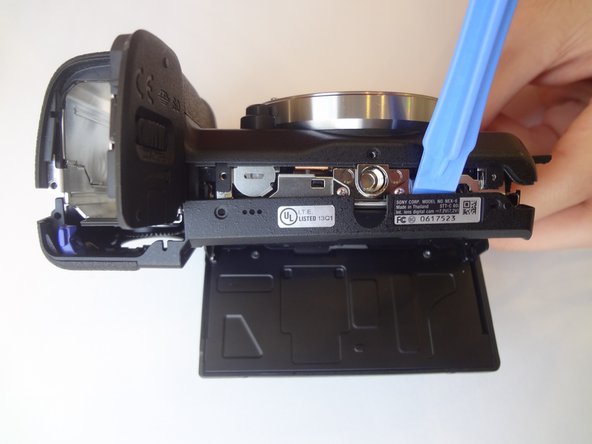
Starting with the battery compartment gently begin to separate the back case front the camera.
-
Using a plastic opening tool, separate the bottom of the back case from the camera. Then proceed by separating the sides.
-
Gently lift the back case away from the camera an slide it down to completely remove the back case.
-


To reassemble your device, follow these instructions in reverse order.
To reassemble your device, follow these instructions in reverse order.
Rückgängig: Ich habe diese Anleitung nicht absolviert.
2 weitere Personen haben diese Anleitung absolviert.
Team

USF Tampa, Team 11-2, Blackwell Winter 2015 Mitglied von USF Tampa, Team 11-2, Blackwell Winter 2015
USFT-BLACKWELL-W15S11G2
4 Mitglieder
14 Anleitungen geschrieben
3 Kommentare
At {STEP 7} you will notice the last parts to release are the flash button / record button areas. This is particularly tricky.
The flash button release seems to be attached inside, so take care. In my case I did not remove the back case completely due to this.
The corner where the record button is requires extra force to slide down / pry out.
Re-assembly : Take note of these parts.
- the PLAY button flexible circuit has a small hole which fits into a pin on the back case. It is important to align this correctly or your play & AEL button may not function.
- The eye piece has a flexible circuit on its right side which tucks behind a small tab - take care this is not dislodged or it could be damaged when re assembling.
Can you please let me know how to replace the battery door? Thank you.