Einleitung
The LCD screen is a helpful display when taking photos. A cracked or damaged screen needs replacement.
Was du brauchst
-
-
Use a Phillips head 000 screwdriver to remove the two 2.0mm screws on the bottom of the LCD screen.
-
-
-
-
Use a Phillips head 000 screwdriver to remove the two 1.0mm screws on the smaller backplate of the LCD screen that covers the ribbon cable.
-
The smaller backplate should easily come off. Put it to the side.
-
-
-
Use a Phillips head 000 screwdriver to remove the two 1.0mm screws on the bigger backplate of the LCD.
-
-
-
Using the plastic opening tool, remove the larger backplate from the LCD screen.
-
-
-
With your hands, gently remove the black plastic piece on the backside of the LCD screen.
-
-
-
Using tweezers, gently pull up and away on the ribbon cable connected to the motherboard, after which, the LCD screen should come off.
-


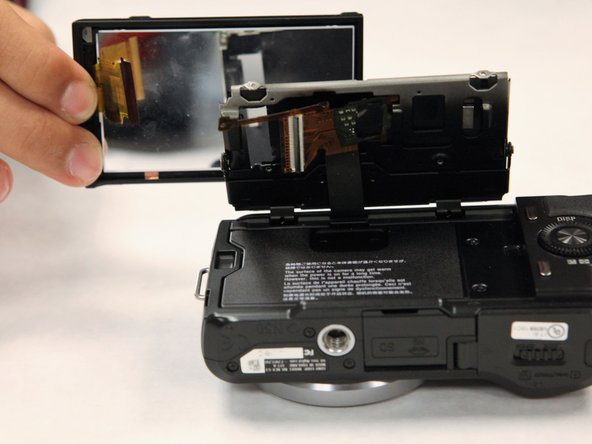
To reassemble your device, follow these instructions in reverse order. However, when installing the ribbon cable, the connector has a specific step. The connector has a tiny flap that clamps down onto the ribbon cable in order to make it secure.
To reassemble your device, follow these instructions in reverse order. However, when installing the ribbon cable, the connector has a specific step. The connector has a tiny flap that clamps down onto the ribbon cable in order to make it secure.
Rückgängig: Ich habe diese Anleitung nicht absolviert.
Ein:e weitere:r Nutzer:in hat diese Anleitung absolviert.
Team

UC Santa Barbara, Team S1-G1, Weedon Fall 2017 Mitglied von UC Santa Barbara, Team S1-G1, Weedon Fall 2017
UCSB-WEEDON-F17S1G1
3 Mitglieder
13 Anleitungen geschrieben