Zum Hauptinhalt wechseln

Sony Cyber-shot DSC-HX1 Button Assembly Replacement

Was du brauchst

  1. Sony Cyber-shot DSC-HX1 Button Assembly Replacement, Battery: Schritt 1, Bild 1 von 1
    • Make sure the surface you place the screen on is clean of debris and dust. Otherwise you risk scratching your screen.

    • Place the camera with the bottom facing you and the lens facing up.

  2. Sony Cyber-shot DSC-HX1 Button Assembly Replacement: Schritt 2, Bild 1 von 1
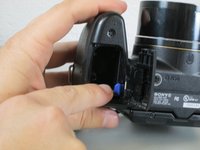
    • Push down and away from the camera to the left on the indicated indentation in the battery cover. The compartment should slide open as shown.

  3. Sony Cyber-shot DSC-HX1 Button Assembly Replacement: Schritt 3, Bild 1 von 2 Sony Cyber-shot DSC-HX1 Button Assembly Replacement: Schritt 3, Bild 2 von 2
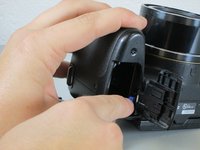
    • Push the blue tab towards the camera body to the right, while simultaneously pulling out the battery.

    • The battery is not shown here. However, normally the battery would be in the displayed compartment.

  4. Sony Cyber-shot DSC-HX1 Button Assembly Replacement, Button Assembly: Schritt 4, Bild 1 von 1
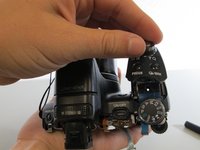
    • On the top of the inside the battery compartment, remove the #00 6.0 mm Phillips screw.

  5. Sony Cyber-shot DSC-HX1 Button Assembly Replacement: Schritt 5, Bild 1 von 2 Sony Cyber-shot DSC-HX1 Button Assembly Replacement: Schritt 5, Bild 2 von 2
    • Lift the button housing from its position on top of the camera.

Abschluss

To reassemble your device, follow these instructions in reverse order.

Ein:e weitere:r Nutzer:in hat diese Anleitung absolviert.

Team

Cal Poly, Team 17-3, Forte Spring 2015 Mitglied von Cal Poly, Team 17-3, Forte Spring 2015

CPSU-FORTE-S15S17G3

4 Mitglieder

10 Anleitungen geschrieben

0 Kommentare

Kommentar hinzufügen

Seitenaufrufe:

Letzte 24 Stunden: 0

Letzte 7 Tage: 8

Letzte 30 Tage: 13

Insgesamt: 853