Diese Version enthält möglicherweise inkorrekte Änderungen. Wechsle zur letzten geprüften Version.
Was du brauchst
-
Dieser Schritt ist noch nicht übersetzt. Hilf mit, ihn zu übersetzen!
-
Remove Memory Stick Pro from the card reader slot on the bottom of the camera.
-
Remove both batteries.
-
-
Dieser Schritt ist noch nicht übersetzt. Hilf mit, ihn zu übersetzen!
-
Remove the single visible screw from both sides of the camera.
-
Remove the two screws that are adjacent to the warning label, which is on the underside of the camera.
-
-
Dieser Schritt ist noch nicht übersetzt. Hilf mit, ihn zu übersetzen!
-
Gently remove the back cover from the camera.
-
-
-
Dieser Schritt ist noch nicht übersetzt. Hilf mit, ihn zu übersetzen!
-
Remove the two screws holding the circuit board down.
-
-
Dieser Schritt ist noch nicht übersetzt. Hilf mit, ihn zu übersetzen!
-
Detach the orange cable from the board.
-
-
Dieser Schritt ist noch nicht übersetzt. Hilf mit, ihn zu übersetzen!
-
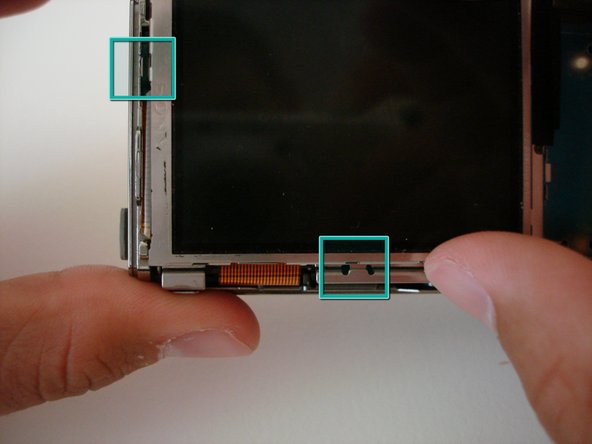
The LCD screen sits in two slots; one on the bottom, and one on the left edge.
-
Slide LCD screen from the two slots.
-
-
Dieser Schritt ist noch nicht übersetzt. Hilf mit, ihn zu übersetzen!
-
To remove the LCD screen, detach the orange cable from the board.
-
If needed, replace the LCD screen.
-


Rückgängig: Ich habe diese Anleitung nicht absolviert.
4 weitere Nutzer:innen haben diese Anleitung absolviert.
Team

Cal Poly, Team 15-50, Garner Spring 2010 Mitglied von Cal Poly, Team 15-50, Garner Spring 2010
CPSU-GARNER-S10S15G50
5 Mitglieder
12 Anleitungen geschrieben