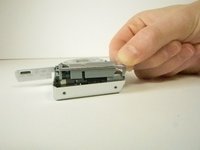
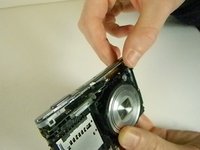
Zum Hauptinhalt wechseln

Sony Cyber-shot DSC-W730 Flash Capacitor Replacement

Was du brauchst

  1. Sony Cyber-shot DSC-W730 Flash Capacitor Replacement, Removing the Case: Schritt 1, Bild 1 von 3 Sony Cyber-shot DSC-W730 Flash Capacitor Replacement, Removing the Case: Schritt 1, Bild 2 von 3 Sony Cyber-shot DSC-W730 Flash Capacitor Replacement, Removing the Case: Schritt 1, Bild 3 von 3
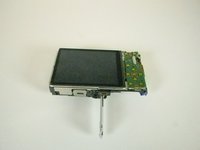
    • Open the battery/memory card door and remove the 6 screws (.35cm) with a Philips 000 screwdriver. There will be two screws on the left and right sides, and two on the bottom.

  2. Sony Cyber-shot DSC-W730 Flash Capacitor Replacement: Schritt 2, Bild 1 von 3 Sony Cyber-shot DSC-W730 Flash Capacitor Replacement: Schritt 2, Bild 2 von 3 Sony Cyber-shot DSC-W730 Flash Capacitor Replacement: Schritt 2, Bild 3 von 3
    • Take off the front part of the case with a plastic opening tool.

  3. Sony Cyber-shot DSC-W730 Flash Capacitor Replacement: Schritt 3, Bild 1 von 2 Sony Cyber-shot DSC-W730 Flash Capacitor Replacement: Schritt 3, Bild 2 von 2
    • Pull off the two silver side pieces on the left and right sides.

  4. Sony Cyber-shot DSC-W730 Flash Capacitor Replacement: Schritt 4, Bild 1 von 2 Sony Cyber-shot DSC-W730 Flash Capacitor Replacement: Schritt 4, Bild 2 von 2
    • Remove the main back piece. It should easily lift off.

  5. Sony Cyber-shot DSC-W730 Flash Capacitor Replacement: Schritt 5, Bild 1 von 3 Sony Cyber-shot DSC-W730 Flash Capacitor Replacement: Schritt 5, Bild 2 von 3 Sony Cyber-shot DSC-W730 Flash Capacitor Replacement: Schritt 5, Bild 3 von 3
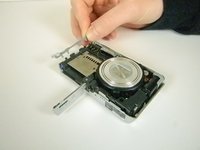
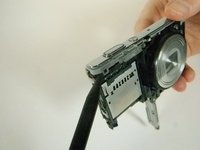
    • Unscrew the .45cm screw located on the upper right corner on the back of the camera. Once the screw is off, use the spudger and unclip the piece holding the top down on the upper left on the front of the camera. It should lift off with ease.

  6. Sony Cyber-shot DSC-W730 Flash Capacitor Replacement, Flash Capacitor: Schritt 6, Bild 1 von 3 Sony Cyber-shot DSC-W730 Flash Capacitor Replacement, Flash Capacitor: Schritt 6, Bild 2 von 3 Sony Cyber-shot DSC-W730 Flash Capacitor Replacement, Flash Capacitor: Schritt 6, Bild 3 von 3
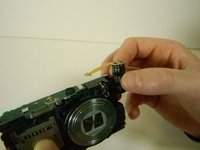
    • Lift the capacitor out and gently pull it away from the control board to unplug the ribbon attached to the side of the circuit board. Be careful not to bend the ribbon.

Abschluss

To reassemble your device, follow these instructions in reverse order.

Douglas Howe

Mitglied seit: 01/08/15

510 Reputation

4 Anleitungen geschrieben

Team

USF Tampa, Team 9-4, Blackwell Winter 2015 Mitglied von USF Tampa, Team 9-4, Blackwell Winter 2015

USFT-BLACKWELL-W15S9G4

3 Mitglieder

12 Anleitungen geschrieben

0 Kommentare

Kommentar hinzufügen

Seitenaufrufe:

Letzte 24 Stunden: 0

Letzte 7 Tage: 1

Letzte 30 Tage: 8

Insgesamt: 715