Zum Hauptinhalt wechseln

Sony Cyber-shot DSC-WX220 Lens Assembly Replacement

Was du brauchst

  1. Sony Cyber-shot DSC-WX220 Lens Assembly Replacement, Battery: Schritt 1, Bild 1 von 1
    • Slide the gray switch from lock to open position.

  2. Sony Cyber-shot DSC-WX220 Lens Assembly Replacement: Schritt 2, Bild 1 von 2 Sony Cyber-shot DSC-WX220 Lens Assembly Replacement: Schritt 2, Bild 2 von 2
    • Pull down on the blue tab to release the battery.

  3. Sony Cyber-shot DSC-WX220 Lens Assembly Replacement, Outer Case: Schritt 3, Bild 1 von 3 Sony Cyber-shot DSC-WX220 Lens Assembly Replacement, Outer Case: Schritt 3, Bild 2 von 3 Sony Cyber-shot DSC-WX220 Lens Assembly Replacement, Outer Case: Schritt 3, Bild 3 von 3
    • Use a PH00 screwdriver to remove the five 3.5 mm screws.

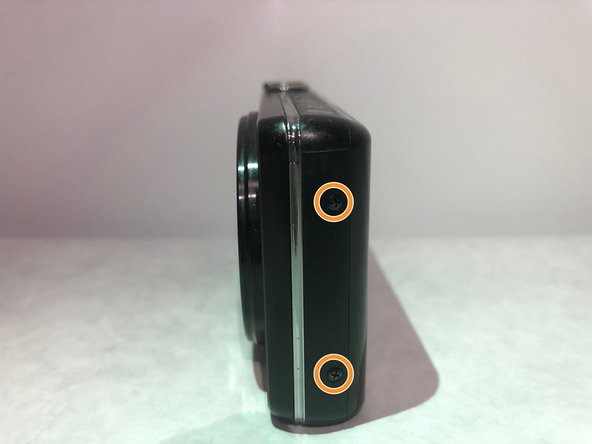
    • Use a PH00 screwdriver to remove the two 2.5 mm screws.

  4. Sony Cyber-shot DSC-WX220 Lens Assembly Replacement: Schritt 4, Bild 1 von 2 Sony Cyber-shot DSC-WX220 Lens Assembly Replacement: Schritt 4, Bild 2 von 2
    • Pry apart the case gently using a plastic opening tool.

  5. Sony Cyber-shot DSC-WX220 Lens Assembly Replacement, Lens Assembly: Schritt 5, Bild 1 von 1
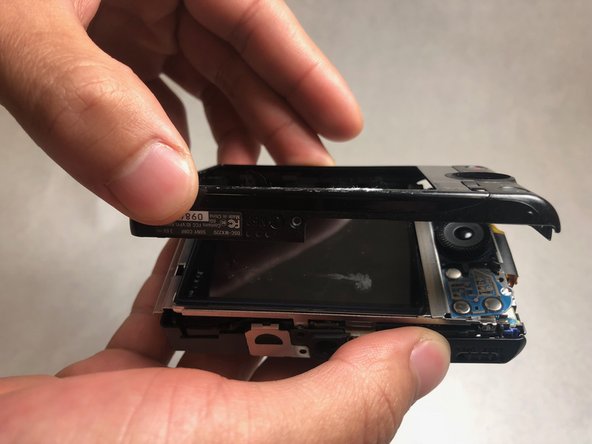
    • Pry back the panel to the right of the screen using a plastic opening tool.

  6. Sony Cyber-shot DSC-WX220 Lens Assembly Replacement: Schritt 6, Bild 1 von 1
    • Working on the left side of the screen, pry the metal panel off from the motherboard housing using a plastic opening tool.

  7. Sony Cyber-shot DSC-WX220 Lens Assembly Replacement: Schritt 7, Bild 1 von 1
    • Pull out the ZIF cable from the motherboard.

    • When removing the ZIF cable, pull it straight out to avoid damaging the cable.

  8. Sony Cyber-shot DSC-WX220 Lens Assembly Replacement: Schritt 8, Bild 1 von 2 Sony Cyber-shot DSC-WX220 Lens Assembly Replacement: Schritt 8, Bild 2 von 2
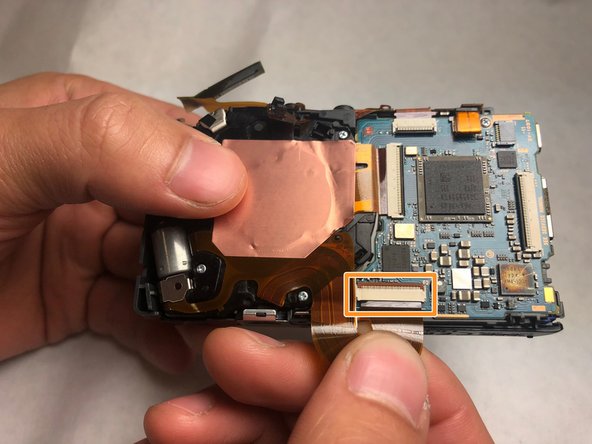
    • Unpin the ZIF cable by lifting the cable towards the top of the camera while pulling up towards yourself.

    • Pull the ZIF cable out.

  9. Sony Cyber-shot DSC-WX220 Lens Assembly Replacement: Schritt 9, Bild 1 von 1
    • Lift the lens out of the case.

    • Pull out the ZIF cable.

Abschluss

To reassemble your device, follow these instructions in reverse order.

2 weitere Nutzer:innen haben diese Anleitung absolviert.

Kate Glazer

Mitglied seit: 03/20/18

621 Reputation

5 Anleitungen geschrieben

Team

IUPUI, Team S6-G3, Baechle Spring 2018 Mitglied von IUPUI, Team S6-G3, Baechle Spring 2018

IUPUI-BAECHLE-S18S6G3

3 Mitglieder

5 Anleitungen geschrieben

0 Kommentare

Kommentar hinzufügen

Seitenaufrufe:

Letzte 24 Stunden: 0

Letzte 7 Tage: 1

Letzte 30 Tage: 14

Insgesamt: 992