Zum Hauptinhalt wechseln
Gemeinsam reparieren - Jetzt registrieren

Sony Ericsson Xperia Pro MK16A Logic Board Replacement

Was du brauchst

    1. Sony Ericsson Xperia Pro MK16A Logic Board Replacement, Taking the Back Off: Schritt 1, Bild 1 von 3 Sony Ericsson Xperia Pro MK16A Logic Board Replacement, Taking the Back Off: Schritt 1, Bild 2 von 3 Sony Ericsson Xperia Pro MK16A Logic Board Replacement, Taking the Back Off: Schritt 1, Bild 3 von 3
      • Use a plastic opening tool to get the back cover off your phone.

      • The plastic opener will work on any side, but be careful and pry gently.

      Frag FixBot

      Kommentar hinzufügen

    2. Sony Ericsson Xperia Pro MK16A Logic Board Replacement, Removing the Battery: Schritt 2, Bild 1 von 1
      • Locate the battery in your phone.

      • Find the divot below the battery.

      • Use your thumb to lift the battery out of the phone.

      Frag FixBot

      Kommentar hinzufügen

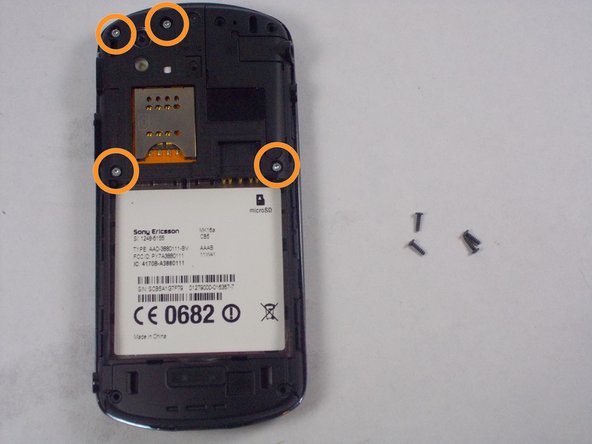
    1. Sony Ericsson Xperia Pro MK16A Logic Board Replacement, Remove Screws: Schritt 3, Bild 1 von 3 Sony Ericsson Xperia Pro MK16A Logic Board Replacement, Remove Screws: Schritt 3, Bild 2 von 3 Sony Ericsson Xperia Pro MK16A Logic Board Replacement, Remove Screws: Schritt 3, Bild 3 von 3
      • Remove the 4 black screws with the Phillips screwdriver.

      • Remove the 4 silver screws with the Torx screwdriver.

      Frag FixBot

      Kommentar hinzufügen

    2. Sony Ericsson Xperia Pro MK16A Logic Board Replacement, Remove Back Case: Schritt 4, Bild 1 von 1
      • Insert the plastic opening tool in between the two halves of the case. Pry around the phone to detach the back case.

      Frag FixBot

      Kommentar hinzufügen

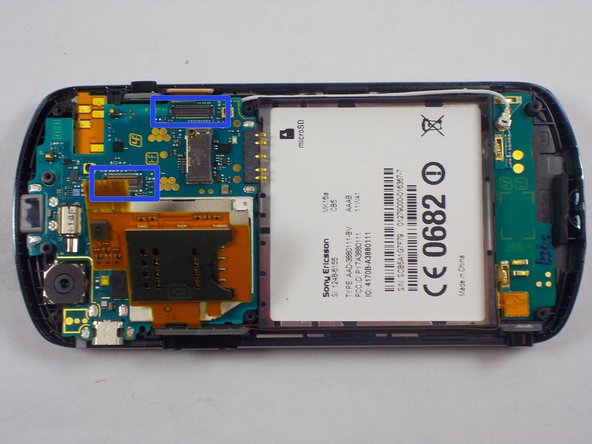
    3. Sony Ericsson Xperia Pro MK16A Logic Board Replacement, Access the Logic Board: Schritt 5, Bild 1 von 3 Sony Ericsson Xperia Pro MK16A Logic Board Replacement, Access the Logic Board: Schritt 5, Bild 2 von 3 Sony Ericsson Xperia Pro MK16A Logic Board Replacement, Access the Logic Board: Schritt 5, Bild 3 von 3
      • Remove the last screw that is connecting the logic board using the Phillips screwdriver.

      • Undo the two ribbons.

      Frag FixBot

      Kommentar hinzufügen

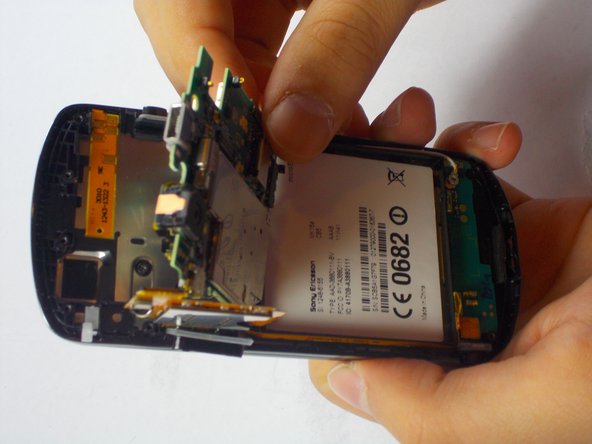
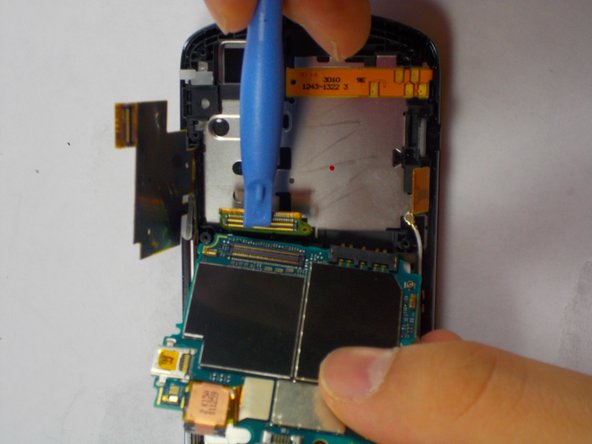
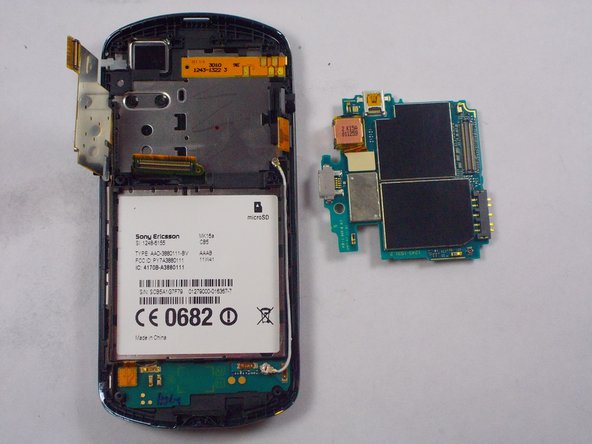
    4. Sony Ericsson Xperia Pro MK16A Logic Board Replacement, Remove the Logic Board: Schritt 6, Bild 1 von 3 Sony Ericsson Xperia Pro MK16A Logic Board Replacement, Remove the Logic Board: Schritt 6, Bild 2 von 3 Sony Ericsson Xperia Pro MK16A Logic Board Replacement, Remove the Logic Board: Schritt 6, Bild 3 von 3
      • Undo that last connector.

      Frag FixBot

      Kommentar hinzufügen

Abschluss

To reassemble your device, follow these instructions in reverse order.

Rückgängig: Ich habe diese Anleitung nicht absolviert.

Team

UMass Dartmouth, Team 6-5, Vijaybhaskar Fall 2014 Mitglied von UMass Dartmouth, Team 6-5, Vijaybhaskar Fall 2014

UMASSD-VIJAYBHASKAR-F14S6G5

3 Mitglieder

40 Anleitungen geschrieben

0 Kommentare zur Anleitung

Kommentar hinzufügen

Seitenaufrufe:

Letzte 24 Stunden: 0

Letzte 7 Tage: 5

Letzte 30 Tage: 14

Insgesamt: 1,339