Zum Hauptinhalt wechseln

Sony Ericsson Xperia X10 Touchscreen Glass Digitizer Replacement

Was du brauchst

Einführungsvideo

  1. Sony Ericsson Xperia X10 Touchscreen Glass Digitizer Replacement, Logic Board: Schritt 1, Bild 1 von 3 Sony Ericsson Xperia X10 Touchscreen Glass Digitizer Replacement, Logic Board: Schritt 1, Bild 2 von 3 Sony Ericsson Xperia X10 Touchscreen Glass Digitizer Replacement, Logic Board: Schritt 1, Bild 3 von 3
    • Switch-off the phone.

    • Remove the battery.

    • Unscrew 8x T6 Torx screws.

  2. Sony Ericsson Xperia X10 Touchscreen Glass Digitizer Replacement: Schritt 2, Bild 1 von 3 Sony Ericsson Xperia X10 Touchscreen Glass Digitizer Replacement: Schritt 2, Bild 2 von 3 Sony Ericsson Xperia X10 Touchscreen Glass Digitizer Replacement: Schritt 2, Bild 3 von 3
    • Use a Plastic Pry or other plastic tool to unhook the back housing / bezel and remove it.

    • Tip - try prying it open from the top and over to the side. It can be very tight if you are doing this for the first time. The volume rocker and camera button are not part of the housing, so try going around it.

  3. Sony Ericsson Xperia X10 Touchscreen Glass Digitizer Replacement: Schritt 3, Bild 1 von 3 Sony Ericsson Xperia X10 Touchscreen Glass Digitizer Replacement: Schritt 3, Bild 2 von 3 Sony Ericsson Xperia X10 Touchscreen Glass Digitizer Replacement: Schritt 3, Bild 3 von 3
    • Remove the Volume Up/Down and Camera buttons.

    • Unhook the SIM & SD Card reader unit and disconnect the flex cable.

  4. Sony Ericsson Xperia X10 Touchscreen Glass Digitizer Replacement: Schritt 4, Bild 1 von 3 Sony Ericsson Xperia X10 Touchscreen Glass Digitizer Replacement: Schritt 4, Bild 2 von 3 Sony Ericsson Xperia X10 Touchscreen Glass Digitizer Replacement: Schritt 4, Bild 3 von 3
    • Remove the Audio jack connector.

    • Disconnect 4x flex cables:

    • LCD Display

    • Menu buttons

    • Touchscreen

    • Earpiece, Volume & Power On buttons

    • Carefully remove the mother board.

    • Please SUBSCRIBE to my channel ツ

  5. Sony Ericsson Xperia X10 Touchscreen Glass Digitizer Replacement, Touchscreen Glass Digitizer: Schritt 5, Bild 1 von 3 Sony Ericsson Xperia X10 Touchscreen Glass Digitizer Replacement, Touchscreen Glass Digitizer: Schritt 5, Bild 2 von 3 Sony Ericsson Xperia X10 Touchscreen Glass Digitizer Replacement, Touchscreen Glass Digitizer: Schritt 5, Bild 3 von 3
    • Use a heat gun or a hairdryer and warm the glass.

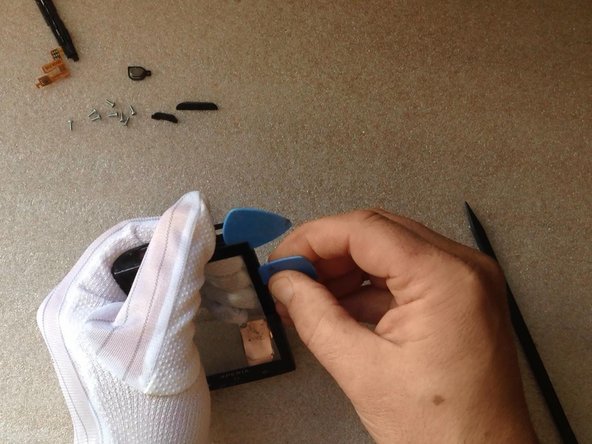
    • With a cutter carefully make a room between the glass and the frame to insert a Plastic Pick.

    • Slowly separate the Touchscreen from the frame.

  6. Sony Ericsson Xperia X10 Touchscreen Glass Digitizer Replacement: Schritt 6, Bild 1 von 2 Sony Ericsson Xperia X10 Touchscreen Glass Digitizer Replacement: Schritt 6, Bild 2 von 2
Abschluss

To reassemble your device, follow these instructions in reverse order.

Ein:e weitere:r Nutzer:in hat diese Anleitung absolviert.

ZFix

Mitglied seit: 12/09/13

191.182 Reputation

330 Anleitungen geschrieben

Team

Master Techs Mitglied von Master Techs

Community

322 Mitglieder

2.521 Anleitungen geschrieben

0 Kommentare

Kommentar hinzufügen

Seitenaufrufe:

Letzte 24 Stunden: 0

Letzte 7 Tage: 1

Letzte 30 Tage: 3

Insgesamt: 1,669