Zum Hauptinhalt wechseln

Sony Ericsson xPeria Active Speaker Replacement

Was du brauchst

  1. Sony Ericsson xPeria Active Speaker Replacement, Remove the back cover.: Schritt 1, Bild 1 von 3 Sony Ericsson xPeria Active Speaker Replacement, Remove the back cover.: Schritt 1, Bild 2 von 3 Sony Ericsson xPeria Active Speaker Replacement, Remove the back cover.: Schritt 1, Bild 3 von 3
    • Open the flaps and remove the back cover using the plastic opening device.

  2. Sony Ericsson xPeria Active Speaker Replacement, Remove inside plastic battery cover.: Schritt 2, Bild 1 von 2 Sony Ericsson xPeria Active Speaker Replacement, Remove inside plastic battery cover.: Schritt 2, Bild 2 von 2
    • Remove the battery shield with the plastic opening device.

  3. Sony Ericsson xPeria Active Speaker Replacement, Remove the battery: Schritt 3, Bild 1 von 2 Sony Ericsson xPeria Active Speaker Replacement, Remove the battery: Schritt 3, Bild 2 von 2
    • Remove the battery.

  4. Sony Ericsson xPeria Active Speaker Replacement, Unfastening The Motherboard Cover: Schritt 4, Bild 1 von 1
    • Unscrew the 5mm screws with the T5 head.

    • Unscrew the 6mm screw with the T6 head.

  5. Sony Ericsson xPeria Active Speaker Replacement, Removing The Motherboard Cover: Schritt 5, Bild 1 von 2 Sony Ericsson xPeria Active Speaker Replacement, Removing The Motherboard Cover: Schritt 5, Bild 2 von 2
    • Remove the black cover with the plastic opening tool.

    • Remove the headphone jack from its slot.

  6. Sony Ericsson xPeria Active Speaker Replacement, Speaker: Schritt 6, Bild 1 von 2 Sony Ericsson xPeria Active Speaker Replacement, Speaker: Schritt 6, Bild 2 von 2
    • Carefully pry the power cable away from the motherboard.

  7. Sony Ericsson xPeria Active Speaker Replacement: Schritt 7, Bild 1 von 1
    • Pry the motherboard out of the case.

  8. Sony Ericsson xPeria Active Speaker Replacement: Schritt 8, Bild 1 von 1
    • Remove the power cable from the backside of the motherboard.

  9. Sony Ericsson xPeria Active Speaker Replacement: Schritt 9, Bild 1 von 1
    • The speaker can be seen in the top middle area on the reverse of the screen.

  10. Sony Ericsson xPeria Active Speaker Replacement: Schritt 10, Bild 1 von 1
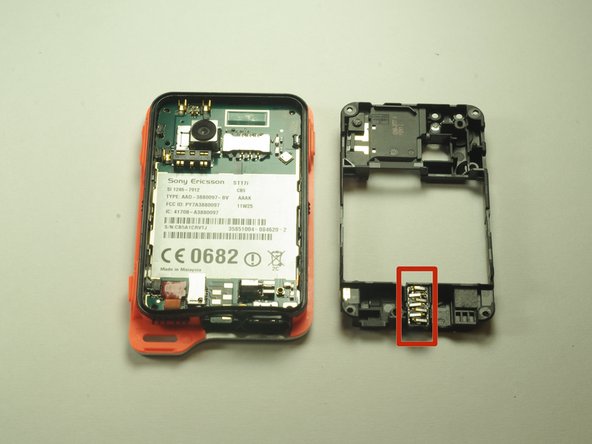
    • Use the plastic opening tool to carefully pry the speaker away from the phone.

Abschluss

To reassemble your device, follow these instructions in reverse order.

2 weitere Nutzer:innen haben diese Anleitung absolviert.

Daniel

Mitglied seit: 10/13/14

437 Reputation

2 Anleitungen geschrieben

Team

USF Tampa, Team 14-5, Leahy Fall 2014 Mitglied von USF Tampa, Team 14-5, Leahy Fall 2014

USFT-LEAHY-F14S14G5

3 Mitglieder

5 Anleitungen geschrieben

0 Kommentare

Kommentar hinzufügen

Seitenaufrufe:

Letzte 24 Stunden: 1

Letzte 7 Tage: 1

Letzte 30 Tage: 3

Insgesamt: 851