Zum Hauptinhalt wechseln

Sony Handycam DCR-DVD103 Laser Disc Replacement

Was du brauchst

  1. Sony Handycam DCR-DVD103 Laser Disc Replacement, Battery: Schritt 1, Bild 1 von 1
    • Images do not show the camera's battery.

    • On the back of the camera beneath the viewfinder, locate the battery pack.

    • Press the small button.

    • Slide the switch forward.

  2. Sony Handycam DCR-DVD103 Laser Disc Replacement: Schritt 2, Bild 1 von 1
    • Remove the battery from the camera.

    • To reinsert the battery, slide the battery into the camera.

  3. Sony Handycam DCR-DVD103 Laser Disc Replacement, Outer Cover: Schritt 3, Bild 1 von 1
    • Using a #00 Phillips screwdriver, remove the six 4.5 mm screws from the camera's bottom.

  4. Sony Handycam DCR-DVD103 Laser Disc Replacement: Schritt 4, Bild 1 von 2 Sony Handycam DCR-DVD103 Laser Disc Replacement: Schritt 4, Bild 2 von 2
    • Remove the three 4.5 mm screws beneath the battery.

    • Remove the 2.9 mm screw from the right corner.

    • Remove the two 4.5 mm screws from the battery's right wall.

    • Images do not show the battery.

  5. Sony Handycam DCR-DVD103 Laser Disc Replacement: Schritt 5, Bild 1 von 1
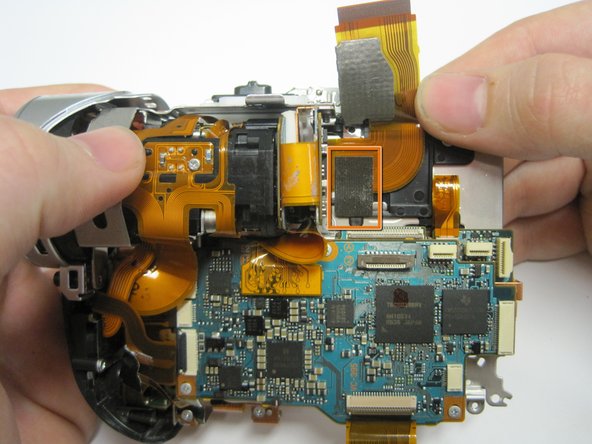
    • Remove the 4.5 mm screw under the output flap on the front of the camera below the lens.

  6. Sony Handycam DCR-DVD103 Laser Disc Replacement: Schritt 6, Bild 1 von 2 Sony Handycam DCR-DVD103 Laser Disc Replacement: Schritt 6, Bild 2 von 2
    • Remove the two 4.5 mm screws at the top of the camera.

    • Remove the 4.5 mm screw from the disk side of the camera (next to the lens).

  7. Sony Handycam DCR-DVD103 Laser Disc Replacement: Schritt 7, Bild 1 von 2 Sony Handycam DCR-DVD103 Laser Disc Replacement: Schritt 7, Bild 2 von 2
    • Extend the gray viewfinder, then gently remove the black plastic casing.

    • Caution: Plastic pieces are fragile.

  8. Sony Handycam DCR-DVD103 Laser Disc Replacement: Schritt 8, Bild 1 von 1
    • Remove the two 2.9 mm screws under the black plastic casing.

  9. Sony Handycam DCR-DVD103 Laser Disc Replacement: Schritt 9, Bild 1 von 1
    • Gently pull apart the outer silver case and screen.

    • Remove the copper wire strip to detach the case from the camera.

  10. Sony Handycam DCR-DVD103 Laser Disc Replacement, Laser Disc: Schritt 10, Bild 1 von 3 Sony Handycam DCR-DVD103 Laser Disc Replacement, Laser Disc: Schritt 10, Bild 2 von 3 Sony Handycam DCR-DVD103 Laser Disc Replacement, Laser Disc: Schritt 10, Bild 3 von 3
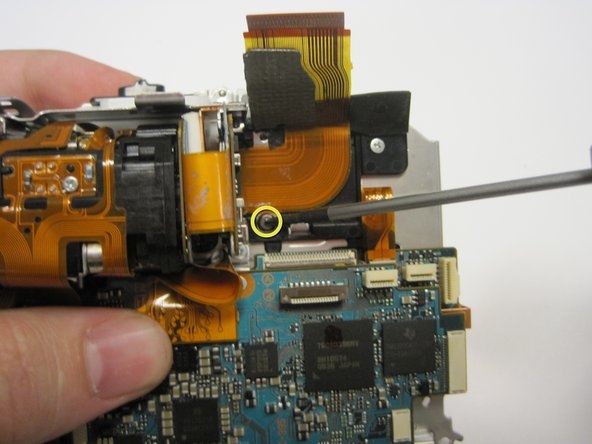
    • Remove (1) 2.9mm screw from under the eye piece.

    • Remove (1) 2.9mm screw from above the eye piece.

    • Remove (4) copper strips from bellow the eye piece.

    • Pull off the eye piece assembly.

  11. Sony Handycam DCR-DVD103 Laser Disc Replacement: Schritt 11, Bild 1 von 1
    • Pull off back cover. Caution: Be careful not to tear any copper strips in the process.

    • Remove (4) copper strips in order to pull off eye piece.

  12. Sony Handycam DCR-DVD103 Laser Disc Replacement: Schritt 12, Bild 1 von 1
    • Remove (4) 3.6mm wide head screws on the laser reader.

    • Note: There are rubber rings around screws that easily fall off.

  13. Sony Handycam DCR-DVD103 Laser Disc Replacement: Schritt 13, Bild 1 von 3 Sony Handycam DCR-DVD103 Laser Disc Replacement: Schritt 13, Bild 2 von 3 Sony Handycam DCR-DVD103 Laser Disc Replacement: Schritt 13, Bild 3 von 3
    • Unplug copper strip and lift up.

    • Pull off tape over 2.3mm screw.

    • Remove (1) 2.3mm screw from under the tape.

  14. Sony Handycam DCR-DVD103 Laser Disc Replacement: Schritt 14, Bild 1 von 2 Sony Handycam DCR-DVD103 Laser Disc Replacement: Schritt 14, Bild 2 von 2
    • Pull the copper strip, marked by the red rectangle, through the hole behind it, marked with the yellow rectangle.

  15. Sony Handycam DCR-DVD103 Laser Disc Replacement: Schritt 15, Bild 1 von 3 Sony Handycam DCR-DVD103 Laser Disc Replacement: Schritt 15, Bild 2 von 3 Sony Handycam DCR-DVD103 Laser Disc Replacement: Schritt 15, Bild 3 von 3
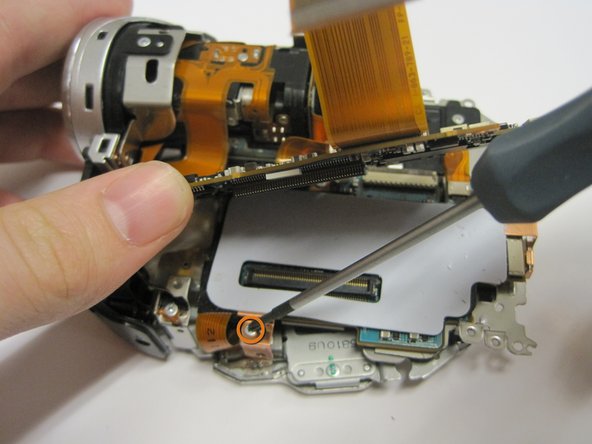
    • Remove (3) 2.9mm screws from top circuit board.

    • Note: Circuit board will resist trying to be pulled off so pull it off with care but still firmly.

    • Lift up circuit board and remove (1) 2.9mm screw underneath.

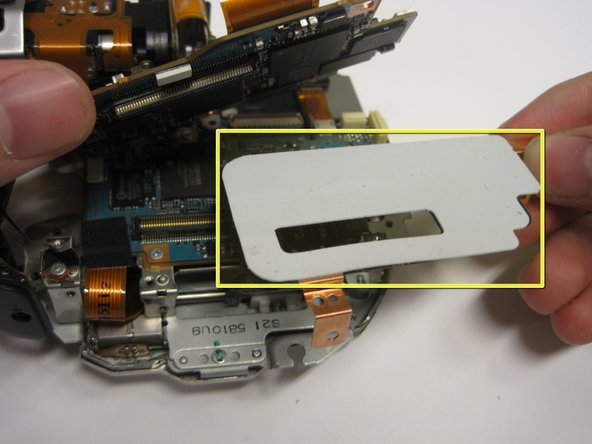
    • Pull out copper plate with rubber insulator on it.

  16. Sony Handycam DCR-DVD103 Laser Disc Replacement: Schritt 16, Bild 1 von 3 Sony Handycam DCR-DVD103 Laser Disc Replacement: Schritt 16, Bild 2 von 3 Sony Handycam DCR-DVD103 Laser Disc Replacement: Schritt 16, Bild 3 von 3
    • Remove tape over copper strip in the bottom left corner and pull out copper strip.

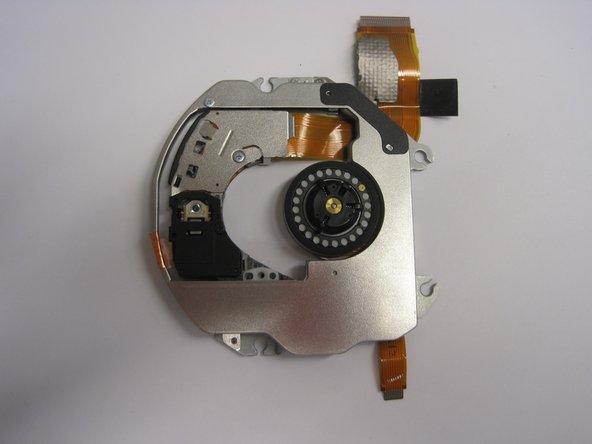
    • Remove laser reader assembly.

Abschluss

To reassemble your device, follow these instructions in reverse order.

Ein:e weitere:r Nutzer:in hat diese Anleitung absolviert.

Lauren

Mitglied seit: 01/05/11

253 Reputation

2 Anleitungen geschrieben

Team

Cal Poly, Team 7-44, Regan Winter 2011 Mitglied von Cal Poly, Team 7-44, Regan Winter 2011

CPSU-REGAN-W11S7G44

5 Mitglieder

10 Anleitungen geschrieben

0 Kommentare

Kommentar hinzufügen

Seitenaufrufe:

Letzte 24 Stunden: 0

Letzte 7 Tage: 2

Letzte 30 Tage: 22

Insgesamt: 3,423