Zum Hauptinhalt wechseln

Sony Handycam HDR-XR500V Door Replacement

Was du brauchst

  1. Sony Handycam HDR-XR500V Door Replacement, Opening LCD screen: Schritt 1, Bild 1 von 2 Sony Handycam HDR-XR500V Door Replacement, Opening LCD screen: Schritt 1, Bild 2 von 2
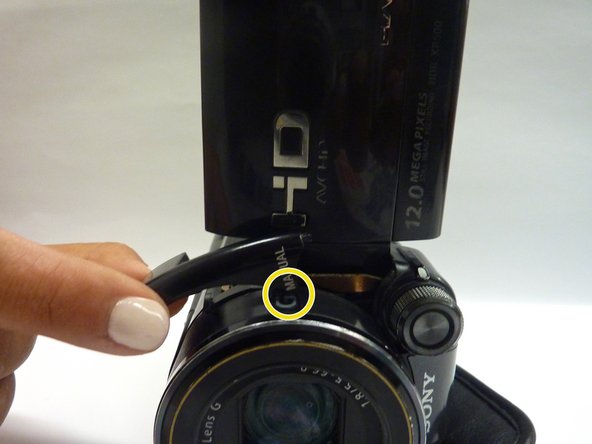
    • Pull on tab away from the camera by applying pressure with index finger.

  2. Sony Handycam HDR-XR500V Door Replacement: Schritt 2, Bild 1 von 1
    • Next, remove the three 3 screws shown with the red markers.

  3. Sony Handycam HDR-XR500V Door Replacement: Schritt 3, Bild 1 von 3 Sony Handycam HDR-XR500V Door Replacement: Schritt 3, Bild 2 von 3 Sony Handycam HDR-XR500V Door Replacement: Schritt 3, Bild 3 von 3
    • Place the camera on a flat service, so that the strap is downward and the lens is facing you.

    • First, lift up the connector.

    • Then pull it back.

    • Remove the connector from the device.

  4. Sony Handycam HDR-XR500V Door Replacement: Schritt 4, Bild 1 von 2 Sony Handycam HDR-XR500V Door Replacement: Schritt 4, Bild 2 von 2
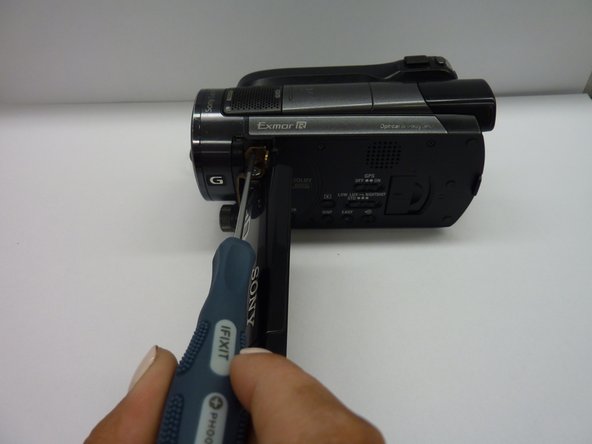
    • Position the camera so that the screen tab is pointing towards you.

    • Twist the tab clockwise one notch.

    • Remove the single screw.

  5. Sony Handycam HDR-XR500V Door Replacement: Schritt 5, Bild 1 von 1
    • Remove the two screws on the control board.

  6. Sony Handycam HDR-XR500V Door Replacement: Schritt 6, Bild 1 von 2 Sony Handycam HDR-XR500V Door Replacement: Schritt 6, Bild 2 von 2
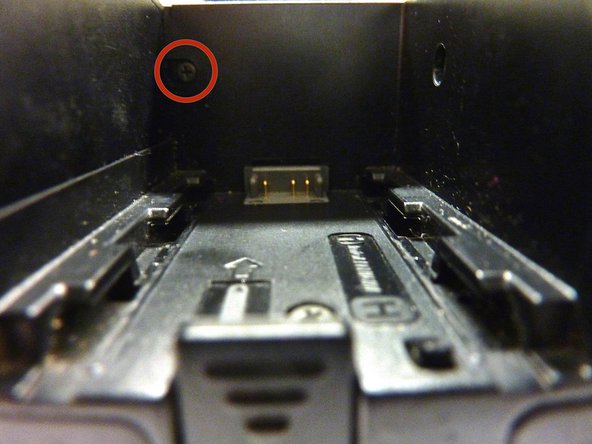
    • Place the camera so that the lens is facing downward and the battery compartment is facing towards you.

    • Remove the single screw.

  7. Sony Handycam HDR-XR500V Door Replacement: Schritt 7, Bild 1 von 1
    • Lay the device on its side so it is resting on the strap and the bottom of the camera is facing you.

    • Remove the five screws.

  8. Sony Handycam HDR-XR500V Door Replacement: Schritt 8, Bild 1 von 1
    • Close the LCD screen door.

    • Turn the camera to the eye piece and battery compartment is facing you.

  9. Sony Handycam HDR-XR500V Door Replacement: Schritt 9, Bild 1 von 1
    • Pull the entire cabinet panel away from camera.

  10. Sony Handycam HDR-XR500V Door Replacement: Schritt 10, Bild 1 von 1
    • You have disassembled the cabinet door and got to the speakers.

    • Do not try to pry off the entire door, it can remain slightly attached.

Abschluss

Your door will now be disassembled in order to replace parts inside and these steps in reverse order will also help you put the door back together

Amber Han

Mitglied seit: 09/09/14

113 Reputation

1 Anleitung geschrieben

Team

CSU Fullerton, Team 2-5, Bruce Fall 2014 Mitglied von CSU Fullerton, Team 2-5, Bruce Fall 2014

CSUF-BRUCE-F14S2G5

4 Mitglieder

2 Anleitungen geschrieben

0 Kommentare

Kommentar hinzufügen

Seitenaufrufe:

Letzte 24 Stunden: 1

Letzte 7 Tage: 1

Letzte 30 Tage: 4

Insgesamt: 802