Zum Hauptinhalt wechseln
Gemeinsam reparieren - Jetzt registrieren

Sony M-430 Microcassette-Corder Mechanism Deck Replacement

Was du brauchst

    1. Sony M-430 Microcassette-Corder Mechanism Deck Replacement, Cassette Lid: Schritt 1, Bild 1 von 3 Sony M-430 Microcassette-Corder Mechanism Deck Replacement, Cassette Lid: Schritt 1, Bild 2 von 3 Sony M-430 Microcassette-Corder Mechanism Deck Replacement, Cassette Lid: Schritt 1, Bild 3 von 3
      • Using a spudger, apply pressure towards the back corner of the cassette compartment to the plastic tab directly behind the gold cone.

      • Pushing the tab allows the hinge to be separated from the body of the device.

      • The third picture shows the what the tab looks like when the device is disassembled, and illustrates the direction to apply pressure.

      Frag FixBot

      Kommentar hinzufügen

    2. Sony M-430 Microcassette-Corder Mechanism Deck Replacement: Schritt 2, Bild 1 von 2 Sony M-430 Microcassette-Corder Mechanism Deck Replacement: Schritt 2, Bild 2 von 2
      • Next, use a plastic opening tool to pull the metal latch towards the speaker.

      • The latch should be clear of the slot in the cassette lid.

      • Be careful not to bend the latch too far, as it may warp.

      Frag FixBot

      Kommentar hinzufügen

    3. Sony M-430 Microcassette-Corder Mechanism Deck Replacement: Schritt 3, Bild 1 von 1
      • Carefully lift the cassette lid, making sure the tab and latch are free from connection.

      Frag FixBot

      Kommentar hinzufügen

    1. Sony M-430 Microcassette-Corder Mechanism Deck Replacement, Battery: Schritt 4, Bild 1 von 1
      • Find the arrow on the battery cover on the back of the device.

      • While pressing down on the arrow, slide the cover towards the bottom of the recorder until it clicks.

      Frag FixBot

      Kommentar hinzufügen

    2. Sony M-430 Microcassette-Corder Mechanism Deck Replacement: Schritt 5, Bild 1 von 2 Sony M-430 Microcassette-Corder Mechanism Deck Replacement: Schritt 5, Bild 2 von 2
      • Lift the cover and remove the batteries.

      Frag FixBot

      Kommentar hinzufügen

    1. Sony M-430 Microcassette-Corder Mechanism Deck Replacement, Back Cover: Schritt 6, Bild 1 von 2 Sony M-430 Microcassette-Corder Mechanism Deck Replacement, Back Cover: Schritt 6, Bild 2 von 2
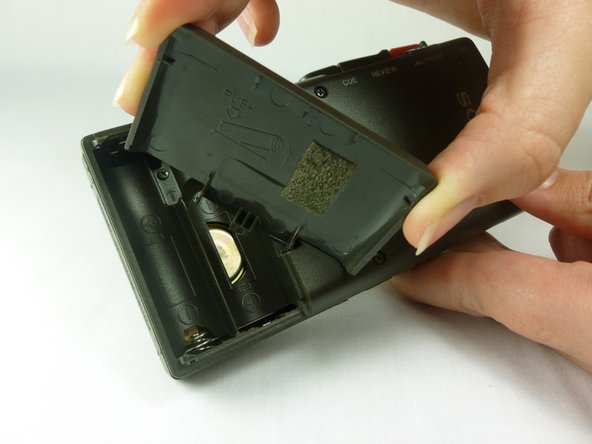
      • Remove the battery cover by first tilting it so it is at a right angle with the rest of the device.

      • Next, twist it to the side as shown in the second picture. The lid should simply snap off.

      • Potential for device damage: be careful not to apply too much force, as the lid may break.

      Frag FixBot

      Kommentar hinzufügen

    2. Sony M-430 Microcassette-Corder Mechanism Deck Replacement: Schritt 7, Bild 1 von 2 Sony M-430 Microcassette-Corder Mechanism Deck Replacement: Schritt 7, Bild 2 von 2
      • Use a #00 Phillips head screwdriver to remove the four (1.7x16 mm) screws from the back case.

      • Next, use the same screwdriver to unscrew the (1.7X5 mm) screw, which is located inside the battery compartment.

      Frag FixBot

      Kommentar hinzufügen

    3. Sony M-430 Microcassette-Corder Mechanism Deck Replacement: Schritt 8, Bild 1 von 1
      • Use a spudger to push in the two tabs located on the bottom of the device.

      • It works best to push the tabs at an upward angle (towards the top of the battery compartment). It may take a decent amount of force in order to push in the tabs.

      Frag FixBot

      Kommentar hinzufügen

    4. Sony M-430 Microcassette-Corder Mechanism Deck Replacement: Schritt 9, Bild 1 von 1
      • With a firm grip on the larger half, remove the back cover by lifting first on the battery area.

      • The back cover should lift cleanly off.

      Frag FixBot

      Kommentar hinzufügen

    1. Sony M-430 Microcassette-Corder Mechanism Deck Replacement, Motherboard: Schritt 10, Bild 1 von 2 Sony M-430 Microcassette-Corder Mechanism Deck Replacement, Motherboard: Schritt 10, Bild 2 von 2
      In diesem Schritt verwendetes Werkzeug:
      Tweezers
      $4.99
      • Using tweezers, pull upward on the black tape which secures the wires.

      • Removing this tape allows you to move the wires out of the way for the next step.

      Frag FixBot

      Kommentar hinzufügen

    2. Sony M-430 Microcassette-Corder Mechanism Deck Replacement: Schritt 11, Bild 1 von 2 Sony M-430 Microcassette-Corder Mechanism Deck Replacement: Schritt 11, Bild 2 von 2
      • Desolder all wires connecting components to the motherboard.

      • Be careful to not melt the solder points together.

      • A red wire and a blue wire connect the motor to the motherboard.

      • Two black wires connect the speaker to the motherboard.

      • A red wire and a black wire connect the microphone to the motherboard.

      Frag FixBot

      Kommentar hinzufügen

    3. Sony M-430 Microcassette-Corder Mechanism Deck Replacement: Schritt 12, Bild 1 von 1
      • After desoldering the microphone connections, pull the microphone straight out from the device and set aside.

      • Be careful not to tear the wires off of the microphone.

      • Removing the microphone gives you access to the green ribbon cable that connects to the mechanism deck.

      Frag FixBot

      Kommentar hinzufügen

    4. Sony M-430 Microcassette-Corder Mechanism Deck Replacement: Schritt 13, Bild 1 von 2 Sony M-430 Microcassette-Corder Mechanism Deck Replacement: Schritt 13, Bild 2 von 2
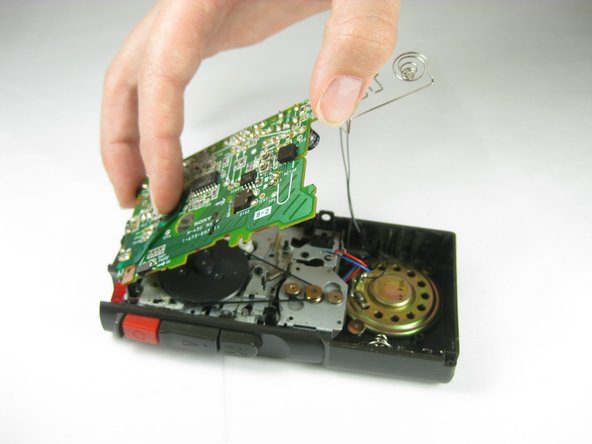
      • Desolder the 4 connections of the green ribbon cable.

      • Pull upward on the green ribbon cable to separate it from the motherboard.

      • Be careful when pulling up the film as it may tear.

      Frag FixBot

      Kommentar hinzufügen

    5. Sony M-430 Microcassette-Corder Mechanism Deck Replacement: Schritt 14, Bild 1 von 1
      • Using a #00 Phillips screwdriver, remove the two 1.4x3 mm screws securing the motherboard.

      Frag FixBot

      Kommentar hinzufügen

    6. Sony M-430 Microcassette-Corder Mechanism Deck Replacement: Schritt 15, Bild 1 von 1
      • If the replacement motherboard does not have the wire battery terminals attached, desolder the two battery connections on the motherboard.

      • Leave the wire battery terminals in place.

      • If the replacement motherboard has battery terminals attached, the connections do not need to be desoldered.

      Frag FixBot

      Kommentar hinzufügen

    7. Sony M-430 Microcassette-Corder Mechanism Deck Replacement: Schritt 16, Bild 1 von 1
      • To remove the battery terminals, use a prying tool to push the lip of the metal wire towards the motherboard.

      • Lift up on the wire while the small lip is depressed and slide the wire terminals out of the plastic guides.

      • Be careful not to bend the wire terminals.

      Frag FixBot

      Kommentar hinzufügen

    8. Sony M-430 Microcassette-Corder Mechanism Deck Replacement: Schritt 17, Bild 1 von 2 Sony M-430 Microcassette-Corder Mechanism Deck Replacement: Schritt 17, Bild 2 von 2
      • Verify all of the connections have been desoldered and the screws removed.

      • Lift the motherboard upward to remove it from the microcassette-corder.

      Frag FixBot

      Kommentar hinzufügen

    1. Sony M-430 Microcassette-Corder Mechanism Deck Replacement, Mechanism Deck: Schritt 18, Bild 1 von 3 Sony M-430 Microcassette-Corder Mechanism Deck Replacement, Mechanism Deck: Schritt 18, Bild 2 von 3 Sony M-430 Microcassette-Corder Mechanism Deck Replacement, Mechanism Deck: Schritt 18, Bild 3 von 3
      • First, remove the buttons from the mechanism deck so that you can remove it from the case.

      • Find the tabs on each button.

      • Push the tab with a spudger away from the metal connection.

      • Pull button away from the mechanism deck to remove it.

      Frag FixBot

      Kommentar hinzufügen

    2. Sony M-430 Microcassette-Corder Mechanism Deck Replacement: Schritt 19, Bild 1 von 1
      • Remove the mechanism deck by lifting the tab as shown.

      Frag FixBot

      Kommentar hinzufügen

Abschluss

To reassemble your device, follow these instructions in reverse order.

Rückgängig: Ich habe diese Anleitung nicht absolviert.

8 weitere Personen haben diese Anleitung absolviert.

Stephen

Mitglied seit: 01/21/12

236 Reputation

2 Anleitungen geschrieben

Team

Cal Poly, Team 10-34, Amido Winter 2012 Mitglied von Cal Poly, Team 10-34, Amido Winter 2012

CPSU-AMIDO-W12S10G34

4 Mitglieder

56 Anleitungen geschrieben

3 Kommentare zur Anleitung

I have to replace the capstan wheel of the driving mechanism. where do I get the above part? its Part NO. and app cost please. Thank you

Char.jp - Antwort Teilen

I have cassettes, but recorder is not functioning for want of the capstan wheel of driving mechanism. Can you please help me with information

Char.jp - Antwort Teilen

I would greatly appreciate receiving some info regarding where to get parts or a full mechanism deck replacement for Sony M-607V microcassette recorder. Also if it is possible to get a Service Manual with exploded views.

Thanks in advance for any help.

Hermann

Hermann Hugo Holbut Arroyo - Antwort Teilen

Kommentar hinzufügen

Seitenaufrufe:

Letzte 24 Stunden: 2

Letzte 7 Tage: 19

Letzte 30 Tage: 85

Insgesamt: 7,777