Zum Hauptinhalt wechseln
Gemeinsam reparieren - Jetzt registrieren

Sony M-430 Microcassette-Corder Microphone Replacement

Was du brauchst

    1. Sony M-430 Microcassette-Corder Microphone Replacement, Battery: Schritt 1, Bild 1 von 1
      • Find the arrow on the battery cover on the back of the device.

      • While pressing down on the arrow, slide the cover towards the bottom of the recorder until it clicks.

      Frag FixBot

      Kommentar hinzufügen

    2. Sony M-430 Microcassette-Corder Microphone Replacement: Schritt 2, Bild 1 von 2 Sony M-430 Microcassette-Corder Microphone Replacement: Schritt 2, Bild 2 von 2
      • Lift the cover and remove the batteries.

      Frag FixBot

      Kommentar hinzufügen

    1. Sony M-430 Microcassette-Corder Microphone Replacement, Back Cover: Schritt 3, Bild 1 von 2 Sony M-430 Microcassette-Corder Microphone Replacement, Back Cover: Schritt 3, Bild 2 von 2
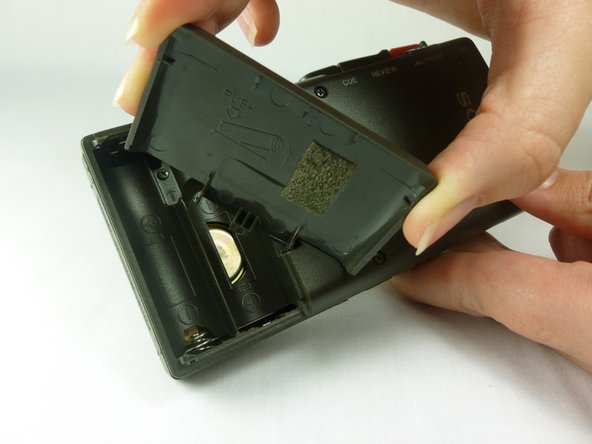
      • Remove the battery cover by first tilting it so it is at a right angle with the rest of the device.

      • Next, twist it to the side as shown in the second picture. The lid should simply snap off.

      • Potential for device damage: be careful not to apply too much force, as the lid may break.

      Frag FixBot

      Kommentar hinzufügen

    2. Sony M-430 Microcassette-Corder Microphone Replacement: Schritt 4, Bild 1 von 2 Sony M-430 Microcassette-Corder Microphone Replacement: Schritt 4, Bild 2 von 2
      • Use a #00 Phillips head screwdriver to remove the four (1.7x16 mm) screws from the back case.

      • Next, use the same screwdriver to unscrew the (1.7X5 mm) screw, which is located inside the battery compartment.

      Frag FixBot

      Kommentar hinzufügen

    3. Sony M-430 Microcassette-Corder Microphone Replacement: Schritt 5, Bild 1 von 1
      • Use a spudger to push in the two tabs located on the bottom of the device.

      • It works best to push the tabs at an upward angle (towards the top of the battery compartment). It may take a decent amount of force in order to push in the tabs.

      Frag FixBot

      Kommentar hinzufügen

    4. Sony M-430 Microcassette-Corder Microphone Replacement: Schritt 6, Bild 1 von 1
      • With a firm grip on the larger half, remove the back cover by lifting first on the battery area.

      • The back cover should lift cleanly off.

      Frag FixBot

      Kommentar hinzufügen

    1. Sony M-430 Microcassette-Corder Microphone Replacement, Microphone: Schritt 7, Bild 1 von 1
      • The microphone is the silver circular part above the buttons on your device.

      • A black and a red wire connect the microphone to the motherboard as shown in the bottom left of the picture.

      Frag FixBot

      Kommentar hinzufügen

    2. Sony M-430 Microcassette-Corder Microphone Replacement: Schritt 8, Bild 1 von 1
      In diesem Schritt verwendetes Werkzeug:
      Tweezers
      $4.99
      • The wires are held down with a piece of black tape.

      • Remove the tape with a pair of tweezers.

      • Potential for device damage: try not to pull the wires, as they might tear loose from their soldering connections

      Frag FixBot

      Kommentar hinzufügen

    3. Sony M-430 Microcassette-Corder Microphone Replacement: Schritt 9, Bild 1 von 1
      • Desolder the two connections between the wires and the motherboard. Make sure that the two solder points do not melt together.

      Frag FixBot

      Kommentar hinzufügen

    4. Sony M-430 Microcassette-Corder Microphone Replacement: Schritt 10, Bild 1 von 1
      • Now that the wires are disconnected from the motherboard, you can simply pull the mic out, away from the top of the device.

      • Potential for device damage: be careful to not detach the mic from its wires, as the connection between the wire and the mic itself is delicate.

      Frag FixBot

      Kommentar hinzufügen

Abschluss

To reassemble your device, follow these instructions in reverse order.

Rückgängig: Ich habe diese Anleitung nicht absolviert.

Team

Cal Poly, Team 10-34, Amido Winter 2012 Mitglied von Cal Poly, Team 10-34, Amido Winter 2012

CPSU-AMIDO-W12S10G34

4 Mitglieder

35 Anleitungen geschrieben

0 Kommentare zur Anleitung

Kommentar hinzufügen

Seitenaufrufe:

Letzte 24 Stunden: 2

Letzte 7 Tage: 8

Letzte 30 Tage: 41

Insgesamt: 1,844