Diese Version enthält möglicherweise inkorrekte Änderungen. Wechsle zur letzten geprüften Version.
Was du brauchst
-
Dieser Schritt ist noch nicht übersetzt. Hilf mit, ihn zu übersetzen!
-
Rotate screen to upper vertical position.
-
Remove the 8 (1.0 mm) black screws from the screen backing with Phillips screwdriver.
-
-
Dieser Schritt ist noch nicht übersetzt. Hilf mit, ihn zu übersetzen!
-
Remove black plate with tweezers. (Be careful not to lose the small square magnet sticking to the underside. It allows the auto rotation of the screen for selfies.)
-
-
Dieser Schritt ist noch nicht übersetzt. Hilf mit, ihn zu übersetzen!
-
Remove the second black metal plate covering with tweezers.
-
-
Dieser Schritt ist noch nicht übersetzt. Hilf mit, ihn zu übersetzen!
-
After removing both plates, remove the 2 (1.75 mm) Phillips screws on the bottom of the LCD screen.
-
Take off the 2 metal sliding side components. This will allow for us to slide off the screen.
-
-
-
Dieser Schritt ist noch nicht übersetzt. Hilf mit, ihn zu übersetzen!
-
Remove the blue square film covering the teal chip.
-
-
Dieser Schritt ist noch nicht übersetzt. Hilf mit, ihn zu übersetzen!
-
Lift the screen away from the backing.
-
-
Dieser Schritt ist noch nicht übersetzt. Hilf mit, ihn zu übersetzen!
-
Peel away the large rectangular black sheet with the tweezers.
-
Rotate the sheet so it is to the opposite side of the screen.
-
-
Dieser Schritt ist noch nicht übersetzt. Hilf mit, ihn zu übersetzen!
-
Using the tweezers, gently pull the small orange tab away from the backing.
-
-
Dieser Schritt ist noch nicht übersetzt. Hilf mit, ihn zu übersetzen!
-
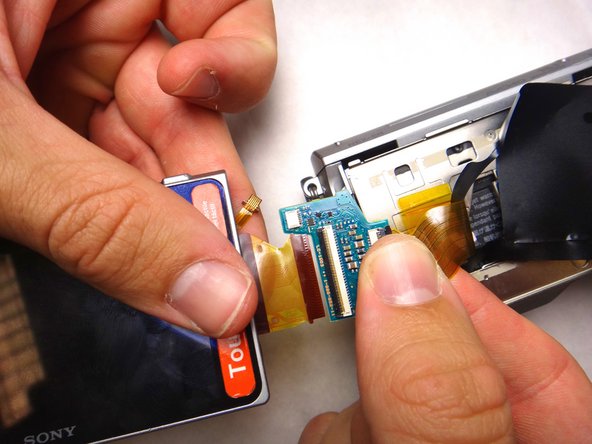
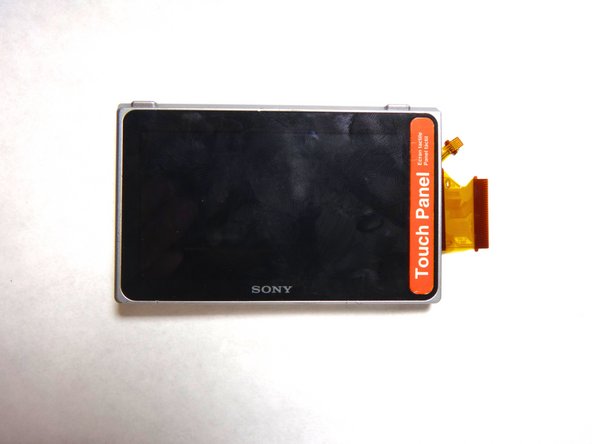
Use a spudger or plastic opening tool to flip the black locking tab up. Slide the cable straight out of its socket and remove the display.
-
-
Dieser Schritt ist noch nicht übersetzt. Hilf mit, ihn zu übersetzen!
-
Some replacement LCD screens do not come with the plastic frame. The original frame is easily separated and reused. Push the LDC out of the frame from behind. This takes some force. Be careful not to break the frame.
-
After separation, removed the sticky material between them and replaced it with double sided tape.
-
On reassembly stick strips of the tape to the inside edges of the plastic frame and then trimmed them to fit with a Exacto knife.
-
The small flexible cable must be folded around the inside edge of the plastic frame and then folded again to meet the connector. Follow the folds of the original cable.
-


Rückgängig: Ich habe diese Anleitung nicht absolviert.
11 weitere Nutzer:innen haben diese Anleitung absolviert.
Team

Cal Poly, Team 8-9, Regan Spring 2014 Mitglied von Cal Poly, Team 8-9, Regan Spring 2014
CPSU-REGAN-S14S8G9
4 Mitglieder
14 Anleitungen geschrieben
13 Kommentare
Success! This guide was very helpful. Here is a bit more info:
The LCD screen I ordered did not have the plastic frame. The original frame is easily separated. Push the LDC out of the frame from behind. This takes some force. Be careful not to break the frame. After separation, I removed the sticky material between them and replaced it with double sided tape. I first stuck strips of the tape to the inside edges of the plastic frame and then trimmed them to fit with a Exacto knife. The small flexible cable must be folded around the inside edge of the plastic frame and then folded again to meet the connector. Follow the folds of the original cable.
On reassembly I used a very tiny bit of double sided tape on each of the side rails, near the screw holes to hold them in place while putting on the outer most screen backing shown in step 6. When replacing this part pay special attention to the two small tabs at the bottom which must slide into slots at the bottom of the screen assembly.
Where can I buy the screen other than bidding on ebay
I purchased my NEX-5 replacement screen from e-Bay 'buy it now' from seller: szdigital2013. It came from China and cost a mere £10.29 inc.post.
Michael Sept.2017
I see it amazon but is too damned expensive 60 ,79