Diese Version enthält möglicherweise inkorrekte Änderungen. Wechsle zur letzten geprüften Version.
Was du brauchst
-
Dieser Schritt ist noch nicht übersetzt. Hilf mit, ihn zu übersetzen!
-
Remove the following ten screws from the bottom case of the laptop:
-
Two 6.5mm Phillips #00 Phillips screws.
-
Four 8.95mm Phillips #00 screws.
-
Four 6.25mm Phillips #00 screws.
-
-
Dieser Schritt ist noch nicht übersetzt. Hilf mit, ihn zu übersetzen!
-
Use a plastic opening tool to separate the bottom cover from the laptop.
-
Lift the lower cover and pull away from the laptop.
-
-
-
Dieser Schritt ist noch nicht übersetzt. Hilf mit, ihn zu übersetzen!
-
Remove the eight Phillips #00 screws from the battery:
-
Six 4.65mm screws.
-
Two 4.65mm screws.
-
-
Dieser Schritt ist noch nicht übersetzt. Hilf mit, ihn zu übersetzen!
-
Lift the battery up and pull it out of the laptop.
-
-
Dieser Schritt ist noch nicht übersetzt. Hilf mit, ihn zu übersetzen!
-
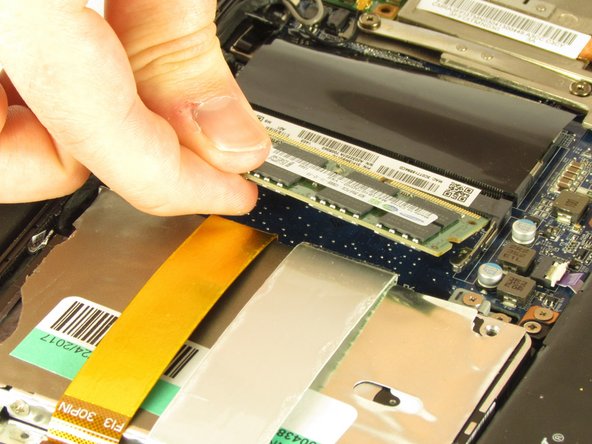
Gently push the silver heads outwards on either side of the RAM chip to release it from the slot.
-
Pull the RAM chip gently out of the slot.
-


Rückgängig: Ich habe diese Anleitung nicht absolviert.
Ein:e weitere:r Nutzer:in hat diese Anleitung absolviert.
Team

USF Tampa, Team S2-G4, Nance Spring 2018 Mitglied von USF Tampa, Team S2-G4, Nance Spring 2018
USFT-NANCE-S18S2G4
4 Mitglieder
12 Anleitungen geschrieben