Zum Hauptinhalt wechseln

Diese Anleitung enthält neuere Änderungen. Wechsel zur neuesten unüberprüften Version.

Sony Xperia XA LCD Screen Replacement

Was du brauchst

  1. Sony Xperia XA LCD Screen Replacement, Back Cover: Schritt 1, Bild 1 von 1
    • Apply heat on the back surface of the phone.

    • Continue to heat the device as needed throughout the replacement process.

    • The device can get very hot, so be careful when handling it.

  2. Sony Xperia XA LCD Screen Replacement: Schritt 2, Bild 1 von 1
    • Stick the small suction cup on the bottom half of the back surface of the phone.

  3. Sony Xperia XA LCD Screen Replacement: Schritt 3, Bild 1 von 3 Sony Xperia XA LCD Screen Replacement: Schritt 3, Bild 2 von 3 Sony Xperia XA LCD Screen Replacement: Schritt 3, Bild 3 von 3
    • With the bottom of the device facing you, lift up on the suction cup handle.

    • Use the plastic opening tool around all sides to pry off the back cover.

  4. Sony Xperia XA LCD Screen Replacement: Schritt 4, Bild 1 von 3 Sony Xperia XA LCD Screen Replacement: Schritt 4, Bild 2 von 3 Sony Xperia XA LCD Screen Replacement: Schritt 4, Bild 3 von 3
    • Pull the back of the phone case away from the device.

    • You will hear popping sounds of glue being ripped from the phone.

    • You will hear the sound of the back unlatching from the device.

    • You will need to apply adhesive or glue along the device to have maximum seal in reassembly.

    • RAF antenna may be attached to the back cover upon removal.

  5. Sony Xperia XA LCD Screen Replacement: Schritt 5, Bild 1 von 1
    • Apply heat to the copper RAF antenna.

    • This step and the following step only apply if the RAF antenna does not come off when taking the back cover off.

  6. Sony Xperia XA LCD Screen Replacement: Schritt 6, Bild 1 von 1
    • Peel back the RAF antenna.

  7. Sony Xperia XA LCD Screen Replacement, Battery: Schritt 7, Bild 1 von 3 Sony Xperia XA LCD Screen Replacement, Battery: Schritt 7, Bild 2 von 3 Sony Xperia XA LCD Screen Replacement, Battery: Schritt 7, Bild 3 von 3
    • Peel back the black tabs on the battery.

    • This may require some force as you are breaking the adhesive seal.

    • You will need to apply more adhesive for the reassembly.

  8. Sony Xperia XA LCD Screen Replacement: Schritt 8, Bild 1 von 2 Sony Xperia XA LCD Screen Replacement: Schritt 8, Bild 2 von 2
    • Use a plastic opening tool to pry up the orange battery connector that is directly above the battery in the center of the phone.

  9. Sony Xperia XA LCD Screen Replacement: Schritt 9, Bild 1 von 1
    • Use a plastic opening tool to get under the battery and pry it up.

  10. Sony Xperia XA LCD Screen Replacement: Schritt 10, Bild 1 von 1
    • Lift the battery out with your hands.

  11. Sony Xperia XA LCD Screen Replacement, LCD Screen: Schritt 11, Bild 1 von 2 Sony Xperia XA LCD Screen Replacement, LCD Screen: Schritt 11, Bild 2 von 2
    • Remove the four 4mm screws holding the loudspeaker in place with a Phillips #00 screwdriver.

  12. Sony Xperia XA LCD Screen Replacement: Schritt 12, Bild 1 von 2 Sony Xperia XA LCD Screen Replacement: Schritt 12, Bild 2 von 2
    • Push back the two retaining tabs on the top of the loudspeaker with the spudger.

  13. Sony Xperia XA LCD Screen Replacement: Schritt 13, Bild 1 von 1
    • Pry the loudspeaker up with the spudger.

  14. Sony Xperia XA LCD Screen Replacement: Schritt 14, Bild 1 von 1
    • Remove the loudspeaker with your hands.

  15. Sony Xperia XA LCD Screen Replacement: Schritt 15, Bild 1 von 1
    • With a spudger, pry up the orange connector that is directly underneath where the loud speaker was just removed.

  16. Sony Xperia XA LCD Screen Replacement: Schritt 16, Bild 1 von 2 Sony Xperia XA LCD Screen Replacement: Schritt 16, Bild 2 von 2
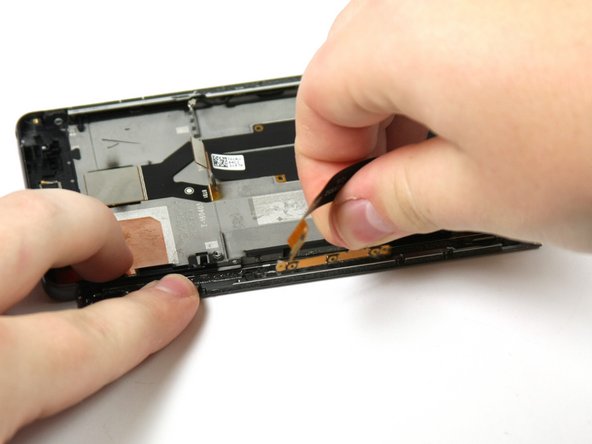
    • Pry up the small silver connector on the right side of the bottom of the phone with a spudger.

  17. Sony Xperia XA LCD Screen Replacement: Schritt 17, Bild 1 von 2 Sony Xperia XA LCD Screen Replacement: Schritt 17, Bild 2 von 2
    • Pry up the charging port using a spudger.

  18. Sony Xperia XA LCD Screen Replacement: Schritt 18, Bild 1 von 2 Sony Xperia XA LCD Screen Replacement: Schritt 18, Bild 2 von 2
    • Remove the five black 4mm screws with a Phillips #00 screwdriver.

  19. Sony Xperia XA LCD Screen Replacement: Schritt 19, Bild 1 von 1
    • Pry up the black camera case with a nylon spudger, and then remove the case.

  20. Sony Xperia XA LCD Screen Replacement: Schritt 20, Bild 1 von 3 Sony Xperia XA LCD Screen Replacement: Schritt 20, Bild 2 von 3 Sony Xperia XA LCD Screen Replacement: Schritt 20, Bild 3 von 3
    • Use a spudger to pry up the six motherboard connectors.

  21. Sony Xperia XA LCD Screen Replacement: Schritt 21, Bild 1 von 1
    • Use the flat end of the nylon spudger to lift the camera out of the phone.

  22. Sony Xperia XA LCD Screen Replacement: Schritt 22, Bild 1 von 1
    • Pull out the front camera using your fingers.

  23. Sony Xperia XA LCD Screen Replacement: Schritt 23, Bild 1 von 1
    • Use the spudger to separate the motherboard from the frame.

  24. Sony Xperia XA LCD Screen Replacement: Schritt 24, Bild 1 von 2 Sony Xperia XA LCD Screen Replacement: Schritt 24, Bild 2 von 2
    • Pry up the headphone jack using a spudger.

  25. Sony Xperia XA LCD Screen Replacement: Schritt 25, Bild 1 von 2 Sony Xperia XA LCD Screen Replacement: Schritt 25, Bild 2 von 2
    • Peel back the black tabs that were holding the battery in place.

    • You may hear loud sounds as you pull the tabs because they are stuck with adhesive.

  26. Sony Xperia XA LCD Screen Replacement: Schritt 26, Bild 1 von 2 Sony Xperia XA LCD Screen Replacement: Schritt 26, Bild 2 von 2
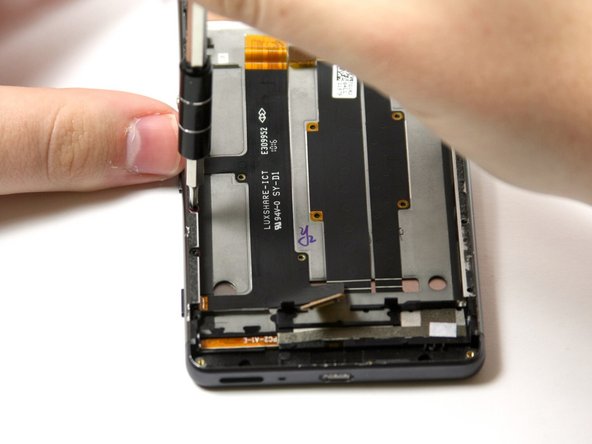
    • Remove the two 4 mm screws with a Phillips #000 screwdriver from the left side of the back of the screen.

  27. Sony Xperia XA LCD Screen Replacement: Schritt 27, Bild 1 von 2 Sony Xperia XA LCD Screen Replacement: Schritt 27, Bild 2 von 2
    • Remove the three 3mm screws with a T5 screwdriver along the side of the device where the volume buttons are.

  28. Sony Xperia XA LCD Screen Replacement: Schritt 28, Bild 1 von 2 Sony Xperia XA LCD Screen Replacement: Schritt 28, Bild 2 von 2
    • Push down the side of the screen that you just removed screws from.

  29. Sony Xperia XA LCD Screen Replacement: Schritt 29, Bild 1 von 3 Sony Xperia XA LCD Screen Replacement: Schritt 29, Bild 2 von 3 Sony Xperia XA LCD Screen Replacement: Schritt 29, Bild 3 von 3
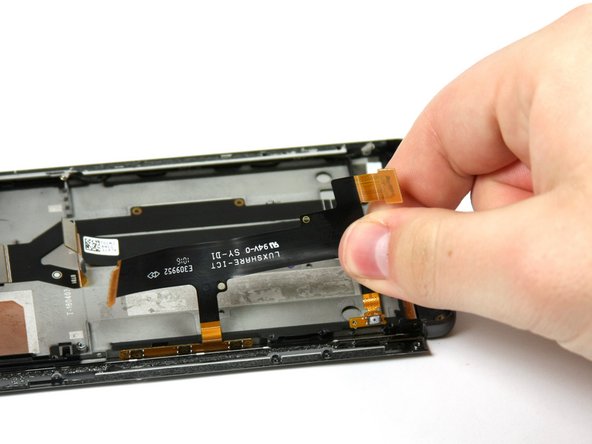
    • Pull up the orange and black tab that is on the left half of the middle of the screen.

  30. Sony Xperia XA LCD Screen Replacement: Schritt 30, Bild 1 von 2 Sony Xperia XA LCD Screen Replacement: Schritt 30, Bild 2 von 2
    • Remove the Wifi antenna.

  31. Sony Xperia XA LCD Screen Replacement: Schritt 31, Bild 1 von 2 Sony Xperia XA LCD Screen Replacement: Schritt 31, Bild 2 von 2
    • Remove the three 3 mm screws with a Star Bit T5 Screwdriver on the opposite side of the phone.

  32. Sony Xperia XA LCD Screen Replacement: Schritt 32, Bild 1 von 2 Sony Xperia XA LCD Screen Replacement: Schritt 32, Bild 2 von 2
    • Use tweezers to remove the earpiece.

Abschluss

To reassemble your device, follow these instructions in reverse order.

7 weitere Nutzer:innen haben diese Anleitung absolviert.

Team

Cal Poly, Team S17-G2, Livingston Spring 2018 Mitglied von Cal Poly, Team S17-G2, Livingston Spring 2018

CPSU-LIVINGSTON-S18S17G2

4 Mitglieder

8 Anleitungen geschrieben

0 Kommentare

Kommentar hinzufügen

Seitenaufrufe:

Letzte 24 Stunden: 0

Letzte 7 Tage: 3

Letzte 30 Tage: 23

Insgesamt: 4,163