Zum Hauptinhalt wechseln

Sony Xperia XZ Premium Headphone Jack Replacement

Was du brauchst

  1. Sony Xperia XZ Premium Headphone Jack Replacement, Back Panel: Schritt 1, Bild 1 von 1
    • Place a heated iOpener on the back panel of the phone to melt the adhesive inside.

    • The iOpener or your desired heat source can be very hot and can heat up the phone, so make sure you do not burn yourself.

    • Follow this guide for directions on using the iOpener.

  2. Sony Xperia XZ Premium Headphone Jack Replacement: Schritt 2, Bild 1 von 1
    In diesem Schritt verwendetes Werkzeug:
    Plastic Cards
    $2.99
    Kaufen
    • Slide a thin plastic card under the back panel and around the perimeter of the phone to remove the adhesive.

  3. Sony Xperia XZ Premium Headphone Jack Replacement: Schritt 3, Bild 1 von 1
    • Take hold of the back panel with your fingers and remove.

  4. Sony Xperia XZ Premium Headphone Jack Replacement, Frame: Schritt 4, Bild 1 von 1
    • Orient the phone horizontally with the front screen facing down and the camera on the bottom left corner.

  5. Sony Xperia XZ Premium Headphone Jack Replacement: Schritt 5, Bild 1 von 2 Sony Xperia XZ Premium Headphone Jack Replacement: Schritt 5, Bild 2 von 2
    • Remove nine 3.9mm Phillips #000 screws.

    • Make sure to turn carefully in the counter-clockwise direction or you may wear out the thread and shape of the screws. You will not be able to remove the screws once they are damaged!

    • When unscrewing, remember "Left Loosey, Righty Tighty!"

  6. Sony Xperia XZ Premium Headphone Jack Replacement: Schritt 6, Bild 1 von 1
    • Place the spudger under the top left corner frame piece and lift to loosen.

  7. Sony Xperia XZ Premium Headphone Jack Replacement: Schritt 7, Bild 1 von 1
    • Grab hold of the top left frame piece with your fingers and gently wiggle and lift to remove.

  8. Sony Xperia XZ Premium Headphone Jack Replacement: Schritt 8, Bild 1 von 1
    • Place the spudger under the bottom left frame piece and lift to loosen it.

  9. Sony Xperia XZ Premium Headphone Jack Replacement: Schritt 9, Bild 1 von 1
    • Grab hold of bottom left frame piece with your fingers and lift gently.

    • When dislodging the left frame piece, carefully wiggle the piece while lifting it vertically to prevent any damage to the wedges on the frame. This applies for all of the other frame pieces you will remove after this step!

  10. Sony Xperia XZ Premium Headphone Jack Replacement: Schritt 10, Bild 1 von 1
    • Place the spudger under the top right frame piece and lift to loosen it.

  11. Sony Xperia XZ Premium Headphone Jack Replacement: Schritt 11, Bild 1 von 1
    • Grab hold of the top right frame piece with your fingers and lift.

  12. Sony Xperia XZ Premium Headphone Jack Replacement, Motherboard: Schritt 12, Bild 1 von 1
    • Insert your nail under the top left connector and push to disconnect it.

  13. Sony Xperia XZ Premium Headphone Jack Replacement: Schritt 13, Bild 1 von 1
    • Grab hold of the metal part of the connector with your fingers and lift.

  14. Sony Xperia XZ Premium Headphone Jack Replacement: Schritt 14, Bild 1 von 1
    • Insert your nail under the metal part of the bottom left connector.

  15. Sony Xperia XZ Premium Headphone Jack Replacement: Schritt 15, Bild 1 von 1
    • Push the bottom left connector with your finger to disconnect it.

  16. Sony Xperia XZ Premium Headphone Jack Replacement: Schritt 16, Bild 1 von 1
    • Insert your nail under the center topmost connector and push to loosen it.

  17. Sony Xperia XZ Premium Headphone Jack Replacement: Schritt 17, Bild 1 von 1
    • Grab hold of the top connector with your fingers and lift to disconnect it.

  18. Sony Xperia XZ Premium Headphone Jack Replacement: Schritt 18, Bild 1 von 1
    • Insert your nail under the metal tab of the connector above the battery and push to loosen it.

  19. Sony Xperia XZ Premium Headphone Jack Replacement: Schritt 19, Bild 1 von 1
    • Pull the metal tab of the connector towards you with your fingers to disconnect the pins.

  20. Sony Xperia XZ Premium Headphone Jack Replacement: Schritt 20, Bild 1 von 1
    • Insert spudger in the gap above the battery and lift to loosen the motherboard.

    • Use the spudger to slide under the edges of the motherboard if the motherboard does not seem to loosen after the above step.

  21. Sony Xperia XZ Premium Headphone Jack Replacement: Schritt 21, Bild 1 von 1
    • Insert the spudger in the gap between the motherboard and the left side of the battery to further lift out the motherboard.

  22. Sony Xperia XZ Premium Headphone Jack Replacement: Schritt 22, Bild 1 von 1
    • Grab hold of the motherboard with your fingers and lift it out of the phone gently.

  23. Sony Xperia XZ Premium Headphone Jack Replacement, Headphone Jack: Schritt 23, Bild 1 von 1
    • Insert the spudger in the gap to the bottom of the headphone jack.

  24. Sony Xperia XZ Premium Headphone Jack Replacement: Schritt 24, Bild 1 von 2 Sony Xperia XZ Premium Headphone Jack Replacement: Schritt 24, Bild 2 von 2
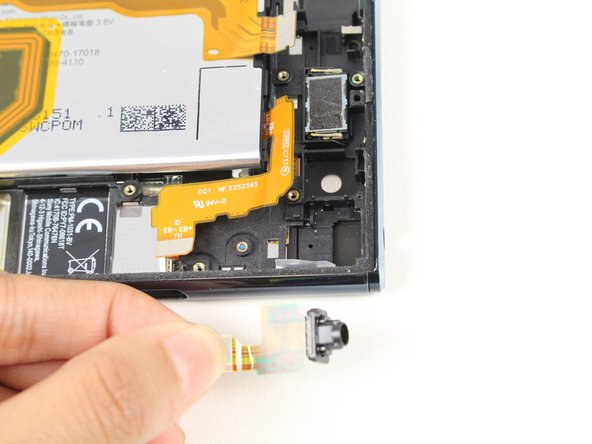
    • Gently extract the headphone jack by pulling the orange tab with your fingers.

Abschluss

To reassemble your device, follow these instructions in reverse order.

Bolaji Makinde

Mitglied seit: 04/18/18

85 Reputation

1 Anleitung geschrieben

Team

Cal Poly, Team S18-G2, Livingston Spring 2018 Mitglied von Cal Poly, Team S18-G2, Livingston Spring 2018

CPSU-LIVINGSTON-S18S18G2

5 Mitglieder

16 Anleitungen geschrieben

0 Kommentare

Kommentar hinzufügen

Seitenaufrufe:

Letzte 24 Stunden: 4

Letzte 7 Tage: 5

Letzte 30 Tage: 10

Insgesamt: 1,501