Diese Version enthält möglicherweise inkorrekte Änderungen. Wechsle zur letzten geprüften Version.
Was du brauchst
-
-
Erhitze die Rückabdeckung deines Sony Xperia Z3, um den darunterliegenden Klebstoff zu lösen.
-
Hebe die Rückabdeckung mit einem Saugnapf an, damit ein Schlitz zwischen Rückabdeckung und Mittelrahmen entsteht.
-
Bewege vorsichtig ein Plektrum in dem Schlitz entlang um die Ecken herum und entlang der Seiten des Smartphones, um den Klebstoff zu trennen.
-
-
-
Nachdem der Kleber von den Kanten gelöst ist, hebe die die Rückabdeckung an.
-
Nutze eine Pinzette, um die zwei schwarzen Streifen, die an dem Kleber befestigt sind, zu greifen.Aber ziehe noch nicht.
-
-
-
Ziehe die beiden Klebestreifen vorsichtig und parallel zur Rückabdeckung heraus.
-
-
-
Nachdem du die Klebestreifen entfernt hast, hebe die Rückabdeckung an und nimm sie heraus.
-
-
-
Trenne die Verbindung des Akku-Flachbandkabels.
-
Nutze eine Pinzette, um den Klebestreifen an der unteren Kante des Akkus abzuziehen.
-
-
-
Setze einen Spudger links im Handy zwischen Akku und Rahmen ein, um die Batterie herauszuhebeln.
-
Nimm den Akku heraus.
-
-
-
Löse die beiden #00 Kreuzschlitzschrauben.
-
-
-
Löse das Antennenkabel mit einer Pinzette.
-
Löse das Flachbandkabel zum Motherboard und zum Vibrationsmotor mit einem Spudger.
-
-
-
Entferne die Abdeckung der Lautsprechereinheit.
-
Ziehe den Vibrationsmotor mit einem Spudger heraus und entferne die Dichtung mit einer Pinzette.
-
-
-
Löse den Kleber der Lautsprechereinheit mit einer Pinzette.
-
Ziehe die Metallklemme am oberen Ende der Lautsprechereinheit mit einer Pinzette ab und entferne sie.
-
-
-
Hebe mit einem Spudger das Hauptflachbandkabel, das über der Lautsprechereinheit liegt.
-
Hebe die ganze Lautsprechereinheit mit einem Spudger nach oben und entferne sie.
-
-
-
Hebe das Ende des Hauptflachbandkabels mit einem Spudger nach oben.
-
Entferne die bronzene Folie über dem Anschluss zum Hauptflachbandkabel mit einer Pinzette.
-
-
-
Hebe die Metallplatte unter der Lautsprechereinheit und entferne sie.
-
Klemme das Hauptflachbandkabel ab.
-
Entferne die gelbe Klebefolie über dem Displayflachbandkabel.
-
-
Dieser Schritt ist noch nicht übersetzt. Hilf mit, ihn zu übersetzen!
-
Remove the three Phillips #00 screws (3 mm length).
-
-
Dieser Schritt ist noch nicht übersetzt. Hilf mit, ihn zu übersetzen!
-
Use a pair of tweezers to peel the blue foil off the motherboard.
-
-
-
Dieser Schritt ist noch nicht übersetzt. Hilf mit, ihn zu übersetzen!
-
Use a pair of tweezers to remove the black plastic bracket below the camera in the top left corner of the phone.
-
-
Dieser Schritt ist noch nicht übersetzt. Hilf mit, ihn zu übersetzen!
-
Use a pair of tweezers to remove the black plastic cover from the right edge of the motherboard.
-
-
Dieser Schritt ist noch nicht übersetzt. Hilf mit, ihn zu übersetzen!
-
Use a spudger to pry up and disconnect the magnetic charging flex cable
-
-
Dieser Schritt ist noch nicht übersetzt. Hilf mit, ihn zu übersetzen!
-
Use a spudger to pry up and disconnect the main flex cable.
-
-
Dieser Schritt ist noch nicht übersetzt. Hilf mit, ihn zu übersetzen!
-
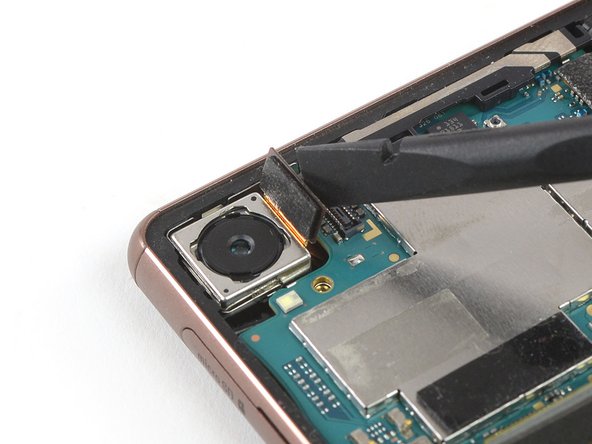
Use a spudger to pry up and disconnect the rear camera flex cable.
-
-
Dieser Schritt ist noch nicht übersetzt. Hilf mit, ihn zu übersetzen!
-
Use a pair of tweezers to lift the rear camera out of its recess and remove it.
-
-
Dieser Schritt ist noch nicht übersetzt. Hilf mit, ihn zu übersetzen!
-
Use a spudger to pry up the plastic cover at the top edge of the motherboard and remove it with a pair of tweezers.
-
-
Dieser Schritt ist noch nicht übersetzt. Hilf mit, ihn zu übersetzen!
-
Use a spudger to pry up and disconnect the headphone jack and microphone flex cable in the top right corner.
-
-
Dieser Schritt ist noch nicht übersetzt. Hilf mit, ihn zu übersetzen!
-
Use a pair of tweezers to carefully pry up and disconnect the antenna cable at the bottom right of the motherboard.
-
-
Dieser Schritt ist noch nicht übersetzt. Hilf mit, ihn zu übersetzen!
-
Insert the flat end of a spudger into the gap between the midframe and the left edge of the motherboard.
-
Use the spudger to carefully lever up the motherboard until you can get a good grip.
-
-
Dieser Schritt ist noch nicht übersetzt. Hilf mit, ihn zu übersetzen!
-
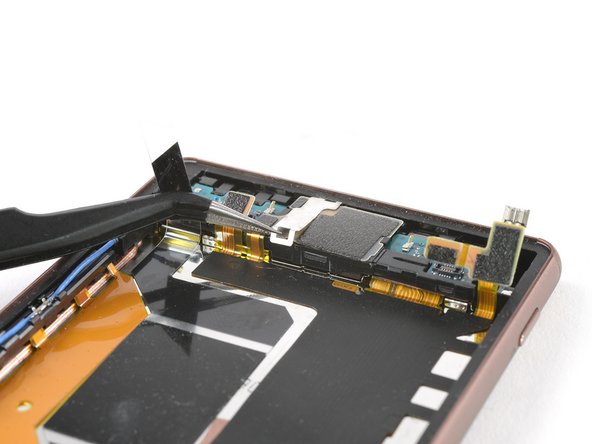
Use a pair of tweezers to remove the black plastic spacer next to the earpiece speaker.
-
-
Dieser Schritt ist noch nicht übersetzt. Hilf mit, ihn zu übersetzen!
-
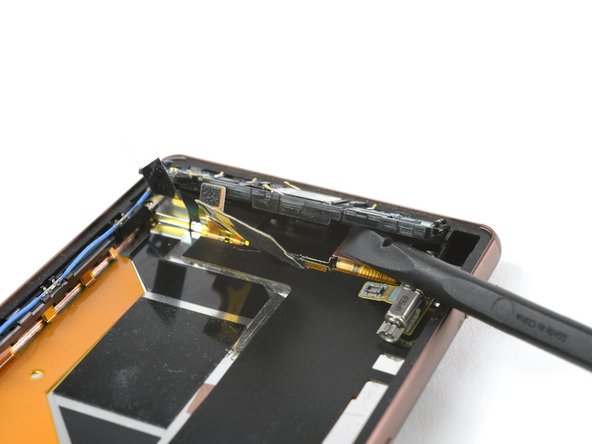
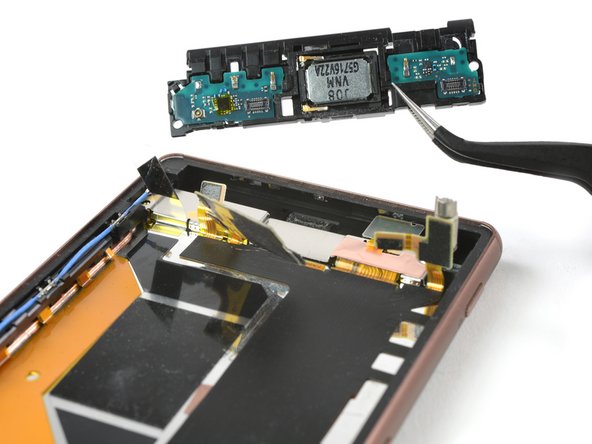
Use a pair of tweezers to remove the earpiece speaker by carefully prying it out from its left where the spacer was before.
-
-
Dieser Schritt ist noch nicht übersetzt. Hilf mit, ihn zu übersetzen!
-
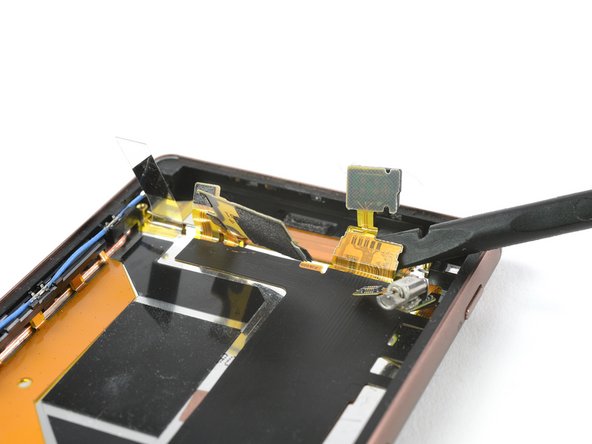
Use a pair of tweezers to pry up and remove the white plastic piece next to the headphone jack.
-
-
Dieser Schritt ist noch nicht übersetzt. Hilf mit, ihn zu übersetzen!
-
Apply a heated iOpener to the upper end of the screen to loosen the adhesive beneath the headphone jack. Apply the iOpener for at least two minutes.
-
-
Dieser Schritt ist noch nicht übersetzt. Hilf mit, ihn zu übersetzen!
-
Use a pair of tweezers to pry up the black plastic cover on top of the headphone jack.
-
-
Dieser Schritt ist noch nicht übersetzt. Hilf mit, ihn zu übersetzen!
-
Use a pair of tweezers to pull the headphone jack out of its recess and remove it.
-
-
Dieser Schritt ist noch nicht übersetzt. Hilf mit, ihn zu übersetzen!
-
Use a pair of tweezers to pry the blue antenna cable out of the brackets on the edge of the phone and remove it.
-
-
Dieser Schritt ist noch nicht übersetzt. Hilf mit, ihn zu übersetzen!
-
Use a spudger to pry up and disconnect the main flex cable from the display flex connector located at the bottom of the phone.
-
-
Dieser Schritt ist noch nicht übersetzt. Hilf mit, ihn zu übersetzen!
-
Use one arm of a pair of tweezers to pry the topmost gray plastic cover out of its recess on the left edge of the midframe.
-
Remove the plastic cover.
-
-
Dieser Schritt ist noch nicht übersetzt. Hilf mit, ihn zu übersetzen!
-
Use the same procedure to loosen the gray plastic cover below the previous one.
-
Carefully pull up the the cover until it is freed and not blocked by the midframe.
-
-
Dieser Schritt ist noch nicht übersetzt. Hilf mit, ihn zu übersetzen!
-
Use a pair of tweezers and carefully pry the top left part of the main flex cable away from the midframe.
-
-
Dieser Schritt ist noch nicht übersetzt. Hilf mit, ihn zu übersetzen!
-
Flip the phone over and apply a heated iOpener to the right side of the screen to loosen the adhesive beneath the main flex cable. Apply the iOpener for at least two minutes.
-
-
Dieser Schritt ist noch nicht übersetzt. Hilf mit, ihn zu übersetzen!
-
Flip the phone back over and use a pair of tweezers to carefully peel the main flex cable off the midframe.
-
Remove the main flex cable.
-
-
Dieser Schritt ist noch nicht übersetzt. Hilf mit, ihn zu übersetzen!
-
On the right edge of the phone use a pair of tweezers to pry the magnetic charging cable out of its recess.
-
-
Dieser Schritt ist noch nicht übersetzt. Hilf mit, ihn zu übersetzen!
-
Apply a heated iOpener to the left side of the screen to loosen the adhesive beneath the magnetic charging cable. Apply the iOpener for at least two minutes.
-
-
Dieser Schritt ist noch nicht übersetzt. Hilf mit, ihn zu übersetzen!
-
Carefully peel the magnetic charging cable off the midframe and remove it.
-
-
Dieser Schritt ist noch nicht übersetzt. Hilf mit, ihn zu übersetzen!
-
Compare your new replacement part to the original—you may need to transfer remaining components such as the protective foil in the earpiece speaker recess or remove adhesive backings from the new part before installing.
-


Rückgängig: Ich habe diese Anleitung nicht absolviert.
3 weitere Nutzer:innen haben diese Anleitung absolviert.

