Einleitung
Benutze diese Anleitung, um den Akku in deinem Steam Deck LCD ohne Sicherheitsrisiko auszutauschen.
Schalte aus Sicherheitsgründen dein Steam Deck ein und entlade den Akku vollständig, bevor du mit dieser Reparatur beginnst. Ein geladener Lithium-Ionen-Polymer-Akku kann sehr gefährlich sein, wenn er versehentlich beschädigt wird. Das Erhitzen eines geladenen Akkus stellt eine Brandgefahr dar. Wenn dein Akku aufgebläht oder geschwollen aussieht, musst du zusätzliche Vorsichtsmaßnahmen treffen.
Hinweis: Der Akku ist sehr fest mit dem Steam Deck verklebt und erfordert daher mehrfaches Erhitzen und Hebeln. Die durch den iOpener erzeugte Hitze ist möglicherweise nicht ausreichend, ein Heißluftgebläse (oder ein Fön) sind in diesem Falls empfehlenswerter.
Achte während der Reparatur auf allgemeine Vorsichtsmaßnahmen zur Vermeidung von elektrostatischen Entladungen (ESD = engl. electrostatic discharge).
Nachdem der Akku entfernt wurde, darf er nicht wiederverwendet werden, um mögliche Gefahren zu vermeiden. Ersetze ihn deshalb mit einem neuen Akku.
Hinweis: Anfang 2023 brachte Valve Steam Decks LCD mit leichten Änderungen im Inneren heraus. Dein Steam Deck unterscheidet sich vielleicht ein wenig von den hier gezeigten, die Verfahren sind aber gleich. Entferne die Rückseite, um zu überprüfen, welche Version du hast. Das ursprüngliche Steam Deck ist mit einer Metallabschirmung über der Hauptplatine und einem Lüfter mit eckigen Kanten ausgestattet, so wie hier gezeigt. Bei der neueren Version ist die Abdeckung über der Hauptplatine schwarz und die Kanten des Lüfters sind abgerundet, so wie hier zu sehen. Anleitungen für das Steam Deck OLED A findest du hier.
Was du brauchst
Einführungsvideo
-
-
Benutze einen Kreuzschlitzschraubendreher, um die acht Schrauben zu entfernen, mit denen die Rückabdeckung befestigt ist:
-
Vier 9,5 mm Schrauben
-
Vier 5,8 mm Schrauben
-
-
-
Setze ein Plektrum in den schmalen Spalt an der Kante an einem der Griffe zwischen Rückabdeckung und Vordergehäuse ein.
-
Heble an der Rückabdeckung, um die Verschlussclips zu lösen.
-
-
-
Fasse die Rückabdeckung an der eben entstandenen Öffnung und ziehe sie vom Gerät weg, um die Clips an den langen Kanten zu lösen.
-
Entferne die Rückabdeckung.
-
-
-
Entferne mithilfe einer Pinzette das Stück Klebefolie auf der versteckten Schraube auf der Platinenabschirmung.
Use some heat here from a hairdryer to make this part easier.
If you screw up here you can replace the little aluminium square with some aluminium tape from Amazon. No less than 50 microns thick, slightly thicker is fine. and the square is 13mm both ways.
Thanks for that Matt, i destroyed the original tape and i had no solution since i read your comment.
You should not. This is EM shielding to protect your processor and ram from radio waves in the air
I found out my 3 Weeks new Steam Deck is a old Version... gg. Valve...
wenn ich aluminium foile benutze, womit soll ich sie dann verkleben?
If we have the new version with the black shield, how do we access the SSD?
I need this part, does anyone know where to get it?
-
-
-
Benutze einen Schraubendreher, um die drei Kreuzschlitzschrauben zu entfernen, mit denen die Abschirmung der Platine befestigt ist:
-
Eine 3,4 mm Schraube
-
Zwei 3,7 mm Schrauben
The procedure ended here for me, used an ifixit PH 00 bit on the screw behind the aluminium tape, bit wouldnt bite too great, one wrong twist and the screw was stripped. Not sure who or what initially screwed in that particular screw as the rest of the screws on the shield were fine, but boy is it in there tight. So now i have a stripped screw and a botched ssd replacement, don't think valve will let me RMA for this, but i'll give it a try and update accordingly.
Any updates? Did they let you RMA?
I found one screw to be ridiculously tight too, managed to undo it without stripping thanks to reading your comment beforehand and going extra careful. Not going to lie, it was a tense moment :D
Andy HL -
I think the tendency is to go too small on the screwdriver bits because you're working on small electronics.
I used the PH1 bit on the screw under the foil and the PH0 bit for the two remaining screws without any problems.
What does this shield actually do? Some kind of magnetic protection?
if I had to replace the key (R2) and that's it, can I directly remove it or do I have to act here on the motherboard too?
have you gotten an answer yet? trying to change mines as well but dont wanna do too much to the deck
briaNN -
button Not key, i’m sorry
FYI there is a little pin on the cover that slots into the board. It is located near the top screw. I needed that to be inserted for the cover to go back down properly.
For anyone who may have stripped a 3.7mm screw, Steam Support states it's M1.6 diameter with a 0.35 thread pitch and a 3mm length. Hopefully that'll help anyone trying to locate a replacement screw. Hoping iFixIt can make an internal screws kit as they're kinda hard to find the right one online.
Did valve change the shield recently as my new 64gb deck has a black shield with no hidden screw.
Yes there's a new hardware revision out there that some people are getting. Consider stopping at this point and putting your deck back together if you have one of these new hardware revisions (the fan is quite different as well to the pictures) until iFixit has an updated repair guide.
There are only 2 screws now, but be careful taking the shield off, because there are still thermal pads under it sticking it to a heat pipe.
I need this piece, can someone help me where can I find it please?
-
-
-
Entferne die Abschirmung der Platine.
During reassembly, ensure that the fan cable lays on the side of the board shield and isn't pinched underneath.
Are you saying that the fan cable should be positioned above the board shield instead of being pressed down by it? Just like the image shows, where it 'lays on the side of the board shield'?
Necesito esta pieza la mía no la traía se ve que se la quitaro
-
-
-
-
Fasse das Akkukabel an seiner Zuglasche und ziehe es vom Motherboard weg, um es abzutrennen.
After fully reassembling my device I found that my battery was not showing any stats anymore. I couldn't start the device without being plugged in, however if I restarted it would stay on even if my power cable was detached. Battery showed 0%. It turns out I had not fully reinserted the battery cable at this stage during reassembly. MAKE SURE YOU PUSH IT ALL THE WAY BACK IN!
Awesome thanks for this tip!
It is helpful to lift up gently with a the tapered end of a spudger underneath the tucked-in portion of the battery cable, creating a bit of flex in the cable before pulling on the pull tab. I found that without doing so, the fabric pull-tab simply tore off of the cable under light-to-moderate force (the fabric itself ripped cleanly across, like a paper towel). Careful, gentle pressure with a spudger can be used to remove the plug by prying gently on the rear ridge of the plastic plug (not the wire!) if this happens.
This is exactly what happened to me. Maybe it was a pull tab previously, mine was a ribbon cable that tore - captured the image here: https://www.ianwootten.co.uk/2022/11/22/...
This was the best approach (and I feel safest for the wiring) for me. Mostly push pressure on the plastic ridge with some minor pull tension on the fabric.
Victor -
I found it less scary and easier to remove the battery connection by using a fingernail on the ridge and pushing it off the connector. I felt like pulling on the battery cable was too harsh.
Yeah, pulling cables like these is usually ill advice. They might be fine if it's a new device, but for old devices that have been sitting there for years, there's a good chance the connector has grown brittle and the cable might just come off separately (something I learnt the hard way).
skzm -
I second this approach. For me, the cable felt way to flimsy and the connector wouldn't budge even under moderate force. Except I used the flat end of a spudger to "scrape" it out.
Misza -
Upon plugging the battery back in, I found it easy to use two spudgers- one on each side- to pull/push the connector back into it's port. Be careful to not put any pressure on the battery wires themselves.
When reconnecting the battery cable, you'll know when it's inserted and power is restored, because the white LED will illuminate at the top of the Deck near the power button. You should be able to see it while you're reconnecting the battery cable
This is only true if you haven't put the deck into battery storage mode as directed.
Why not just let the battery discharge completely and then not have to disconnect it?
Completely discharging a battery reduces its lifespan. It's completely unnecessary.
Because no lipo battery is ever completely discharged -- you would not be able to recharge it if it was. There will always be enough power left in it to cause damage if shorted even if it isn't charged enough to power up the device it's connected to.
I would personally not recommend pulling the tab. It doesn’t apply force at the correct angle. You should revise these instructions to advise using a combination of pulling on the tab, and careful pressure on the connector towards the right of the mainboard to carefully work it out.
Using the pull tab alone could cause problems if not done extremely carefully.
This part was wayyyyy easier than I anticipated and I worried for nothing because I used the ifixit spudger to push it out a bit and then I literally used my finger nail and was able to slide it right off. Dont be afraid, its not that difficult and its not that delicate to break if you do it patiently
I inserted the cable very firmly with a spunger, being careful not to press down too hard on the cables, and even tried redoing it, but I don't see any LED illumination. I am now unable to boot the deck into the boot manager. Any additional tips?
What is the risk of not unplugging the battery? Just curious!
Once I was changing termal paste on my Windows based expensive tablet PC... And I was so scared to disconnect any cables (there was many of them), so I did it all with battery connected (I didn't even knew where is battery cable). When I tried to put board shield back... it didn't go right into needed place... and short circuit some small component. It flashed. That was the end of my repair. Dudies from repair service later told me that multiple components fried including CPU, so repairing is too hard. That's what can happen if you don't disconnect battery.
To pull the battery out I used my spunger, but the batter had actually not space to be pulled out completely. I needed to lift the cable up with the spunger to get the cable fully out. When plugging it in again I had to press the battery down kinda hard so it would fit again. This was really scary and I recommand using two spunger as someone said above.
Does it have to be a clean fingernail?
-
-
-
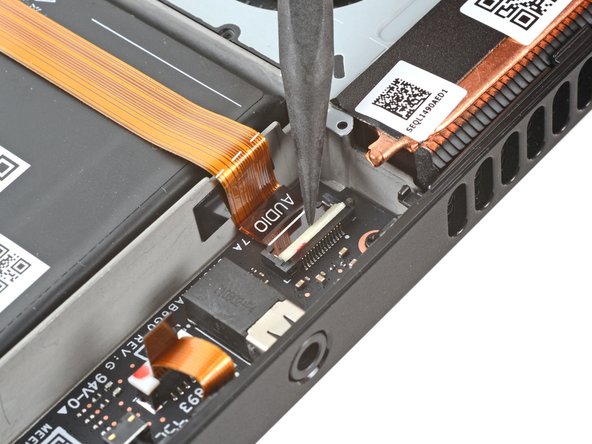
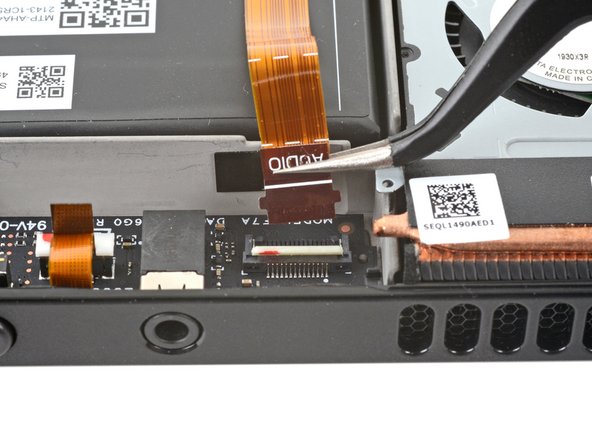
Benutze das spitze Ende eines Spudgers, um den kleinen Sicherungsbügel am ZIF-Steckers des Audio-Kabels anzuheben.
-
-
-
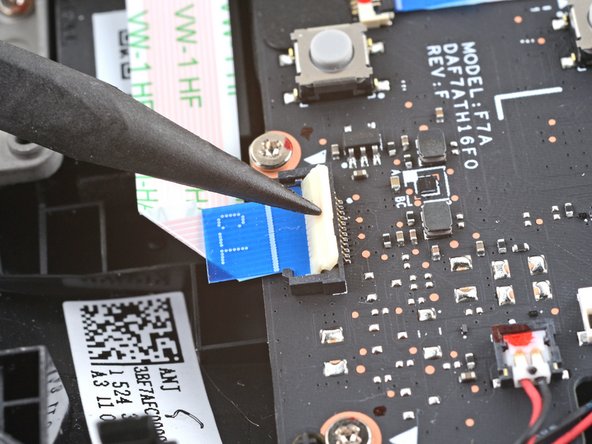
Benutze das spitze Ende eines Spudgers, um den kleinen Sicherungsbügel am ZIF-Stecker des Tastenplatinen-Kabels anzuheben.
-
Schiebe das Kabel mit einer Pinzette aus seinem Stecker heraus.
-
-
-
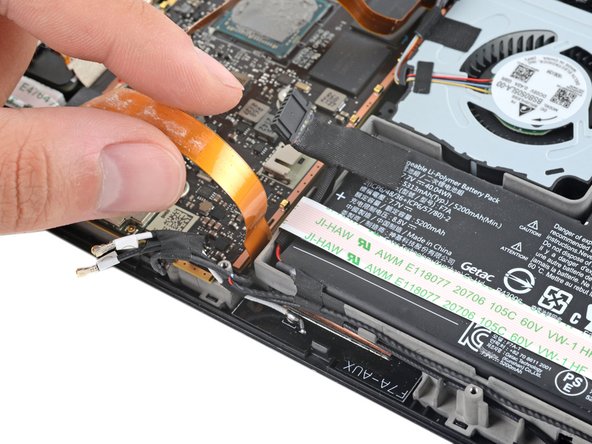
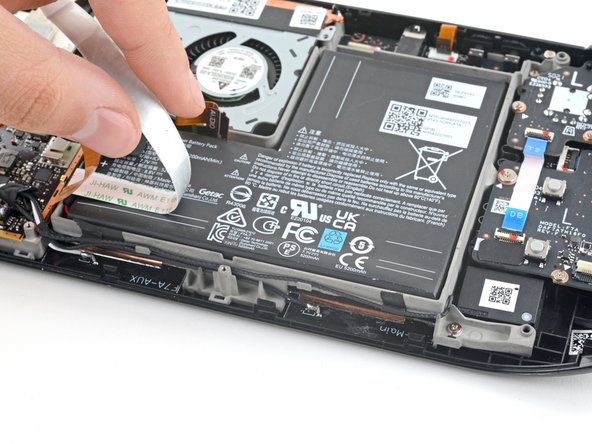
Löse das Tastenplatinen-Kabel vorsichtig vom Akku ab.
-
-
-
Schneide eine Kunststoffkarte der Länge nach entzwei.
-
Runde die scharfen Ecken ab, um zu vermeiden, dass sie den Akku zerkratzen oder durchstechen.
-
-
-
Erhitze den Kleber unter dem Akku 1-2 Minuten lang mit einem Heißluftgebläse.
-
Es ist sehr effektiv, den Kleber mit mindestens 90%igem isopropylalkohol zu lösen. Diese Methode hat aber den Nachteil, dass die Flüssigkeit durch die Ausschnitte im Akkufach auf das Display und andere Bauteile gelangen kann.
-
-
-
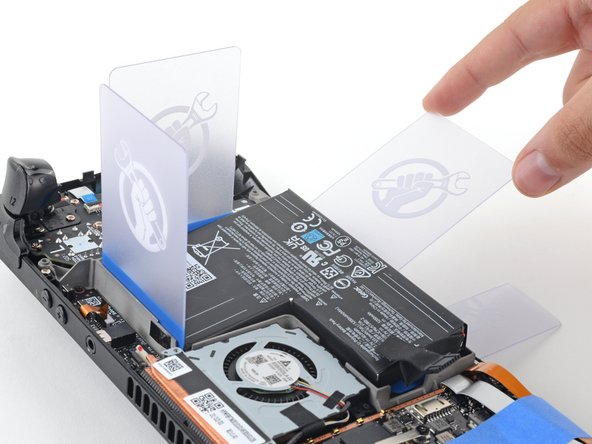
Setze eine nicht zerschnittene Plastikkarte zwischen die Oberkante des Akkus und den Rahmen.
-
Setze eine zweite Plastikkarte zwischen die rechte Kante des Akkus und den Rahmen.
-
-
-
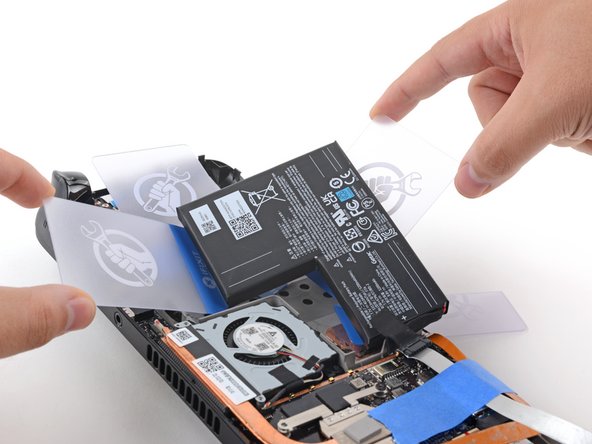
Setze eine Hälfte der zerschnittenen Kunststoffkarten nahe an der rechten Unterkante unter den Akku.
-
Drücke die Karte hinein, um den Akku-Kleber zu durchschneiden, und wackle sie dabei hin und her.
-
-
-
Setze die zweite Hälfte der zerschnittenen Kunststoffkarte nahe an der linken Unterkante unter den Akku.
-
Drücke die Karte hinein, um den Akku-Kleber zu durchschneiden, und wackle sie dabei hin und her.
-
-
-
Setze eine Kunststoffkarte an der Unterkante unter den Akku und heble den Akku vom Rahmen weg.
-
Hebe den Akku hoch und weg vom Steam Deck, um den Kleber komplett abzulösen.
-
Wenn du Schwierigkeiten hast, wiederhole das Erhitzen und Hebeln um alle Kanten herum, bis sich der Akku ablöst.
-
-
-
Entferne den Akku.
-
Befeuchte ein fusselfreies Tuch mit Isopropylalkohol (>90%) und entferne damit alle Klebereste aus der Vertiefung, in die der Akku kommt. Das Tuch darf nicht zu feucht sein, es besteht die Gefahr, dass die Flüssigkeit durch die Ausschnitte im Akkufach läuft.
-
Ziehe die Schutzfolien auf einer Seite der neuen Klebestreifen ab und klebe die Klebestreifen auf den neuen Akku, wobei du deinen alten Akku als Vorlage benutzen kannst, um zu sehen, wohin sie genau kommen.
-
Ziehe die restliche Schutzfolie auf der andere Seite ab. Setze den Akku ein und drücke ihn fest.
-


Um dein Gerät wieder zusammenzubauen, folge den Schritten dieser Anleitung in umgekehrter Reihenfolge.
Entsorge deinen Elektromüll fachgerecht.
Lief die Reparatur nicht wie geplant? Versuche es mit einigen grundsätzlichen Lösungsansätzen, ansonsten findest du in unserem Steam Deck Forum Hilfe bei der Fehlersuche.
Rückgängig: Ich habe diese Anleitung nicht absolviert.
26 weitere Nutzer:innen haben diese Anleitung absolviert.
Besonderer Dank geht an diese Übersetzer:innen:
100%


Diese Übersetzer:innen helfen uns, die Welt zu reparieren! Wie kann ich mithelfen?
Hier starten ›


10 Kommentare
Is it safe to apply small amounts of >90% isopropyl alcohol under the battery to loosen the adhesive bond? Or would that drip into the screen or other components and potentially cause damage?
Your mileage may vary. Isopropyl alcohol may be an effective method to loosen the adhesive, but you run the risk of excess leaking onto or into the display or other components, due to the cutouts on the battery tray. Your second sentence is spot-on, hence the recommendation to carefully use heat instead.
Why couldn’t they of used pull tabs for the adhesive so this process would not be so difficult and tedious. It would also be less risk of over heating the battery/steam deck or puncturing the battery. This is really the only design choice I can criticize of the steam deck. Pull tabs would of made this a repair the average person could achieve.
I feel like patience is everything in this scenario I mean. Just take your time and relax & it will all be ok ! When dealing with particular situations like this just take you're time simple as that I promise. Especially, since Ifixit.com has some of the best guides EVER!!
It seems crazy to me that they made this process so difficult, surely battery is one of (if not THE) most common things that you'll need to eventually replace? I suppose they must have been limited by what they could achieve?
Having just done a Battery Replacement on the Steam Deck the amount of adhesive is a bit high the use of Pull Tabs would have been wonderful. Thanks iFixit and Valve for making the process easier.
I have a question if battery health is a 22%. Will a new battery fix it or is there something wrong with the board.
Most probably battery replacement will fix it. Especially if you really see short battery time and you could observe that it shrink after heavy using of Steam Deck.
However, it's possible that it's some false error, so if battery works fine for you, I wouldn't bother. Also, if battery health dropped quickly, it might indicate overheating
Why they made this so difficult? We are in 2023, this device uses a very small battery in my opinion, it should be more or lesse the double of current size, and it's very difficult to replace it.
10/10 not too bad a job at all.
For me I found the original adhesive was to the left and right of the gaps you jam the cards in, so going in diagonally was the way to do it easily.
Only used a heat gun for 2 minutes and was eventually successful with gentle prying.
Everything was as expected.
Directions that come with the new battery direct to charge to 100% and leave on charge for 2h, then fully discharge until off, finally charge once more to 100%.
If your Steam Deck won't charge or turn on, you might need to disconnect your battery and then plug it back in.
I thought my battery had gone completely dead but when I plugged the battery back in, the Steam Deck would then accept a charge.
My Deck wouldn't accept at charge or respond at all prior to disconnecting the battery.
Make sure to try this trick before completely removing your battery.
Thanks iFixit for making these guides.
Duane Degn - Antwort