Einleitung
Do you want a bigger SSD or perhaps a faster PCIe NVMe SSD? Follow this guide to replace your SSD.
(Note: Surface Studio with Intel Core i5 comes with SATA III SSD while Surface Studio with Intel Core i7 comes with PCIe NVMe SSD.)
Was du brauchst
-
-
Lay the Surface face down on a padded surface
-
Remove the four rubber feet at each corner concealing the Torx screws
-
Remove the four Torx screws under the rubber feet.
-
Two screws on the upper corners are longer than two screws on the lower corners.
-
Attach suction cups to the bottom cover and then pull on the suction cups to free the bottom cover.
-
-
-
Remove five torx screws holding the two fans to the midframe
-
Remove the two fans
-
Remove four large torx screws holding the midframe
-
Remove four small torx screws holding the midframe
-
-
-
-
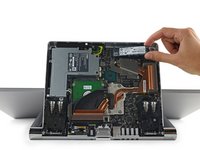
Slowly remove the midframe
-
Detach the connectors for the two fans and the speaker
-
-
-
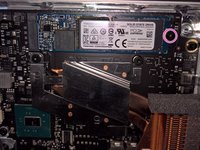
With the midframe removed, the M.2 SSD is now accessible
-
Remove a torx screw holding the M.2 holding the SSD to the motherboard
-
Pull the SSD straight back
-


To reassemble your device, follow these instructions in reverse order.
Rückgängig: Ich habe diese Anleitung nicht absolviert.
6 weitere Personen haben diese Anleitung absolviert.
21 Kommentare zur Anleitung
I know that one of the very first questions would be: Does the M.2 slot supports PCIe NVMe ?
The answer is: Yes it does.
But it does not mean that you can get the drive to run in NVMe model.
There does not appear to be a setting to enable NVMe model for the drive.
John -
Does it support bootable NVMe?
Sure. When installing Windows, choose to install Windows to "Drive 1" instead of "Drive 0"
Is there any raid options that need to be configured?