Diese Version enthält möglicherweise inkorrekte Änderungen. Wechsle zur letzten geprüften Version.
Was du brauchst
-
Dieser Schritt ist noch nicht übersetzt. Hilf mit, ihn zu übersetzen!
-
Remove the 2 rubber foot pads from the bottom (opposite the hinge) with the small Plastic Opening tool.
-
-
Dieser Schritt ist noch nicht übersetzt. Hilf mit, ihn zu übersetzen!
-
Remove the 10 7.1 mm screws using Phillips #1 screwdriver.
-
-
Dieser Schritt ist noch nicht übersetzt. Hilf mit, ihn zu übersetzen!
-
Loosen the back cover by using a plastic opening tool all the way around the device.
-
-
-
Dieser Schritt ist noch nicht übersetzt. Hilf mit, ihn zu übersetzen!
-
Remove the back cover by gently lifting up on one side of the device.
-
-
Dieser Schritt ist noch nicht übersetzt. Hilf mit, ihn zu übersetzen!
-
Remove the tape holding the speaker wire to the battery on both sides using a small opening tool.
-
-
Dieser Schritt ist noch nicht übersetzt. Hilf mit, ihn zu übersetzen!
-
Remove the 4 Phillips 3.2 mm screws holding the battery in place, with the Phillips #1 screwdriver.
-
-
Dieser Schritt ist noch nicht übersetzt. Hilf mit, ihn zu übersetzen!
-
To disconnect the wire from the mother board, gently press down with the flat end of Spudger and pull on the wire.
-
-
Dieser Schritt ist noch nicht übersetzt. Hilf mit, ihn zu übersetzen!
-
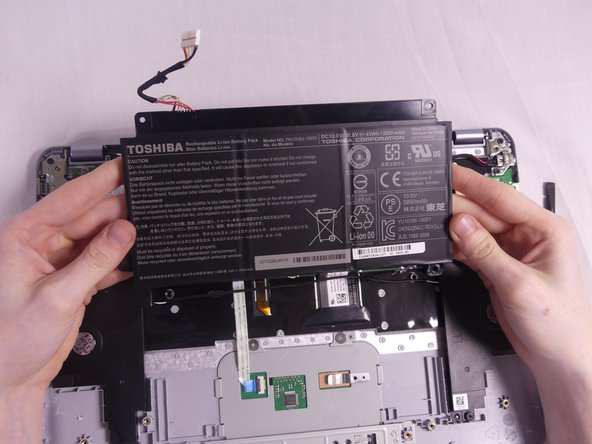
Remove the battery by gently pulling on the bottom corners.
-


Rückgängig: Ich habe diese Anleitung nicht absolviert.
Ein:e weitere:r Nutzer:in hat diese Anleitung absolviert.
Team

USF Tampa, Team S1-G121, Cagle Fall 2017 Mitglied von USF Tampa, Team S1-G121, Cagle Fall 2017
USFT-CAGLE-F17S1G121
3 Mitglieder
14 Anleitungen geschrieben
Ein Kommentar
Thanks again IFIXIT!!! Repaced battery on Toshiba C35 C3300 with your HELP. Guy Rogers