Zum Hauptinhalt wechseln

Toshiba NB205 N330PK Hard Drive Replacement

Was du brauchst

  1. Toshiba NB205 N330PK Hard Drive Replacement, Hard Drive: Schritt 1, Bild 1 von 2 Toshiba NB205 N330PK Hard Drive Replacement, Hard Drive: Schritt 1, Bild 2 von 2
    • To expose the hard drive, use a bit driver and a Star #0 bit to remove the two designated screws.

    • Gently lift the panel off.

  2. Toshiba NB205 N330PK Hard Drive Replacement: Schritt 2, Bild 1 von 2 Toshiba NB205 N330PK Hard Drive Replacement: Schritt 2, Bild 2 von 2
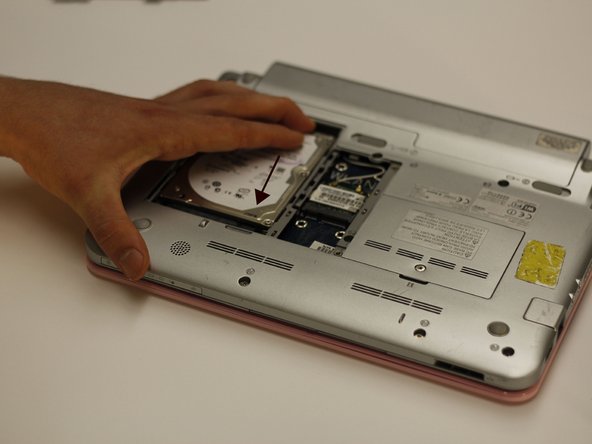
    • With the panel removed, slide the hard drive towards the top of the netbook with moderate force.

    • This will free the hard drive from its original location.

  3. Toshiba NB205 N330PK Hard Drive Replacement: Schritt 3, Bild 1 von 2 Toshiba NB205 N330PK Hard Drive Replacement: Schritt 3, Bild 2 von 2
    • Obtain a new hard drive.

    • Apply firm pressure to secure the new hard drive into the old hard drive's location.

  4. Toshiba NB205 N330PK Hard Drive Replacement: Schritt 4, Bild 1 von 2 Toshiba NB205 N330PK Hard Drive Replacement: Schritt 4, Bild 2 von 2
    • Place the back panel in its original position.

    • Using the bit driver and Phillips #0 bit, secure the hard drive panel to the netbook body.

Ziellinie

3 weitere Nutzer:innen haben diese Anleitung absolviert.

Mason McCaskill

Mitglied seit: 10/18/13

1.000 Reputation

9 Anleitungen geschrieben

Team

Clemson, Team 14-2, Benson Fall 2013 Mitglied von Clemson, Team 14-2, Benson Fall 2013

CLEM-BENSON-F13S14G2

3 Mitglieder

27 Anleitungen geschrieben

0 Kommentare

Kommentar hinzufügen

Seitenaufrufe:

Letzte 24 Stunden: 2

Letzte 7 Tage: 3

Letzte 30 Tage: 13

Insgesamt: 2,664