Zum Hauptinhalt wechseln

Toshiba Qosmio X775-3DV80 Fan Replacement

Was du brauchst

  1. Toshiba Qosmio X775-3DV80 Fan Replacement, Battery: Schritt 1, Bild 1 von 2 Toshiba Qosmio X775-3DV80 Fan Replacement, Battery: Schritt 1, Bild 2 von 2
    • Turn your laptop over so the underside is facing up.

  2. Toshiba Qosmio X775-3DV80 Fan Replacement: Schritt 2, Bild 1 von 2 Toshiba Qosmio X775-3DV80 Fan Replacement: Schritt 2, Bild 2 von 2
    • Identify the two sliding locks on either side of the battery.

    • Simultaneously slide both locks outward to release the battery.

  3. Toshiba Qosmio X775-3DV80 Fan Replacement: Schritt 3, Bild 1 von 1
    • Pull the battery straight out of its slot to remove it.

  4. Toshiba Qosmio X775-3DV80 Fan Replacement, Optical Drive: Schritt 4, Bild 1 von 1
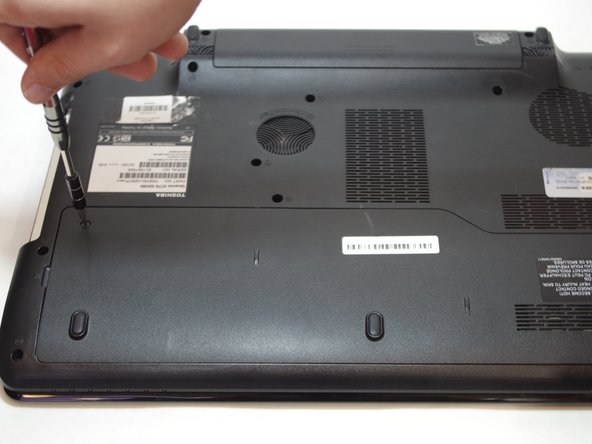
    • Locate the optical drive retaining screw on the underside of the laptop.

  5. Toshiba Qosmio X775-3DV80 Fan Replacement: Schritt 5, Bild 1 von 1
    • Using a Phillips #00 screwdriver, remove the optical drive retaining screw.

  6. Toshiba Qosmio X775-3DV80 Fan Replacement: Schritt 6, Bild 1 von 2 Toshiba Qosmio X775-3DV80 Fan Replacement: Schritt 6, Bild 2 von 2
    • Using your finger or a spudger, push the optical drive out of its compartment so you can grab it.

    • Pull the optical drive out of its slot in the side of the laptop.

  7. Toshiba Qosmio X775-3DV80 Fan Replacement, RAM: Schritt 7, Bild 1 von 1
    • Loosen the single screw on the service panel by twisting counterclockwise with a Phillips #00 screwdriver.

    • It is a captive screw that will remain attached to the service panel.

  8. Toshiba Qosmio X775-3DV80 Fan Replacement: Schritt 8, Bild 1 von 1
    • Using a spudger or plastic opening tool, pry off the service panel.

  9. Toshiba Qosmio X775-3DV80 Fan Replacement: Schritt 9, Bild 1 von 3 Toshiba Qosmio X775-3DV80 Fan Replacement: Schritt 9, Bild 2 von 3 Toshiba Qosmio X775-3DV80 Fan Replacement: Schritt 9, Bild 3 von 3
    • Using your fingers, pull the retaining clips away from the RAM sticks.

    • Pull the RAM sticks out of the slots.

  10. Toshiba Qosmio X775-3DV80 Fan Replacement, Keyboard: Schritt 10, Bild 1 von 2 Toshiba Qosmio X775-3DV80 Fan Replacement, Keyboard: Schritt 10, Bild 2 von 2
    • Using a Phillips #00 screwdriver, remove all the remaining fourteen screws from the bottom case of the laptop.

    • The service panel should already be removed.

  11. Toshiba Qosmio X775-3DV80 Fan Replacement: Schritt 11, Bild 1 von 2 Toshiba Qosmio X775-3DV80 Fan Replacement: Schritt 11, Bild 2 von 2
    • Using a Phillips #00 screwdriver, remove the five screws under the service panel.

    • Remove the retaining clip.

  12. Toshiba Qosmio X775-3DV80 Fan Replacement: Schritt 12, Bild 1 von 1
    • Using a spudger, pry the keyboard from the top panel of the laptop.

    • Make sure to pry it off all around.

  13. Toshiba Qosmio X775-3DV80 Fan Replacement: Schritt 13, Bild 1 von 3 Toshiba Qosmio X775-3DV80 Fan Replacement: Schritt 13, Bild 2 von 3 Toshiba Qosmio X775-3DV80 Fan Replacement: Schritt 13, Bild 3 von 3
    • Disconnect the two ribbon cables connecting the keyboard to the laptop.

    • Unplug the connector on the bottom of the laptop.

  14. Toshiba Qosmio X775-3DV80 Fan Replacement, Fan: Schritt 14, Bild 1 von 1
    • Separate the two halves of the base of the laptop.

  15. Toshiba Qosmio X775-3DV80 Fan Replacement: Schritt 15, Bild 1 von 2 Toshiba Qosmio X775-3DV80 Fan Replacement: Schritt 15, Bild 2 von 2
    • Disconnect the two cables.

  16. Toshiba Qosmio X775-3DV80 Fan Replacement: Schritt 16, Bild 1 von 1
    • Remove the palmrest assembly.

  17. Toshiba Qosmio X775-3DV80 Fan Replacement: Schritt 17, Bild 1 von 2 Toshiba Qosmio X775-3DV80 Fan Replacement: Schritt 17, Bild 2 von 2
    • Using a Phillips #00 screwdriver, remove the four screws securing the fan assembly to the laptop.

  18. Toshiba Qosmio X775-3DV80 Fan Replacement: Schritt 18, Bild 1 von 2 Toshiba Qosmio X775-3DV80 Fan Replacement: Schritt 18, Bild 2 von 2
    • Unplug the fan-motherboard connector.

    • Remove the fan unit.

Abschluss

To reassemble your device, follow these instructions in reverse order.

Jesse Adam Ory

Mitglied seit: 03/24/19

745 Reputation

7 Anleitungen geschrieben

Team

UMass Dartmouth, Team S2-G1, Bailey Spring 2019 Mitglied von UMass Dartmouth, Team S2-G1, Bailey Spring 2019

UMASSD-BAILEY-S19S2G1

4 Mitglieder

21 Anleitungen geschrieben

0 Kommentare

Kommentar hinzufügen

Seitenaufrufe:

Letzte 24 Stunden: 0

Letzte 7 Tage: 1

Letzte 30 Tage: 13

Insgesamt: 841