Zum Hauptinhalt wechseln

Toshiba Satellite C55D-B5206 Fan Replacement

Was du brauchst

  1. Toshiba Satellite C55D-B5206 Fan Replacement, Battery: Schritt 1, Bild 1 von 2 Toshiba Satellite C55D-B5206 Fan Replacement, Battery: Schritt 1, Bild 2 von 2
    • Turn the laptop upside down so the battery faces upwards.

    • Remove the two 7 mm Phillips screws that secure the battery.

  2. Toshiba Satellite C55D-B5206 Fan Replacement: Schritt 2, Bild 1 von 2 Toshiba Satellite C55D-B5206 Fan Replacement: Schritt 2, Bild 2 von 2
    • Place both thumbs on the outside edges of the battery that meet the device.

    • Push the battery out and away from the laptop.

    • The battery should slide out with little resistance.

  3. Toshiba Satellite C55D-B5206 Fan Replacement, Back Casing: Schritt 3, Bild 1 von 1
    • Remove the thirteen 7 mm Phillips #1 screws from the bottom of the chassis.

  4. Toshiba Satellite C55D-B5206 Fan Replacement: Schritt 4, Bild 1 von 1
    • Starting at the center, insert a spudger into the crevice between the bottom casing and the keyboard and pry upwards.

    • Gently slide the spudger along the entire perimeter of the device and pry the casing loose to unhook six clips.

    • These images show a metal spudger, which has the potential to damage the device. Use a plastic opening tool or standard spudger instead.

    • Do not be alarmed if you feel a gentle tug or hear a click as you slide your spudger. These sounds are the clips detaching from the casing.

  5. Toshiba Satellite C55D-B5206 Fan Replacement: Schritt 5, Bild 1 von 3 Toshiba Satellite C55D-B5206 Fan Replacement: Schritt 5, Bild 2 von 3 Toshiba Satellite C55D-B5206 Fan Replacement: Schritt 5, Bild 3 von 3
    • Use your fingers to finish removing the casing from the device.

  6. Toshiba Satellite C55D-B5206 Fan Replacement, Fan: Schritt 6, Bild 1 von 2 Toshiba Satellite C55D-B5206 Fan Replacement, Fan: Schritt 6, Bild 2 von 2
    • Remove the three 7 mm Philips head screws by turning the screws counter clockwise.

  7. Toshiba Satellite C55D-B5206 Fan Replacement: Schritt 7, Bild 1 von 1
    • Gently lift the copper heat sink to make the fan more accessible.

    • The copper heat sink should not detach. Do not pull on it too hard.

  8. Toshiba Satellite C55D-B5206 Fan Replacement: Schritt 8, Bild 1 von 2 Toshiba Satellite C55D-B5206 Fan Replacement: Schritt 8, Bild 2 von 2
    • Maneuver the fan's bottom left corner above the copper heat sink.

  9. Toshiba Satellite C55D-B5206 Fan Replacement: Schritt 9, Bild 1 von 1
    • Cautiously move the white cable cover to allow for the fan to be lifted away.

    • Do not detach the white cable cover.

  10. Toshiba Satellite C55D-B5206 Fan Replacement: Schritt 10, Bild 1 von 1
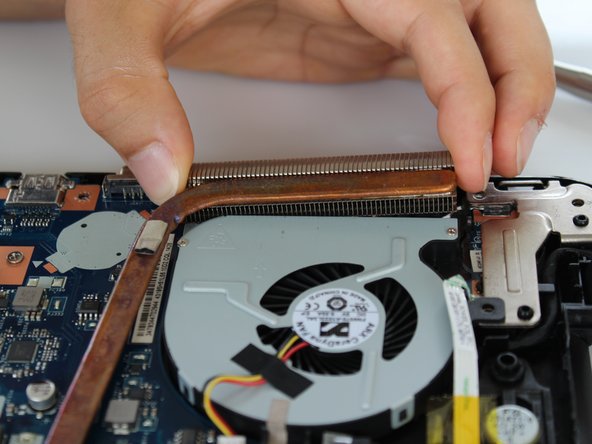
    • Lift the fan approximately one inch upward from back of the laptop.

    • Detach the white cable connector from the connective port.

  11. Toshiba Satellite C55D-B5206 Fan Replacement: Schritt 11, Bild 1 von 1
    • Once the cable port is detached, lift the fan free from the device.

Abschluss

To reassemble your device, follow these instructions in reverse order.

Ein:e weitere:r Nutzer:in hat diese Anleitung absolviert.

Tayyaba

Mitglied seit: 09/24/15

523 Reputation

4 Anleitungen geschrieben

Team

CSU Fullerton, Team 2-5, Bruce Fall 2015 Mitglied von CSU Fullerton, Team 2-5, Bruce Fall 2015

CSUF-BRUCE-F15S2G5

4 Mitglieder

18 Anleitungen geschrieben

0 Kommentare

Kommentar hinzufügen

Seitenaufrufe:

Letzte 24 Stunden: 0

Letzte 7 Tage: 0

Letzte 30 Tage: 11

Insgesamt: 412