Zum Hauptinhalt wechseln

Toshiba Satellite C55Dt-A5306 Keyboard Replacement

Was du brauchst

  1. Toshiba Satellite C55Dt-A5306 Keyboard Replacement, Battery: Schritt 1, Bild 1 von 1
    • Place fingers on the latches and slide outwards to unlock.

  2. Toshiba Satellite C55Dt-A5306 Keyboard Replacement: Schritt 2, Bild 1 von 1
    • Remove battery.

  3. Toshiba Satellite C55Dt-A5306 Keyboard Replacement, Keyboard: Schritt 3, Bild 1 von 2 Toshiba Satellite C55Dt-A5306 Keyboard Replacement, Keyboard: Schritt 3, Bild 2 von 2
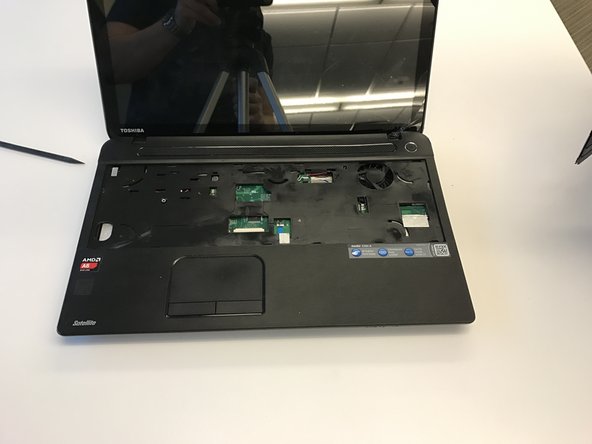
    • After removing the battery, open up your device so that the keyboard is facing you.

  4. Toshiba Satellite C55Dt-A5306 Keyboard Replacement: Schritt 4, Bild 1 von 2 Toshiba Satellite C55Dt-A5306 Keyboard Replacement: Schritt 4, Bild 2 von 2
    • Using the spudger, go around the periphery of the keyboard while gently lifting out the keyboard little by little.

  5. Toshiba Satellite C55Dt-A5306 Keyboard Replacement: Schritt 5, Bild 1 von 1
    • Lift the old keyboard out of the way.

  6. Toshiba Satellite C55Dt-A5306 Keyboard Replacement: Schritt 6, Bild 1 von 2 Toshiba Satellite C55Dt-A5306 Keyboard Replacement: Schritt 6, Bild 2 von 2
    • Before pulling out the keyboard, notice that it is connected to the motherboard via a ribbon cable. Gently press out the ribbon cable from its connection site and put the old keyboard aside.

  7. Toshiba Satellite C55Dt-A5306 Keyboard Replacement: Schritt 7, Bild 1 von 1
    • Locate the keyboard ribbon cable, and the cable retainer keeping it attached to the motherboard.

  8. Toshiba Satellite C55Dt-A5306 Keyboard Replacement: Schritt 8, Bild 1 von 1
    • Use your nylon spudger to release the retainer by gently lifting the retaining clips on either side.

  9. Toshiba Satellite C55Dt-A5306 Keyboard Replacement: Schritt 9, Bild 1 von 2 Toshiba Satellite C55Dt-A5306 Keyboard Replacement: Schritt 9, Bild 2 von 2
    • Once both retaining clips have been lifted up, the ribbon cable should release with a gentle pull.

    • You can now remove the keyboard.

Abschluss

To reassemble your device, follow these instructions in reverse order.

zeena qiryaqoz

Mitglied seit: 01/17/17

301 Reputation

3 Anleitungen geschrieben

Team

Oakland University, Team 2-3, Ruskiewicz Winter 2017 Mitglied von Oakland University, Team 2-3, Ruskiewicz Winter 2017

OAK-RUSKIEWICZ-W17S2G3

4 Mitglieder

14 Anleitungen geschrieben

Ein Kommentar

mein keyboard war leider noch mit 2 schraubenähnlichen Arretierungen befestigt, und die Laschen an den Seiten ließen sich nur mit Gewalt aufbiegen, so daß das alte Keyboard jetzt im Unterblech ziemlich verbogen ist. C55Dt-A5306

immerich - Antwort

Kommentar hinzufügen

Seitenaufrufe:

Letzte 24 Stunden: 0

Letzte 7 Tage: 1

Letzte 30 Tage: 4

Insgesamt: 701