Zum Hauptinhalt wechseln

Toshiba Satellite CL15t-B1204X Screen Display Assembly Replacement

Was du brauchst

  1. Toshiba Satellite CL15t-B1204X Screen Display Assembly Replacement, Battery: Schritt 1, Bild 1 von 1
    • Flip the laptop over so the bottom of the device is facing upward.

  2. Toshiba Satellite CL15t-B1204X Screen Display Assembly Replacement: Schritt 2, Bild 1 von 1
    • Unscrew the 10 5mm Phillips screws, located on the bottom side of the notebook using the PH1 bit and the Magnetic Driver.

  3. Toshiba Satellite CL15t-B1204X Screen Display Assembly Replacement: Schritt 3, Bild 1 von 1
    • Pry open the bottom cover of the notebook with the plastic spudger tools. Slide a thin tool along the edges without ports to pop open the latches.

    • Be careful not to bend or crack the plastic back cover.

  4. Toshiba Satellite CL15t-B1204X Screen Display Assembly Replacement: Schritt 4, Bild 1 von 1
    • Remove the 1" yellow tape on top of the battery. This piece of tape is holding down the battery connection cable.

  5. Toshiba Satellite CL15t-B1204X Screen Display Assembly Replacement: Schritt 5, Bild 1 von 1
    • Lightly grip the battery on the two longest sides. Gently pull up until the adhesive on the notebook is separated from the battery.

  6. Toshiba Satellite CL15t-B1204X Screen Display Assembly Replacement: Schritt 6, Bild 1 von 1
    • Carefully unplug the battery from the device motherboard.

  7. Toshiba Satellite CL15t-B1204X Screen Display Assembly Replacement, Screen Display Assembly: Schritt 7, Bild 1 von 3 Toshiba Satellite CL15t-B1204X Screen Display Assembly Replacement, Screen Display Assembly: Schritt 7, Bild 2 von 3 Toshiba Satellite CL15t-B1204X Screen Display Assembly Replacement, Screen Display Assembly: Schritt 7, Bild 3 von 3
    • Unplug the power connector by pulling back the tape and sliding the connector away using the blue opening tool.

  8. Toshiba Satellite CL15t-B1204X Screen Display Assembly Replacement: Schritt 8, Bild 1 von 3 Toshiba Satellite CL15t-B1204X Screen Display Assembly Replacement: Schritt 8, Bild 2 von 3 Toshiba Satellite CL15t-B1204X Screen Display Assembly Replacement: Schritt 8, Bild 3 von 3
    In diesem Schritt verwendetes Werkzeug:
    Tweezers
    $4.99
    Kaufen
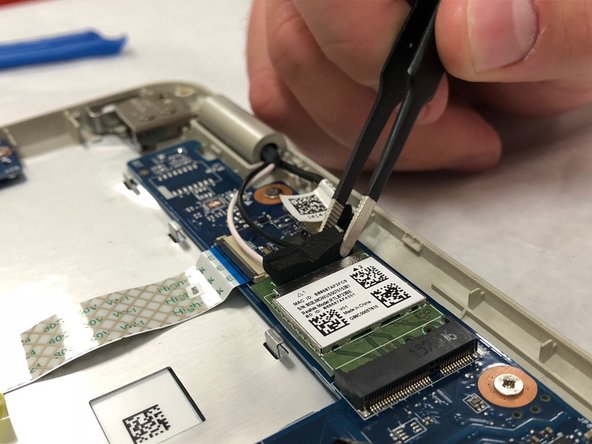
    • Remove the foam and unplug the black and white coaxial cables to the network card by pulling upward using the black tweezers.

  9. Toshiba Satellite CL15t-B1204X Screen Display Assembly Replacement: Schritt 9, Bild 1 von 2 Toshiba Satellite CL15t-B1204X Screen Display Assembly Replacement: Schritt 9, Bild 2 von 2
    • Remove the black webcam connector by pulling backwards with the tweezers.

  10. Toshiba Satellite CL15t-B1204X Screen Display Assembly Replacement: Schritt 10, Bild 1 von 1
    • Using a Phillips #1 screwdriver, remove four 5.00 mm screws from both corner hinges of the display assembly.

  11. Toshiba Satellite CL15t-B1204X Screen Display Assembly Replacement: Schritt 11, Bild 1 von 3 Toshiba Satellite CL15t-B1204X Screen Display Assembly Replacement: Schritt 11, Bild 2 von 3 Toshiba Satellite CL15t-B1204X Screen Display Assembly Replacement: Schritt 11, Bild 3 von 3
    • Open the laptop and remove the display assembly from the keyboard assembly.

Abschluss

To reassemble your device, follow these instructions in reverse order.

Ein:e weitere:r Nutzer:in hat diese Anleitung absolviert.

Matthew Hook

Mitglied seit: 03/25/19

439 Reputation

4 Anleitungen geschrieben

Team

IUPUI, Team S1-G6, Hovde Fall 2019 Mitglied von IUPUI, Team S1-G6, Hovde Fall 2019

IUPUI-HOVDE-F19S1G6

4 Mitglieder

6 Anleitungen geschrieben

0 Kommentare

Kommentar hinzufügen

Seitenaufrufe:

Letzte 24 Stunden: 2

Letzte 7 Tage: 3

Letzte 30 Tage: 5

Insgesamt: 285